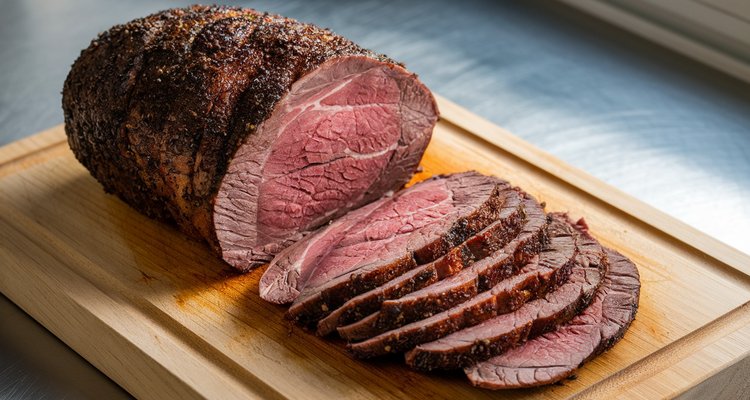
You pull the tray out of the smoker and every head at the party turns. Bacon-wrapped tubes of smoky, cheesy, meaty goodness – smoked shotgun shells are the kind of BBQ snack that disappears before you can even set them down. The salty, crispy bacon exterior and the rich, seasoned filling inside make these irresistible. This recipe walks you through everything: the filling, the wrapping technique, the right smoker temperature, and the finishing glaze that makes the bacon crackle.
What Are Smoked Shotgun Shells?
Smoked shotgun shells are uncooked manicotti pasta tubes stuffed with seasoned ground meat and cheese, wrapped tightly in thin-cut bacon, and smoked low and slow until the bacon renders crispy and the filling cooks through. The pasta softens as it absorbs moisture from the filling during a mandatory refrigerator rest before smoking. The name comes from the obvious: slice one open lengthwise and it looks exactly like a spent shotgun shell casing. That visual, combined with the ridiculous flavor payoff, is why they went viral on BBQ social media and haven’t slowed down since.
Helpful gear for this cook:
- Temperature control: AMMZO digital meat thermometer checks doneness without guessing.
- Handling: Hotec stainless kitchen tongs turns food cleanly without piercing it.
- Prep: Grill Armor extra-long heat-resistant gloves protects your hands around hot grates, pans, and smoker parts.
Ingredients for Smoked Shotgun Shells
For the Filling
- Ground beef (80/20) or hot Italian sausage – or a mix of both. The fat content keeps the filling juicy through the long smoke.
- Cream cheese (4 oz, softened) – adds creaminess and moisture that the pasta needs to soften properly.
- Shredded cheddar or Monterey Jack cheese (1 cup) – sharp cheddar gives the best flavor contrast.
- BBQ rub (2 tbsp) – your favorite store-bought or homemade blend. Salt, pepper, garlic, and smoked paprika work great.
- Optional add-ins: diced jalapeños, minced onion, or a splash of hot sauce.
For the Shells and Finish
- Manicotti shells (12-14, uncooked) – not oven-ready; standard dry pasta tubes work best.
- Thin-cut bacon (1 lb) – must be thin-cut. Thick-cut bacon won’t fully render in the smoking window, leaving chewy patches instead of crispy coverage.
- BBQ sauce (½ cup) – sweet-style works best; it caramelizes beautifully over the bacon in the final minutes.
Best Wood for Smoked Shotgun Shells
Wood choice matters here because the filling is rich and the bacon is fatty – you want smoke that complements rather than competes.
- Hickory – bold, classic BBQ smokiness. The most popular choice for shotgun shells and pairs well with pork and beef fillings.
- Apple or cherry – lighter, sweeter profile. Great if you want the bacon and cheese flavors to lead without heavy smoke.
- Pecan – balanced and slightly nutty, a reliable all-rounder for this recipe.
- Avoid mesquite – too aggressive for a 90-minute cook; it’ll overpower the filling.
How to Make Smoked Shotgun Shells
Step 1 – Make the Filling
Combine the ground beef or sausage, softened cream cheese, shredded cheese, BBQ rub, and any optional mix-ins in a large bowl. Mix thoroughly with your hands until everything is evenly incorporated – you want the cheese fully worked into the meat so there are no dry pockets. Pro tip: Spoon the filling into a zip-lock bag, seal it, and cut one corner off. This turns it into a piping bag that makes stuffing the shells much faster and cleaner.
Step 2 – Stuff the Manicotti Shells
Using your piping bag (or a small spoon), fill each manicotti shell from both ends to avoid air pockets in the middle. Pack the filling firmly – loose filling collapses during smoking and leaves hollow spots. The shells are dry and brittle at this stage, which is fine; they’ll soften during the refrigerator rest.
Step 3 – Wrap in Bacon

Lay a strip of thin-cut bacon flat and start wrapping from one end of the stuffed shell, pulling the bacon slightly to stretch it as you go. Work in a tight spiral toward the other end, overlapping each pass slightly. Tuck both ends under the shell. Full coverage is critical – any exposed pasta won’t soften properly and will come out crunchy. Secure with a toothpick if needed, especially on the first few while you get the technique down.
Step 4 – Refrigerate (Don’t Skip This Step)
Place the wrapped shells on a sheet pan in a single layer, cover with plastic wrap, and refrigerate for at least 4-6 hours. Overnight is better. Up to 48 hours is fine. This step is non-negotiable. The moisture from the cream cheese and meat filling slowly migrates into the pasta, softening it from the inside. Skip it and you’ll pull perfectly smoky-looking shotgun shells off the grate only to bite into crunchy, undercooked pasta. The fridge rest is what transforms dry manicotti into tender, fully cooked shells.
Step 5 – Preheat the Smoker to 250°F
Fire up your smoker and bring it to a steady 250°F. This is the sweet spot – hot enough to render the bacon within the cook window, cool enough to let smoke penetrate the filling. The 225-275°F range all works; 250°F gives you the most consistent results. Add your wood chunks or chips: hickory for bold flavor, apple or cherry for something lighter. Let the smoker stabilize fully before loading the shells.
Step 6 – Smoke to 165°F Internal Temperature
Place the shells directly on the grill grates – not on a sheet pan or foil. The bacon needs full airflow on all sides to render and crisp properly. If you cook them on a pan, the bottom bacon steams instead of rendering. Smoke for approximately 90 minutes to 2 hours. The exact time varies with your smoker and shell size, which is why you want to cook to temperature rather than time. Pull the shells when the meat filling hits an internal temperature of 165°F, measured with an instant-read thermometer inserted through the end of the shell. No need to flip them – the grate provides even heat from below, and the smoke circulates around.
Step 7 – Glaze with BBQ Sauce and Finish
When your shotgun shells reach 155-160°F internal, brush them generously with BBQ sauce on all sides. A sweet sauce works best here – it caramelizes against the hot bacon and creates a glossy, sticky glaze. Raise the smoker temperature to 275-300°F (or leave it at 250°F for an extra 15 minutes) and continue smoking for another 10-15 minutes until the sauce sets, the bacon crisps up further, and the internal temperature reaches 165°F. Let them rest for 5 minutes before serving – this helps the juices settle and makes them easier to handle.
Tips for Perfect Smoked Shotgun Shells
- Thin-cut bacon only. Thick-cut bacon won’t fully render in the 90-minute cook window. You’ll end up with chewy, greasy bacon instead of the crispy shell you’re after.
- Overnight rest beats 4 hours every time. The pasta texture is noticeably better after a full overnight rest in the fridge. If you have the time, use it.
- Pack the filling tight. Air pockets steam out during smoking and leave hollow, greasy pockets inside the shell. Fill firmly from both ends.
- Cook to internal temperature, not to time. Smoker temps vary, shell sizes vary – a reliable instant-read thermometer is the only way to know when they’re done.
- Cover every inch of pasta with bacon. Exposed pasta ends mean crunchy, underdone pasta. Stretch and overlap the bacon to ensure total coverage.
Filling Variations to Try
Once you nail the base recipe, the filling becomes a playground. Here are four variations worth trying:
- Classic jalapeño popper: Ground beef + cream cheese + sharp cheddar + diced jalapeños. The most popular version for good reason.
- Spicy Italian: Hot Italian sausage + cream cheese + pepper jack + diced green chiles. Bolder heat, great with apple wood.
- BBQ brisket: Leftover smoked brisket (chopped fine) + cream cheese + smoked gouda. A next-level use for brisket scraps.
- Breakfast smoke: Breakfast sausage + cream cheese + sharp cheddar + a pinch of maple syrup in the BBQ glaze. Surprisingly great for weekend brunch cooks.
Make-Ahead, Storage, and Reheating
Make-ahead: Assemble the shells up to 48 hours before smoking. The longer they rest in the fridge, the better the pasta texture. Assemble, wrap, and refrigerate – smoke when ready. Storage: Cooked smoked shotgun shells keep in an airtight container in the refrigerator for up to 4 days. Reheating: Place on a baking sheet and warm in a 350°F oven for 15-20 minutes, loosely covered with foil. Remove the foil for the last 5 minutes to re-crisp the bacon. Avoid the microwave – it turns the bacon rubbery. Freezing: To freeze uncooked assembled shells, arrange them on a sheet pan and freeze until solid (about 2 hours), then transfer to a freezer bag. Smoke directly from frozen – just add 30-45 extra minutes to the cooking time.
Frequently Asked Questions
Why were my smoked shotgun shells crunchy?
Two causes. First: not enough refrigerator rest time. The pasta needs a minimum of 4-6 hours (ideally overnight) to absorb moisture from the filling and soften before smoking. Second: exposed pasta ends not covered by bacon. Any part of the manicotti shell that isn’t wrapped in bacon won’t soften properly. Make sure your bacon fully covers every inch of the shell.
Can I make smoked shotgun shells the day before?
Yes – and it’s actually the recommended approach. Assemble the shells, wrap in bacon, and refrigerate overnight. The longer rest gives the pasta more time to absorb moisture and results in a noticeably better texture when smoked. They’ll keep assembled in the fridge for up to 48 hours.
What internal temperature are shotgun shells done?
165°F is the safe internal temperature for the meat filling. Insert an instant-read thermometer through the end of the shell into the center of the meat. Don’t rely on time alone – cook to temperature. Shells pulled at 160°F can carry-over cook to 165°F during the 5-minute rest.
What’s the best way to reheat smoked shotgun shells?
Oven at 350°F, loosely covered with foil, for 15-20 minutes. Remove the foil for the final 5 minutes to re-crisp the bacon. Avoid the microwave – it softens the bacon and makes the shells chewy. If you want maximum crispness, a brief stint under the broiler for the last 2 minutes works well.
What kind of bacon is best for smoked shotgun shells?
Thin-cut bacon. It stretches enough to wrap tightly around the shells, fully covers the pasta, and renders completely during the 90-minute to 2-hour smoke time. Thick-cut bacon doesn’t render fully in that window – you’ll end up with chewy, fatty bacon rather than the crispy shell everyone’s after.
Smoked Shotgun Shells
Equipment
- Smoker or pellet grill set to 250°F
- Instant-read meat thermometer to check 165°F internal temp
- Sheet pan for fridge rest
- Zip-lock bag cut corner for DIY piping bag (optional)
Ingredients
For the Filling
- 1 lb ground beef (80/20) or hot Italian sausage or a mix of both
- 4 oz cream cheese softened to room temperature
- 1 cup shredded cheddar or Monterey Jack cheese sharp cheddar recommended
- 2 tbsp BBQ rub your favorite blend
- 1 jalapeño diced, optional
For the Shells
- 12 manicotti shells dry, uncooked — not oven-ready
- 1 lb thin-cut bacon thin-cut only — not thick-cut
- 1/2 cup BBQ sauce sweet-style recommended
Instructions
- Mix the ground beef or sausage, softened cream cheese, shredded cheese, BBQ rub, and any optional mix-ins (jalapeño, onion) in a large bowl. Mix thoroughly with your hands until everything is evenly combined.
- Spoon the filling into a zip-lock bag and cut one corner off to use as a piping bag. Pipe filling into each manicotti shell from both ends, packing firmly to eliminate air pockets.
- Wrap each stuffed shell in thin-cut bacon in a tight spiral, pulling slightly to stretch the bacon. Start at one end and work toward the other, overlapping each pass. Tuck both ends under the shell. Ensure total bacon coverage — exposed pasta won't soften.
- Place wrapped shells on a sheet pan in a single layer. Cover with plastic wrap and refrigerate for at least 4–6 hours, or overnight. This step is mandatory — the pasta absorbs moisture from the filling and softens during this rest.
- Preheat your smoker to 250°F. Add hickory, apple, cherry, or pecan wood. Let the smoker stabilize before loading the shells.
- Place the shells directly on the grill grates — not on a pan or foil. Smoke for 90 minutes to 2 hours until the internal temperature of the meat filling reaches 165°F, measured with an instant-read thermometer inserted through the end of the shell.
- When the internal temp reaches 155–160°F, brush generously with BBQ sauce on all sides. Raise smoker to 275–300°F and smoke for another 10–15 minutes until the sauce sets and bacon crisps. Shells are done at 165°F internal.
- Remove from the smoker and rest for 5 minutes. Serve as-is or with ranch, blue cheese, or Caesar dressing for dipping.
Notes
Contents