Your steak hits the grill looking perfect – then you lift the lid ten minutes later to find the outside charred black while the center is still raw. That’s what happens when everything cooks over a single blast of direct heat with nowhere to go. Two zone grilling solves that problem by splitting your grill into a hot searing side and a cool finishing side, giving you full control over every cook.
Helpful gear for this cook:
- Temperature control: Bryco Goods pink butcher paper wraps barbecue without trapping as much steam as foil.
- Handling: AMMZO digital meat thermometer checks doneness without guessing.
- Prep: Cutluxe butcher knife handles trimming and slicing jobs cleanly.
What Is Two-Zone Grilling?
Two-zone grilling means dividing your grill into two distinct heat areas: a direct heat zone where food sits directly over the flame or coals, and an indirect heat zone where food cooks away from the heat source. The result is a grill that functions like both a stovetop and an oven at the same time.
On the direct side, intense heat sears surfaces fast, creating the caramelized crust and grill marks that make grilled food taste so good. On the indirect side, hot circulating air cooks food through slowly and evenly without any risk of burning the exterior before the interior is done.
This single setup change transforms your grill from a one-trick direct-heat machine into a versatile outdoor cooking tool capable of handling everything from thin chicken wings to a whole brisket.
Direct Heat vs. Indirect Heat: Key Differences
The Direct Heat Zone (Hot Side)
The direct heat zone sits directly above your heat source – charcoal or a lit gas burner. Temperatures on this side typically run between 450°F and 600°F at grate level. Food placed here cooks quickly through conduction: the grate and radiant heat from below transfer energy directly into the food’s surface.
This is where the Maillard reaction happens – the chemical process that creates the golden-brown crust, char marks, and deep savory flavor that everyone associates with grilled food. Direct heat is the right tool for anything thin enough to cook through before the outside burns: burgers, steaks under an inch thick, fish fillets, shrimp, and sliced vegetables.
The Indirect Heat Zone (Cool Side)
The indirect heat zone has no heat source beneath it. Instead, the hot air circulating inside the closed grill does the cooking – the same convection principle as an oven. Temperatures in this zone typically range from 225°F to 350°F depending on how hot your direct side is running.
Food in the indirect zone cooks slowly and evenly from all sides with no risk of flare-ups or scorching. This makes it ideal for large cuts that need time for the interior to reach safe temperatures, for bone-in pieces where the bone slows cooking, and for any food that needs to finish gently after a hard sear.
| Feature | Direct Heat (Hot Zone) | Indirect Heat (Cool Zone) |
|---|---|---|
| Temperature | 450-600°F | 225-350°F |
| Heat Source | Directly below food | None below food |
| Cooking Method | Conduction + radiation | Convection (like oven) |
| Best Foods | Burgers, thin steaks, shrimp, veggies | Roasts, ribs, whole chicken, thick cuts |
| Lid Position | Open or closed | Always closed |
| Flare-up Risk | High | Very low |
How to Set Up Two-Zone Grilling on a Charcoal Grill

The charcoal setup is the foundation of two zone grilling. Getting it right takes about 20 minutes from the first match to ready-to-cook. If you’re new to lighting charcoal, check out our guide on how to start a charcoal grill before you begin.
- Fill your chimney starter – Load it with the amount of charcoal you need. For a standard 22-inch kettle, a full chimney (about 100 briquettes) gives you strong two-zone heat for 45-60 minutes.
- Light the chimney – Place it on the charcoal grate and light the newspaper or fire starters underneath. Wait until all coals are glowing orange and covered with a light gray ash – typically 15-20 minutes.
- Bank ALL coals to one side – Pour the lit coals entirely onto one half of the charcoal grate. Keep them there. Don’t spread them across the center. The sharp contrast between the hot side and the empty side is what makes the two-zone setup work.
- Optional gradient setup – For more precision, pile coals three briquettes deep on the far hot side, slope down to a single layer in the center, and leave the far cool side completely empty. This gives you three zones: searing heat, medium heat, and indirect.
- Replace the cooking grate and preheat – Put the grill grate back on, close the lid, and let it preheat for 10-15 minutes. This brings the grate itself up to temperature so food doesn’t stick.
- Check your temperatures – The direct side should be around 500°F at grate level. Use your dome thermometer or hold your hand 6 inches above the grate: 2-3 seconds before you need to pull away = high heat.
Vent control tip: On a charcoal grill, the bottom and top vents control airflow and temperature. Open vents fully for maximum heat. Close them halfway to drop the temperature by 50-75°F. Never fully close vents while cooking – the fire needs oxygen.
Long cook tip: For cooks longer than 45 minutes, add a fresh half-chimney of lit coals to the direct side every 45-60 minutes. Bank them against the existing coals to maintain your two-zone structure.
How to Set Up Two-Zone Grilling on a Gas Grill
Two zone grilling on a gas grill is even simpler – as long as you have at least two burners. The principle is the same: heat on one side, no heat on the other.
- Identify your burner layout – Most gas grills have burners running front-to-back or left-to-right. You’ll light one set and leave the opposite set off.
- Turn on one side only – For a 4-burner grill, light the two left burners and leave the two right burners completely off. For a 2-burner grill, light one burner and leave the other off.
- Set the lit burners to medium-high – You want the direct side running around 450-500°F. Start at medium-high and adjust after preheating.
- Close the lid and preheat for 15 minutes – This is longer than most people wait. The extra time brings both the grate and the indirect zone air temperature up to where you want it.
- Adjust if needed – After preheating, check your dome thermometer. If the whole grill is running too hot, dial back the lit burners. The indirect side should be 250-325°F with the lid closed.
One advantage of a gas grill is that you can fine-tune the direct zone temperature instantly. Turn the lit burners up for a harder sear, down for a gentler cook, without touching the indirect side at all.
Temperature Guide for Two-Zone Grilling
| Zone | Temperature Range | Best Used For | Lid Position |
|---|---|---|---|
| Direct / High Heat | 500-600°F | Searing steaks, burgers, final crust development | Open or closed |
| Direct / Medium-High Heat | 400-500°F | Chicken pieces, fish, pork chops, corn | Closed |
| Indirect / Medium Heat | 300-375°F | Thick steaks finishing, bone-in chicken, whole fish | Always closed |
| Indirect / Low Heat | 225-300°F | Ribs, whole chicken, roasts, brisket | Always closed |
What to Cook in Each Zone
Best Foods for the Direct Heat Zone
The direct heat zone is for food that can cook through before the exterior overcooks. A good rule: if it’s an inch thick or less, it can likely go direct the whole way.
- Burgers – The direct zone is where smash-worthy crust happens. Cook at 450-500°F, about 3-4 minutes per side.
- Steaks under 1 inch – Flank steak, skirt steak, flat iron – all do well on direct heat alone. Thicker cuts need two-zone treatment (see below).
- Chicken wings and drumsticks – High direct heat renders the fat and crisps the skin. Move to indirect if they start to burn.
- Vegetables – Corn, bell peppers, zucchini, asparagus, halved onions, and mushrooms all thrive over direct heat. Keep the pieces large enough to maneuver with tongs.
- Seafood – Shrimp, scallops, and thin fish fillets need only 2-4 minutes of direct heat total. Don’t walk away.
- Hot dogs and sausages – Cook direct the whole way, turning every couple of minutes for even browning.
Best Foods for the Indirect Heat Zone
The indirect zone handles food that needs time, thickness, or gentleness – anything that would burn on direct heat before the inside is done.
- Whole chicken – A 4-pound bird takes 60-90 minutes on the indirect side at 350°F. It won’t burn, and the inside finishes at the same time as the outside.
- Ribs – Baby back and spare ribs need 2-4 hours on the indirect side. Keep the temperature at 250-275°F and resist the urge to open the lid.
- Thick-cut steaks (over 1.5 inches) – Park them on the indirect side first, then sear at the end. This is the reverse sear method – more on that below.
- Pork shoulder and Boston butt – Low and slow in the indirect zone, 225-250°F for 8-12 hours for pulled pork.
- Bone-in chicken pieces – Thighs and drumsticks finish beautifully on the indirect side at 325°F after a quick sear.
- Roasts and brisket – Any large beef or pork roast over 3 pounds belongs on the indirect side from start to finish.
| Food | Zone | Approx. Time | Target Internal Temp |
|---|---|---|---|
| Burgers (3/4 inch) | Direct | 6-8 min total | 160°F |
| Steak 1″ thick | Direct | 8-10 min total | 130-145°F |
| Steak 1.5″+ (reverse sear) | Indirect → Direct | 25-40 min + 4 min sear | 130-135°F |
| Chicken wings | Direct (watch closely) | 20-25 min | 165°F |
| Bone-in chicken thighs | Direct sear → Indirect | 35-45 min total | 165°F |
| Whole chicken (4 lb) | Indirect | 60-90 min at 350°F | 165°F |
| Baby back ribs | Indirect | 2-3 hrs at 250°F | 190-203°F |
| Corn on the cob | Direct | 10-15 min, turning | Kernels tender |
The Classic Two-Zone Technique: Sear Then Finish

The most useful two zone grilling move is sear-then-finish. You use the direct zone to develop a flavorful crust, then the indirect zone to bring the interior up to your target temperature without burning anything. This is the right approach for almost every cut of meat between 1 and 1.5 inches thick.
Here’s how to execute it on a thick ribeye:
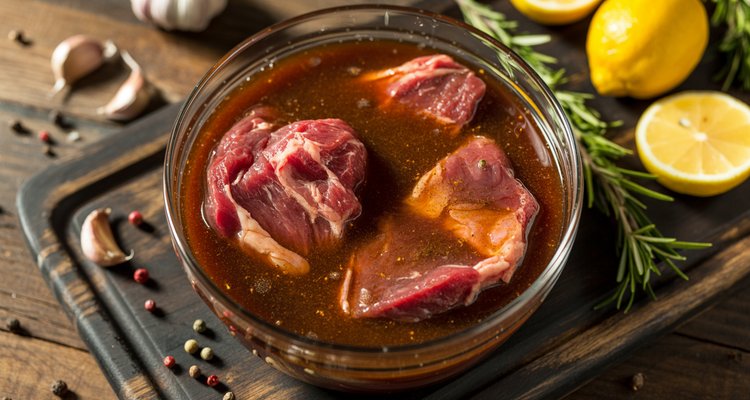
- Start with a dry surface – Pat the steak completely dry with paper towels. Moisture on the surface steams instead of sears. Season generously with salt and pepper at least 30 minutes before cooking, or up to overnight.
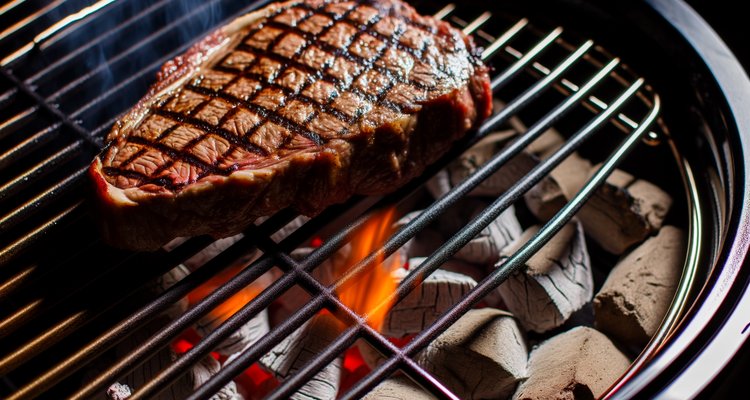
- Sear over direct heat – Place the steak directly over the hot zone. Sear 2-3 minutes per side without moving it. You’re looking for a deep brown crust forming on the bottom before you flip.
- Check for sear color, not time – Lift an edge after 2 minutes. If it’s golden-brown to dark brown across most of the surface, flip. If it’s still gray or pale, give it another minute.
- Move to indirect heat – Once both sides are seared, slide the steak over to the cool side. Close the lid.
- Monitor with a thermometer – Insert an instant-read thermometer into the thickest part. Pull the steak off at 5°F below your target (carryover cooking will close the gap): 125°F for rare, 130°F for medium-rare, 140°F for medium.
- Rest before cutting – Let the steak rest 5-10 minutes on a cutting board before slicing. For tips on perfecting your steak technique, see our complete guide on how to grill steak.
The Reverse Sear Method
The reverse sear flips the sequence. Instead of searing first and finishing on indirect, you start low and slow on the indirect zone, then finish with a blistering sear on the direct zone. It sounds counterintuitive, but it produces the most evenly cooked steak you can get from a grill.
This technique works best for steaks 1.5 inches thick or more – tomahawk chops, double-cut bone-in ribeyes, or any thick-cut you want cooked edge-to-edge pink with a perfect crust.
- Start on indirect heat at 225°F – Place the seasoned steak on the cool side. Close the lid. Let it cook slowly until the internal temperature reaches 10-15°F below your target – about 115°F for medium-rare. This takes 25-45 minutes depending on thickness.
- Remove and rest briefly – Pull the steak off the grill and let it rest uncovered for 5 minutes. During this time, crank the direct side as hot as it will go – all burners on full blast for gas, or add more lit coals for charcoal.
- Sear aggressively – Return the steak to the direct zone. Sear 60-90 seconds per side. Because the steak is already almost at target temperature, you’re just developing the crust – not cooking the interior at all.
- Serve immediately – The reverse sear produces almost no carryover cooking. Serve right away.
The edge-to-edge consistency of a reverse-seared steak is the reason most high-end steakhouses use this method (in oven form). On your grill, it’s the same result.
Pro Tips for Better Two-Zone Grilling
- Keep the lid closed on the indirect side – Every time you lift the lid, you drop the temperature in the indirect zone by 25-50°F and add several minutes to your cook time. Trust your thermometer, not your eyes.
- Use a drip pan under large cuts – Place a disposable aluminum pan filled with a half-inch of water under large roasts or ribs on the indirect side. It catches drippings, prevents flare-ups, and adds moisture to the cooking environment.
- Use the indirect zone as a flare-up refuge – When fat drips cause a flare-up on the direct side, immediately slide the food to the indirect zone until the flames die down. No panicking, no spraying water, no losing food to fire.
- Cook a whole meal at once – Put your protein over direct heat for the sear while potatoes, onions, or other vegetables slow-roast on the indirect side. Everything finishes at similar times with almost no coordination required.
- Always use a thermometer – Visual cues are unreliable. A $15 instant-read thermometer removes all guesswork from two zone grilling. Pull food at the right temperature, not by feel.
- Manage multiple doneness levels – Cook four burger patties on direct heat, then park the well-done ones on the indirect side to finish through while the medium-rare ones rest. Everyone gets exactly what they want.
Common Two-Zone Grilling Mistakes to Avoid
- Not preheating long enough – 10 minutes isn’t enough for charcoal. Wait until the direct zone is genuinely hot (you can only hold your hand over it for 2 seconds) before adding food.
- Crowding both zones – Leave space between pieces of food on both sides. Crowded food steams instead of sears on the direct side, and blocks air circulation on the indirect side.
- Opening the lid constantly on the indirect side – The indirect zone works by trapping hot air. Every peek is a temperature drop. Set a timer and check with a thermometer, not by looking.
- Not accounting for carryover cooking – When you move food from indirect to direct, or from the grill to the cutting board, it keeps cooking. Pull at 5°F below your target every time.
- Using two-zone for everything thin – A half-inch burger patty doesn’t need two zones. Two-zone grilling is the right tool for thick cuts and long cooks. Thin, fast-cooking food is fine on direct the whole way.
Frequently Asked Questions
What is two-zone grilling?
Two-zone grilling is a method of dividing your grill into two heat areas: one side with direct heat (coals or lit burners beneath the food) and one side with indirect heat (no heat source beneath the food). The direct zone is for searing and fast cooking; the indirect zone is for slow, even finishing and temperature control.
How do I set up two zones on a kettle grill?
On a standard 22-inch Weber kettle or similar round charcoal grill, pour all your lit coals to one side of the charcoal grate. The side with coals is your direct heat zone; the other side is your indirect zone. Replace the cooking grate, close the lid, and preheat for 10-15 minutes before cooking.
What temperature should the direct heat zone be?
For searing steaks and burgers, aim for 450-550°F on the direct zone. For chicken pieces and fish, 375-450°F works better – hot enough to brown without burning. You can control charcoal grill heat by adjusting vent openings; gas grills adjust instantly with the burner knobs.
What temperature should the indirect heat zone be?
The indirect zone temperature depends on what you’re cooking. For most whole chicken and bone-in pieces, 325-350°F in the indirect zone produces great results. For low-and-slow cooks like ribs and pork shoulder, keep the indirect side at 225-250°F. The indirect zone temperature is always lower than the direct side – typically 100-200°F lower.
What is the reverse sear method?
The reverse sear is a two-zone technique where you cook a thick steak slowly on the indirect zone first, bringing the interior close to your target temperature, then finish it with a fast sear on the direct zone to develop a crust. It produces more even doneness from edge to edge than the traditional sear-first method, and works best on steaks 1.5 inches thick or more.
Can I use two-zone grilling on a small grill?
Yes, though the size of each zone is smaller. On a compact 18-inch kettle, bank coals to one-third of the grate and keep two-thirds as indirect. On a 2-burner gas grill, light one burner and leave the other off. The principle works on any grill with at least two burners or enough width to separate coals from open grate space.
How do I prevent flare-ups using two-zone grilling?
The indirect zone acts as your escape route during flare-ups. When fat drips cause flames to shoot up on the direct side, immediately slide the food over to the indirect zone and close the lid. The lack of oxygen and direct heat will cause the flare-up to die out in seconds. Do not spray water on a charcoal grill – it scatters ash onto your food and can cause steam burns.
When should I move food from direct to indirect heat?
Move food to the indirect zone when the exterior has the color and crust you want but the interior isn’t done yet. For steaks, this typically means both sides are seared to a deep brown. For chicken pieces, after 5-7 minutes per side on direct heat. Watch the color and use a thermometer to confirm where you are on the internal temperature.
What is the 3-3-3 rule for grilling?
The 3-3-3 rule is an informal guideline for cooking a 1-inch burger patty: 3 minutes on direct heat, flip, 3 more minutes, then 3 minutes of rest. It’s a starting point, not a universal rule – actual timing varies by grill temperature, patty thickness, and desired doneness. Always verify with a thermometer: 160°F for a fully cooked ground beef patty.
How long can I keep food in the indirect zone?
As long as needed. The indirect zone doesn’t overcook food the way direct heat does – it just keeps it warm and cooking gently. Ribs can sit in the indirect zone for 3-4 hours. A whole chicken takes 60-90 minutes. The lid-closed indirect zone is forgiving. Just keep an eye on your coal level (charcoal) or propane level (gas) for very long cooks.
Do I need a thermometer for two-zone grilling?
Yes. An instant-read thermometer is the single most useful piece of equipment for two zone grilling. It removes all the guesswork from knowing when to move food between zones, when to pull food off the grill, and whether a thick cut is safe to eat. It doesn’t have to be expensive – a reliable digital thermometer costs under $20 and lasts for years.
Can two-zone grilling be used for smoking?
Absolutely. Two-zone grilling is the foundation of low-and-slow smoking on a kettle or gas grill. On a charcoal grill, bank the coals and add 2-3 chunks of smoking wood (hickory, apple, cherry) directly on the lit coals. Place your meat on the indirect side and close the lid with the top vent positioned over the food to draw smoke across it. Keep the temperature between 225°F and 275°F by adjusting the bottom vent.
Putting It All Together
Two zone grilling isn’t a complicated technique – it’s a simple rearrangement of how you use heat that unlocks a dramatically wider range of what you can cook on any grill. Once you’ve set up your first two-zone fire, the instinct of “sear here, finish there” becomes second nature fast.
Start with something forgiving: bone-in chicken thighs on a charcoal kettle. Sear them 5 minutes per side on the direct zone, then finish on the indirect side with the lid closed until they hit 165°F. By the time they come off the grill, you’ll understand exactly why two zone grilling is the technique every serious griller comes back to – every single cook.
Contents
- What Is Two-Zone Grilling?
- Direct Heat vs. Indirect Heat: Key Differences
- How to Set Up Two-Zone Grilling on a Charcoal Grill
- How to Set Up Two-Zone Grilling on a Gas Grill
- Temperature Guide for Two-Zone Grilling
- What to Cook in Each Zone
- The Classic Two-Zone Technique: Sear Then Finish
- The Reverse Sear Method
- Pro Tips for Better Two-Zone Grilling
- Common Two-Zone Grilling Mistakes to Avoid
- Frequently Asked Questions
- Putting It All Together