You’ve got a 14-pound turkey and four hours until dinner. The traditional roast takes three hours minimum — and you’ll still end up with overcooked breast meat and rubbery skin on the underside. Spatchcocking fixes all of that. You’ll remove the backbone, flatten the bird, and have it on the table in under 90 minutes with crispy skin from edge to edge.
What Is Spatchcocking (and Why It Works)
Spatchcocking — also called butterflying — means removing the backbone from a whole bird so it lays flat during cooking. That single change fixes three problems that have frustrated turkey cooks for generations. Faster cook time. A traditional whole turkey shields its breast meat inside a dome shape, forcing heat to work around the bird. Flat on the pan, every part of the turkey faces the heat directly. A 14-pound bird goes from three hours to around 90 minutes. Crispier skin all the way around. When a turkey sits upright, the skin on the underside of the thighs and legs never sees direct heat. With the bird flattened, every inch of skin faces the oven or grill. The result is evenly bronzed, shatteringly crisp skin across the whole bird. Juicier, more evenly cooked meat. Dark meat (thighs and legs) needs to hit 175°F for the best texture. Breast meat is done at 165°F. On a traditional roast, the breast overcooks while you wait for the thighs to catch up. Flat on the pan, all the meat cooks at roughly the same rate.
| Factor | Traditional Whole Turkey | Spatchcock Turkey |
|---|---|---|
| Cook Time (14 lb) | 2.5–3 hours | ~90 minutes |
| Skin Quality | Crispy on top, pale underneath | Crispy all over |
| Even Cooking | Breast often overcooked | Breast and thigh finish together |
| Ease of Carving | Awkward — works around the carcass | Simple — flat bird is easy to portion |
| Oven Space | Large roasting pan required | Rimmed baking sheet works fine |
What You Need Before You Start
You don’t need specialty gear. Most of this is already in your kitchen.
- Heavy-duty kitchen shears — This is the most important tool. Cheap scissors won’t cut through bone cleanly. If you don’t own a pair, a sharp chef’s knife or cleaver works, but shears make the process much easier.
- Large cutting board — You need room to maneuver a 12–20 pound bird. A large wooden or plastic cutting board with a lip to catch drips is ideal.
- Wire rack — Elevates the turkey so hot air circulates underneath, helping the skin crisp on the bottom too. Place it over a rimmed baking sheet.
- Rimmed baking sheet — Captures pan drippings, which you’ll use for gravy later.
- Instant-read meat thermometer — Non-negotiable. Cook to temperature, not time.
Turkey size: Spatchcocking works well for birds from 12 to 20 pounds. Beyond 20 pounds, the bird can be unwieldy on a standard baking sheet. If you need to feed a crowd that large, consider two smaller birds. Pro tip: The day before you cook, dry brine the turkey uncovered in the refrigerator. Pat it dry, rub it with kosher salt all over (including under the skin), and leave it uncovered overnight. The salt penetrates the meat and the skin dries out dramatically — which is what you need for the crispiest possible result.
How to Spatchcock a Turkey Step by Step
Step 1 – Prep Your Turkey
Make sure your turkey is fully thawed before you start — this process is very difficult with a frozen or partially frozen bird. Remove the turkey from all packaging. Reach inside the cavity and remove the neck and giblets. Set these aside: you’ll use them to make turkey stock for gravy while the bird cooks. Pat the turkey completely dry with paper towels, inside and out. Moisture on the skin is the enemy of crispiness. Place the bird breast-side down on your cutting board.
Step 2 – Remove the Backbone
 Look at the turkey from the back — you’ll see the spine running down the center. Find the pope’s nose (the small fleshy nub at the tail end of the spine) to orient yourself. Starting at the tail end, use your kitchen shears to cut along one side of the backbone, cutting through the rib bones as you go up toward the neck. Press firmly — this takes some force. Make the same cut along the other side of the backbone. The backbone should now pull free. Don’t throw it away. The backbone, along with the reserved neck and giblets, makes exceptional turkey stock. Simmer them in water with onion, celery, and herbs while the turkey cooks. Use the resulting stock plus the pan drippings from the baking sheet to build your gravy.
Step 3 – Crack and Flatten the Breastbone
Flip the turkey over so it’s breast-side up. Place both hands on the center of the breast and press down hard. You’ll hear — and feel — a crack as the breastbone gives way. This is normal and necessary. Keep pressing until the bird lies as flat as possible. If the turkey isn’t lying completely flat, look for the cartilage running along the center of the breastbone. Make a small shallow cut through the cartilage with a knife, then press again. The bird should now lie nearly flat.
Step 4 – Tuck the Wings
 Grab each wing tip and tuck it behind the breast, almost like the bird is putting its hands behind its head. This prevents the wing tips from burning during the long cook and helps the breast area cook more evenly. Your turkey is now spatchcocked and ready for seasoning.
Seasoning Your Spatchcock Turkey
The flattened shape makes seasoning easier than a whole bird — you can reach every surface. The dry brine method (best for crispy skin): Mix 1 tablespoon kosher salt with 1 teaspoon black pepper and 1 teaspoon dried thyme. Rub this mixture all over the turkey — on top of the skin, under the skin on the breast and thighs, and underneath the bird. Place uncovered on a wire rack in the refrigerator for 12–24 hours before cooking. The salt draws out moisture initially, then gets reabsorbed into the meat, seasoning it deeply. The skin becomes dry and papery — perfect for crisping. Herb butter under the skin (most flavor): Soften 4 tablespoons of butter. Mix in 2 tablespoons each of fresh thyme and fresh sage, 1 teaspoon garlic, and a generous pinch of kosher salt. Slide your fingers under the breast skin to separate it from the meat, then push the herb butter mixture underneath and spread it evenly over the breast and thighs. This bastes the meat from the inside as it cooks. Simple approach: If you’re short on time, brush the turkey with olive oil or melted butter and season generously with kosher salt and black pepper. It’ll still be excellent.
How to Cook a Spatchcock Turkey
Oven Method
The oven is the most forgiving method and produces reliably crispy skin. Preheat your oven to 450°F. Place the seasoned turkey breast-side up on a wire rack set over a rimmed baking sheet. Roast at 450°F for 30 minutes to get the skin browning hard and fast, then drop the temperature to 400°F and continue roasting until the breast hits 160°F and the thighs hit 175°F. The breast will carry over to 165°F during resting. A good rule of thumb: plan for about 6 minutes per pound at this combined method. That’s roughly 75–90 minutes for a 14-pound bird. Watch the skin after the first 30 minutes. If it’s browning too fast, tent loosely with foil. If it’s pale after 45 minutes, check your oven temperature with a thermometer — ovens often run low.
Grill Method
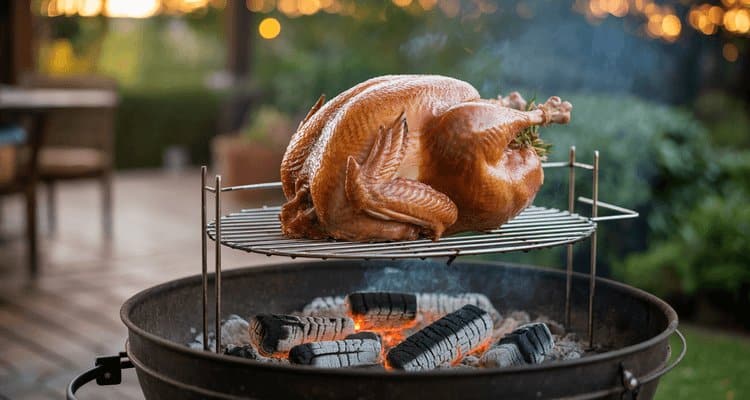
Grilling a spatchcocked turkey gives you both crispy skin and a light char that’s perfect for outdoor entertaining. Set up a two-zone grill: high heat on one side, no heat on the other. You want the indirect zone to hover around 375–400°F. Place the turkey skin-side down over indirect heat. After 20–25 minutes (once the skin has released from the grates and is golden), flip it skin-side up and continue cooking indirectly until the thighs reach 175°F. In the last 5 minutes, move the turkey briefly to the direct heat side to get some final crispness on the skin. Watch it closely — it can go from golden to charred quickly.
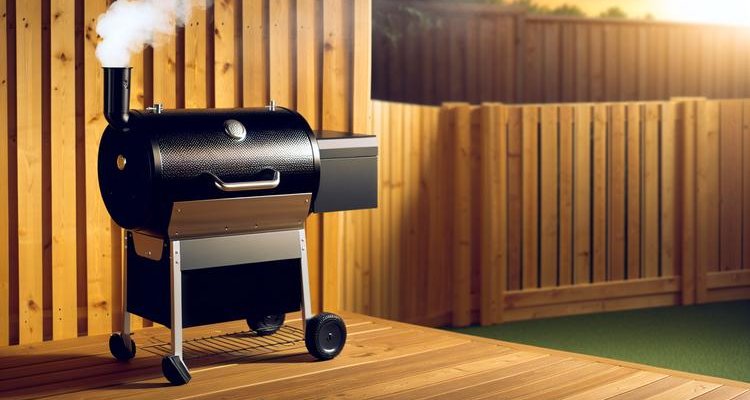
Smoker Method
Smoking a spatchcocked turkey produces a juicy, smoke-kissed bird that’s become a Thanksgiving tradition for many BBQ enthusiasts. The increased surface area from butterflying means more smoke penetration than a whole bird. Stick to mild wood: apple or cherry wood complements turkey perfectly without overpowering it. Mesquite is too strong for poultry. Hickory works if you use it sparingly. Place the turkey breast-side up on the smoker grates. Rotate it halfway through cooking for even smoke exposure. Smoking temperatures and times:
- At 225°F: approximately 30–35 minutes per pound
- At 275°F: approximately 20–25 minutes per pound
- At 325°F: approximately 12–15 minutes per pound (hot and fast, more like oven roasting with smoke)
| Turkey Weight | Oven 425°F | Grill 375–400°F | Smoker 225°F | Smoker 275°F |
|---|---|---|---|---|
| 12 lb | 70–80 min | 75–90 min | 6–7 hrs | 4–5 hrs |
| 14 lb | 80–90 min | 90–105 min | 7–8 hrs | 4.5–5.5 hrs |
| 16 lb | 90–105 min | 105–120 min | 8–9 hrs | 5–6 hrs |
| 18 lb | 105–120 min | 120–135 min | 9–10 hrs | 6–7 hrs |
| 20 lb | 115–130 min | 130–150 min | 10–12 hrs | 7–8 hrs |
*All times are estimates. Always cook to internal temperature, not time. Use an instant-read thermometer to verify doneness.
Internal Temperature and Resting
Pull the turkey when the breast reads 160°F and the thighs read 175°F. The breast will carry over to the USDA safe minimum of 165°F while resting. Where to probe: Insert the thermometer into the thickest part of the breast — not near the bone — and into the thickest part of the inner thigh, again avoiding the bone. If one area is done before the other, tent the done area loosely with foil while the other catches up. Resting is non-negotiable. Tent the turkey loosely with foil and rest it for at least 20–30 minutes before carving. This allows the juices to redistribute throughout the meat. Cutting too soon sends them all running onto the cutting board.
How to Carve a Spatchcock Turkey
Carving a flat turkey is actually simpler than carving a whole roasted bird — the joints are more accessible and the meat comes away cleanly. After the rest, move the turkey to a clean cutting board:
- Remove the legs: Cut through the skin between the thigh and the breast. Press the leg outward to pop the hip joint, then cut through it to remove the whole leg quarter (thigh and drumstick together).
- Separate drumstick from thigh: Find the joint between the drumstick and thigh. Cut through it. You now have four pieces from two leg quarters.
- Remove the wings: Pull each wing outward and cut through the joint where it meets the breast.
- Slice the breast: Cut along both sides of the breastbone to release the entire breast halves, then slice crosswise into serving portions.
- Make the gravy: Pour the pan drippings from the baking sheet into a saucepan. Add your reserved backbone/neck stock and simmer to concentrate. Whisk in a flour or cornstarch slurry to thicken. Season and serve alongside.
Common Mistakes to Avoid
- Starting with a frozen or partially frozen turkey. The shears can’t cut through frozen bone properly, and the bird won’t flatten. Allow 24 hours of refrigerator thawing per 5 pounds of turkey.
- Skipping the dry brine. Cooking a wet, unwashed-and-not-dried turkey gives you steamed rather than roasted skin. Even a few hours of air-drying in the fridge dramatically improves crispness.
- Using weak scissors. Thin kitchen scissors bend or slip on thick rib bones. Use a dedicated pair of heavy-duty kitchen shears or a sharp, sturdy knife.
- Not fully cracking the breastbone. If the bird is still domed in the middle, the thickest part of the breast will cook slower than the rest. Press until the bird lies genuinely flat.
- Cooking by time alone. Turkey sizes vary enormously, and oven temperatures drift. Always use a thermometer. The cook time table is a planning guide — temperature is the finish line.
- Carving too soon. If you skip the rest, juices pour out when you cut. That moisture was going to make the meat taste juicy. Give it 20–30 minutes.
- Throwing away the backbone. The backbone plus neck and giblets make a far better stock than anything from a can or carton. Simmer while the bird cooks — your gravy will be significantly better for it.
Frequently Asked Questions
How long does it take to cook a spatchcock turkey?
A spatchcocked turkey cooks roughly 50% faster than a traditional whole turkey. At 425°F in the oven, plan for about 6 minutes per pound. A 14-pound bird typically takes 80–90 minutes. Always verify doneness with a thermometer: 165°F in the breast, 175°F in the thigh.
What tools do I need to spatchcock a turkey?
The only specialized tool you need is a pair of heavy-duty kitchen shears. You’ll also need a large cutting board, a wire rack, a rimmed baking sheet, and an instant-read meat thermometer. A sharp chef’s knife or cleaver can substitute for shears if needed.
Can I spatchcock a 20 lb turkey?
Yes, though a 20-pound bird is at the upper limit of what’s practical. It will fit on a large rimmed baking sheet and cook evenly once flattened. The sheer size makes handling and flattening more physically demanding — have a sturdy cutting board and a large oven. For feeding large groups, two 12–14 pound birds are easier to manage than one 20-pounder.
Do I need to dry brine a spatchcock turkey?
You don’t have to, but it’s highly recommended. Dry brining — rubbing with kosher salt and leaving uncovered in the fridge for 12–24 hours — draws out surface moisture, then reabsorbs it into the meat. The result is deeply seasoned meat and dramatically crispier skin. It costs nothing but time and makes a noticeable difference.
How long to smoke a spatchcock turkey at 225°F?
At 225°F, plan for approximately 30–35 minutes per pound. A 14-pound spatchcocked turkey will take roughly 7–8 hours at this temperature. This is the traditional low-and-slow approach and produces the deepest smoke flavor, but it’s a long commitment. Use apple or cherry wood for best results.
How long to smoke a spatchcock turkey at 275°F?
At 275°F, plan for approximately 20–25 minutes per pound. A 14-pound bird takes around 4.5–5.5 hours. This is a popular sweet spot — you get good smoke penetration and bark development without the all-day commitment of 225°F. The skin crisps better at this higher temperature too.
Can I prep a spatchcock turkey the night before?
Absolutely — and you should. Spatchcock the turkey the night before, apply your dry brine or seasoning, and leave it uncovered on a wire rack in the refrigerator overnight. The uncovered fridge time dries the skin beautifully. When you’re ready to cook the next day, the turkey goes straight from fridge to oven or grill with no additional prep.
How do I carve a spatchcock turkey?
After a 20–30 minute rest, remove the leg quarters by cutting through the hip joint, then separate drumsticks from thighs. Remove wings by cutting through the shoulder joint. Finally, slice the breast meat off the breastbone and cut crosswise into serving portions. The flat profile makes the joints much easier to access than a whole roasted bird.
What temperature should a spatchcock turkey be?
The USDA safe minimum internal temperature for turkey is 165°F in the thickest part of the breast. For the best texture in the thighs and legs, pull those at 175°F. Use an instant-read thermometer inserted into the thickest part of the meat, not touching bone. Many cooks pull the breast at 160°F and let it carry over to 165°F during resting.
What are common mistakes when spatchcocking a turkey?
The most common mistakes are: starting with a frozen bird (impossible to cut or flatten properly), skipping the dry brine (wet skin won’t crisp), using flimsy scissors that can’t cut bone, failing to fully crack the breastbone so the bird stays domed, cooking by time instead of temperature, and carving too soon without letting the bird rest.
Is spatchcocking better than traditional roasting?
For most home cooks, yes. Spatchcocking cooks the turkey faster, produces crispier skin, and yields more evenly cooked meat than traditional upright roasting. The only trade-off is presentation — a spatchcocked turkey doesn’t have the dramatic whole-bird look on the table. If the showpiece presentation matters more than cooking performance, roast it whole; for flavor and practicality, spatchcock wins.
What wood is best for smoking a spatchcock turkey?
Apple and cherry wood are the top choices for smoking turkey. Both produce mild, slightly sweet smoke that complements poultry without overwhelming it. Hickory works in small amounts but can turn bitter if used heavily. Avoid mesquite entirely for turkey — it’s far too aggressive for poultry’s delicate flavor. Pecan is another excellent mild option that splits the difference between apple and hickory.
Contents