Learning how to smoke brisket starts with two numbers: 225-250°F smoker temperature and 1 to 1.5 hours per pound. Get those right, and you’re on your way to the most rewarding cook in barbecue. This complete guide covers everything from selecting the right cut to achieving that coveted smoke ring, bark, and pull-apart tenderness that defines championship Texas BBQ. Whether you’re attempting your first brisket or refining your technique, mastering this iconic cut requires understanding both the science and art behind low-and-slow cooking. The journey from raw meat to perfectly smoked brisket involves critical decisions at every stage — each impacting the final result that emerges from your smoker after 12-16 hours of careful attention.
- Understanding Brisket: Anatomy and Selection
- Equipment Setup: Smoker and Tools
- Preparation: Trimming Techniques
- The Cook: Complete Smoking Process
- Advanced Techniques: Pro Tips and Methods
- Troubleshooting: Common Problems
- FAQ: Frequently Asked Questions
Understanding Brisket Anatomy
 The brisket comes from the lower chest of the cow, consisting of two distinct muscles that require different approaches during cooking. Understanding this anatomy is crucial for proper trimming, seasoning, and slicing. For a complete introduction to this cut, check out our detailed guide on what is brisket. The flat, also known as the first cut, provides leaner meat with a uniform thickness ideal for even slicing. This muscle runs the length of the brisket and contains less intramuscular fat, making temperature control critical to prevent drying. The characteristic grain structure of the flat requires careful attention when slicing to ensure tenderness. The point, sitting atop the flat at one end, contains significantly more marbling and renders into incredibly juicy, flavorful meat. This fattier section often becomes burnt ends in competition cooking or provides the most forgiving meat for beginners. The irregular shape and higher fat content mean the point typically finishes cooking at a different rate than the flat. Between these muscles lies a fat seam that never fully renders, requiring strategic trimming decisions. Competition cooks often separate these muscles after cooking for optimal presentation, while backyard pitmasters might prefer keeping them together for variety in each slice.
Selecting Quality Brisket
Choosing the right brisket sets the foundation for success. Prime grade offers the most marbling and forgiveness during long cooks, with intramuscular fat that keeps meat moist even if slightly overcooked. Choice grade provides good quality at a lower price point but requires more precise temperature control. Select grade should generally be avoided for smoking unless you’re experienced with injection techniques. Look for flexibility when selecting brisket — a good brisket should bend easily when lifted from the center, indicating proper aging and tenderness potential. The fat cap should be white or cream-colored rather than yellow, suggesting younger beef with better flavor. Avoid briskets with excessive hard fat or those that feel stiff and board-like. Size matters for consistent cooking. Briskets between 12-16 pounds provide the best balance of cooking time and moisture retention. Smaller briskets cook faster but risk drying out, while massive briskets over 18 pounds can challenge temperature management and require extended cook times exceeding 18 hours. Wondering about budget? See our guide on how much brisket costs per pound before you shop. How much brisket per person: Plan on 1/3 to 1/2 pound of cooked brisket per person. Since brisket loses roughly 30-40% of its weight during cooking, buy at least 3/4 pound of raw brisket per adult guest.
Packer vs. Flat Cut
Whole packer briskets include both muscles and offer the complete brisket experience, allowing you to manage different textures and fat contents. The intact fat cap provides protection during long cooks, while the variety of meat satisfies different preferences. Packer cuts typically cost less per pound but require more trimming skill. Flat-only cuts appeal to those seeking leaner meat or working with smaller smokers. These cook more quickly and evenly but lack the moisture insurance provided by the point. Without the point’s fat contribution, flats require careful temperature monitoring and often benefit from wrapping earlier in the cook.
Essential Equipment and Setup
 Your equipment choices significantly impact brisket quality and cooking consistency. While brisket can be smoked on various devices, certain tools and setups dramatically improve your chances of success. If you’re setting up a new smoker, make sure you’ve first followed a proper smoker seasoning guide before your first cook.
Choosing Your Smoker
Offset smokers remain the traditional choice for brisket, providing clean smoke flavor and precise temperature control when properly managed. The separate firebox allows for pure wood combustion without direct heat exposure, creating the ideal environment for rendering fat and developing bark. However, offsets demand constant attention and fire management skills. Installing offset smoker baffle plates can significantly improve heat distribution for more even brisket cooks. For detailed information on choosing an offset smoker, see our best offset smokers guide. Pellet grills offer convenience and consistency, maintaining steady temperatures for the marathon cook times brisket requires. Modern pellet grills provide sufficient smoke flavor for most palates while eliminating the need for hourly fire adjustments. The trade-off comes in maximum temperature limitations and potentially less pronounced smoke rings. Ceramic kamado-style cookers excel at moisture retention and fuel efficiency, crucial for overnight cooks. Their superior insulation maintains rock-steady temperatures even in cold weather. The limited capacity can be challenging for larger briskets, and achieving optimal smoke flavor may require wood chunk placement strategies. Learn more about the benefits and drawbacks in our kamado vs pellet smoker comparison. Electric smokers provide the ultimate in convenience but often struggle with bark development due to moisture retention. These work well for beginners focusing on tenderness over texture. Adding smoke tubes or maze generators can enhance flavor profiles that electric elements alone cannot achieve.
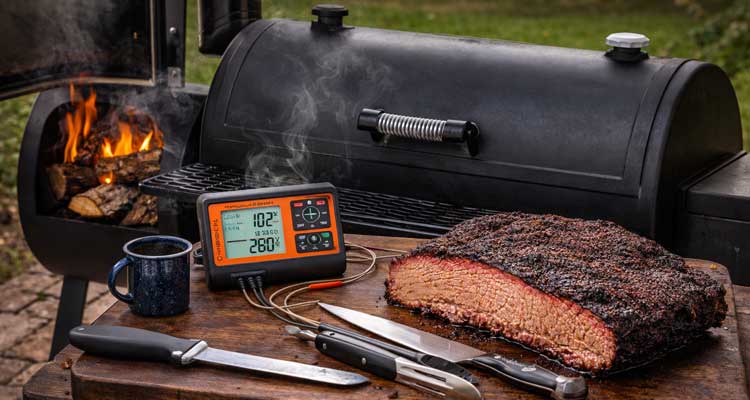
Temperature Monitoring Systems
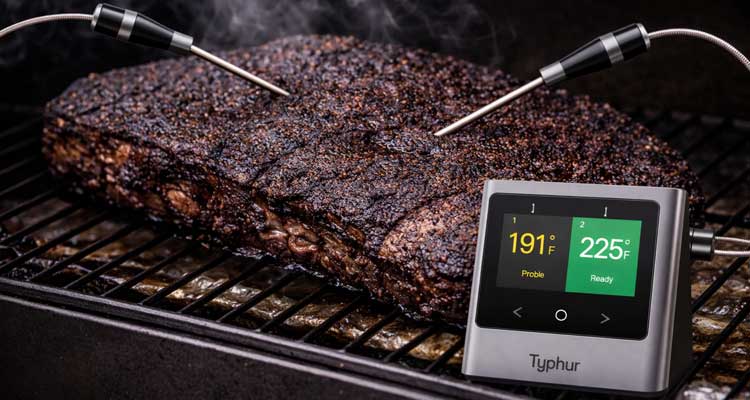 Accurate temperature monitoring separates good brisket from great brisket. Dual-probe thermometers allow simultaneous monitoring of meat and chamber temperatures, essential for maintaining the 225-275°F sweet spot. For our top recommendations, check out our best smoker thermometers guide. For a 12-16 hour brisket cook, we strongly recommend a Bluetooth meat thermometer or wireless temperature probe so you can monitor your cook remotely without opening the smoker. If you want a quick spot-check when probing for doneness at the end of the cook, an instant-read thermometer is indispensable. Place probes in the thickest part of the flat, avoiding fat pockets that give false readings. The point will typically run 10-15°F higher due to increased fat content. Many pitmasters use multiple probes to track temperature gradients across the brisket, ensuring even cooking throughout. Consider leave-in thermometers over instant-read models for brisket. The ability to monitor temperature trends over time provides insights into stalls, cooking acceleration, and when to wrap. Modern smart thermometers with app connectivity and temperature graphing help identify patterns for future cooks.
Essential Tools and Accessories
A quality slicing knife with a 12-inch minimum blade length ensures clean cuts through the entire brisket without sawing. The long blade allows single-stroke cuts that preserve bark integrity and prevent shredding. Granton-edge knives with hollowed sections reduce friction and sticking. Heavy-duty aluminum foil or pink butcher paper for wrapping during the stall phase impacts final bark texture. Butcher paper allows more breathing than foil, preserving bark crispness while accelerating cooking. Foil provides maximum moisture retention but can soften bark to the point of mushiness. Nitrile gloves offer heat resistance and dexterity for handling hot briskets during wrapping or checking tenderness. Cotton glove liners under nitrile provide extra insulation for extended handling. Avoid cloth-only gloves that absorb juices and lose heat protection when wet. A cambro or quality cooler for resting maintains temperature during the crucial post-cook phase. Proper resting allows juices to redistribute while keeping the brisket above safe serving temperatures. Wrapping in towels and using preheated coolers extends holding times to 4+ hours. Browse our full list of essential smoker accessories to make sure your kit is complete before cook day.
- Knife option: Cutluxe slicing knife fits trimming and slicing a whole brisket.
- Seasoning option: Spice Guru BBQ seasoning fits the seasoning strategy section.
- Wrap option: pink butcher paper supports the brisket wrap without trapping as much steam as foil.
- Meat source: Snake River Farms American Wagyu brisket fits readers ready to cook a premium whole packer.
Trimming and Preparation Techniques
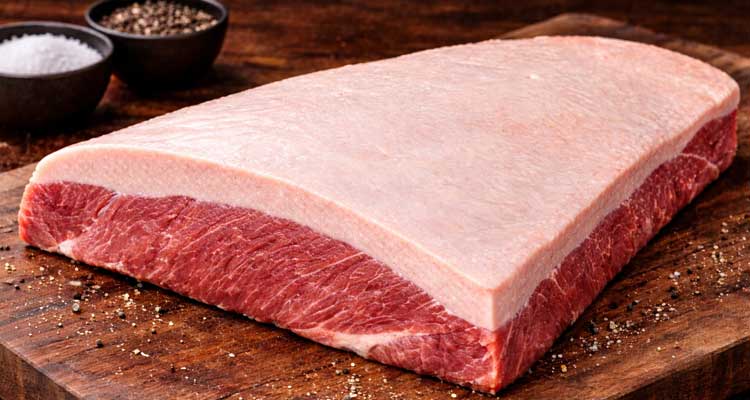 Proper trimming sets the stage for even cooking and optimal bark development. The goal is removing excess fat that won’t render while preserving enough to protect the meat during the long cook.
Fat Cap Management
Trim the fat cap to approximately 1/4 inch thickness, ensuring even coverage without thick spots that won’t render. Some pitmasters prefer slightly thicker coverage on the point where the meat benefits from extra protection. Use long, smooth strokes with your knife held at a shallow angle to avoid gouging the meat beneath. Remove any hard, waxy fat that feels different from the softer fat cap. This kernel fat never renders properly and creates unpleasant eating experiences. Pay special attention to the wedge of hard fat often found where the point meets the flat. The decision to cook fat-side up or down depends on your smoker design. Fat-side down protects against direct heat in offset smokers, while fat-side up can be beneficial in pellet grills where heat comes from below. Neither orientation significantly impacts moisture despite persistent myths about self-basting.
Shaping for Even Cooking
Aerodynamic shaping promotes even cooking and prevents thin edges from overcooking. Round off square corners that would otherwise burn before the center cooks. Remove any thin flaps of meat that would dry out and detract from presentation. The mohawk, a ridge of fat often running along the top of the point, should be trimmed flush to prevent a barrier to smoke penetration. This thick fat deposit rarely renders completely and creates textural issues in finished slices. Consider the grain direction while trimming, marking it with a shallow score if needed. The grain runs different directions in the point and flat, requiring attention when separating or slicing. A small corner cut can serve as a reference point after cooking when the surface is dark with bark.
Seasoning Strategy
Simple seasoning allows beef flavor to shine while creating optimal bark conditions. The classic Texas approach uses only coarse black pepper and kosher salt in equal ratios, known as Dalmatian rub. This minimalist approach highlights quality meat and smoke flavor without masking.
For advanced rub options including coffee, paprika, and brown sugar variants, see our roundup of the best brisket rubs with detailed recipes and taste tests. Advanced rubs might include granulated garlic, onion powder, paprika, or coffee for complexity. Keep sugar content low to prevent burning during long cooks. Apply rubs 2-12 hours before cooking for deeper penetration, though excellent results come from seasoning immediately before smoking.
The Complete Smoking Process
 The actual smoking process requires patience, attention, and understanding of the various phases brisket undergoes during its transformation. Each stage presents unique challenges and opportunities to influence the final product.
Brisket Smoker Temperature: The Complete Reference
The ideal brisket smoker temperature is 225-250°F for low-and-slow cooking. Some pitmasters prefer 275°F to push through the stall faster. Here is a full phase-by-phase temperature reference:
| Phase | Smoker Temp | Meat Internal Temp | Action |
|---|---|---|---|
| Initial Smoke | 225-250°F | 0-150°F | Smoke unwrapped, build bark |
| The Stall | 225-250°F | 150-170°F (plateau) | Be patient — or wrap to push through |
| Post-Wrap | 250-275°F | 170-200°F | Wrapped in butcher paper or foil |
| Probe Tender | — | 195-205°F | Pull when probe slides like warm butter |
| Rest | Keep above 140°F | Carryover to ~205°F+ | Rest 2-4 hours minimum |
How Long to Smoke Brisket: Cook Time Per Pound
Use this table as a planning guide. Always cook to internal temperature and probe feel — not the clock. These estimates are for a traditional wrap method.
| Brisket Weight | Est. Cook Time @ 225°F | Est. Cook Time @ 250°F | Recommended Rest |
|---|---|---|---|
| 8-10 lbs | 10-13 hours | 8-11 hours | 2-3 hours |
| 10-12 lbs | 12-15 hours | 10-13 hours | 2-3 hours |
| 12-14 lbs | 14-18 hours | 12-15 hours | 2-4 hours |
| 14-16 lbs | 16-20 hours | 14-17 hours | 3-4 hours |
| 16-18 lbs | 18-22 hours | 16-19 hours | 4+ hours |
Rule of thumb: Plan on approximately 1 to 1.5 hours per pound at 225°F. Always add 2-4 hours of buffer time for stalls and rest.
Initial Smoke Phase (Hours 0-3)
Start with a cold or room temperature brisket for maximum smoke absorption. Cold meat attracts smoke particles more effectively, developing a deeper smoke ring before the surface temperature inhibits nitric oxide penetration. Some pitmasters even apply cold, wet rubs to enhance this effect. Maintain steady temperatures between 225-250°F during initial smoking. Wild temperature swings stress the meat and create uneven cooking. This phase focuses on smoke flavor development and beginning the rendering process. Resist the urge to push temperatures higher to speed cooking. Wood selection impacts flavor profiles significantly. Oak provides a medium smoke flavor that complements beef without overpowering. Hickory adds bacon-like notes but can turn bitter with overuse. Fruit woods like apple or cherry contribute mild sweetness and enhance bark color. Mix wood types for complexity, using stronger woods sparingly. For more information on wood selection, explore our best wood pellets guide. Spraying or mopping during this phase remains controversial. While adding moisture can enhance smoke ring formation, frequent opening sacrifices temperature stability. If spraying, use apple juice, beef broth, or water every 45-60 minutes, working quickly to minimize heat loss.
Managing the Stall (Hours 4-8)
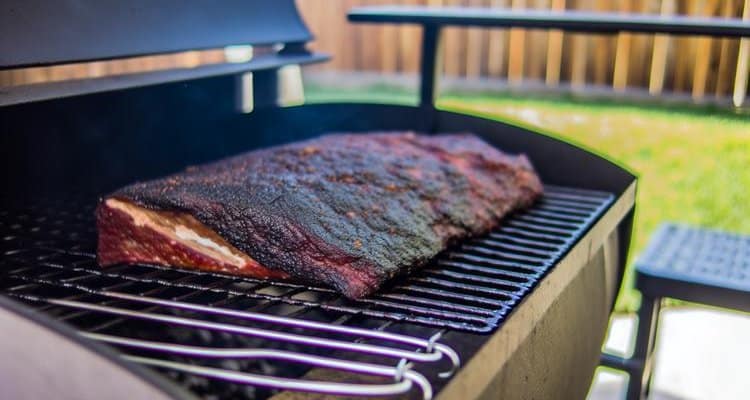
The stall occurs when evaporative cooling matches heat input, causing internal temperature to plateau around 150-170°F. This frustrating phase can last 2-5 hours but serves an important purpose, breaking down connective tissues while the temperature holds steady. Patience during the stall separates experienced pitmasters from beginners. The temptation to increase temperature often backfires, creating tough exterior bark before the interior properly renders. Trust the process and maintain steady temperatures while collagen converts to gelatin. Monitor bark development during the stall to determine optimal wrapping time. The bark should be dark mahogany and set firmly enough to resist light scratching. Wrapping too early prevents proper bark formation, while waiting too long risks over-charring or drying the flat.
The Texas Crutch Decision
 Wrapping accelerates cooking through the stall while preserving moisture — a technique known as the Texas Crutch. The decision whether to wrap, when to wrap, and what material to use significantly impacts final texture and bark quality. Butcher paper has become the preferred wrapping medium for many pitmasters, allowing some breathing while accelerating cooking. The semi-permeable paper preserves more bark texture than foil while still pushing through the stall efficiently. Pink or peach butcher paper has no functional advantage over white but has become traditional. Aluminum foil provides maximum moisture retention and fastest cooking but can oversoften bark to an unpleasant mushiness. Competition cooks often use foil boats, protecting the bottom while leaving the top exposed for continued bark development. This hybrid approach balances speed with texture. The no-wrap method produces the firmest, most pronounced bark but extends cook time and risks drying the flat. This traditional approach requires careful temperature management and often benefits from higher-grade briskets with more marbling. Increase smoking temperature to 275°F if not wrapping to reduce total cook time.
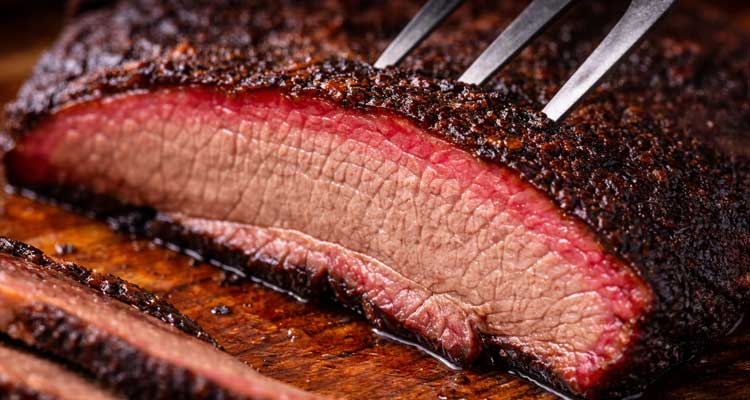
Final Temperature and Doneness
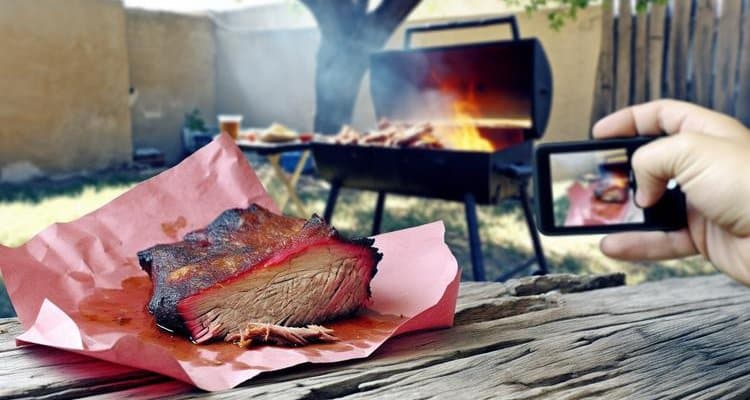
Target internal temperature alone doesn’t determine doneness. While most briskets finish between 195-205°F, the probe test provides the best indicator. A thermometer probe should slide through the meat with minimal resistance, like inserting into soft butter. The flat typically finishes first, reaching probe-tender around 200-203°F. The point, with higher fat content, might need 205-210°F for optimal rendering. Some pitmasters separate the muscles when the flat is done, returning the point for additional cooking. Different areas of the brisket finish at different rates. Check multiple spots for tenderness, particularly the thickest sections of both flat and point. A single temperature reading can be misleading if taken from a fatty area or thin edge. Visual cues complement temperature readings. The brisket should have developed a dark, firm bark, and the whole muscle should jiggle when shaken. The internal texture visible at the probe insertion point should appear glossy and rendered rather than grainy or dry.
Resting and Slicing Techniques
 Proper resting transforms good brisket into great brisket by allowing juices to redistribute throughout the meat. This critical phase requires as much attention as the cooking itself. For detailed guidance, see our article on how long to let brisket rest.
The Resting Phase
Rest wrapped briskets for a minimum of one hour, though 2-4 hours produces superior results. The extended rest allows temperature equalization between the hotter exterior and cooler center while carryover cooking finishes tenderizing any stubborn collagen. Maintain resting temperature above 140°F for food safety while avoiding continued cooking. An empty cooler preheated with hot water creates an ideal resting environment. Wrap the brisket in towels for insulation, monitoring temperature to ensure it stays in the safe zone. Some pitmasters employ a technique called holding, maintaining the brisket at 140-150°F for extended periods. This method, possible with electric warmers or precisely controlled coolers, can improve tenderness through extended enzyme activity. Restaurants often hold briskets for 8-12 hours, achieving exceptional tenderness. The rest provides opportunity to prepare sides, sauces, and serving areas without rushing. Use this time to clean slicing surfaces, warm plates, and organize accompaniments. A well-rested brisket offers more flexibility in serving time, crucial for entertaining.
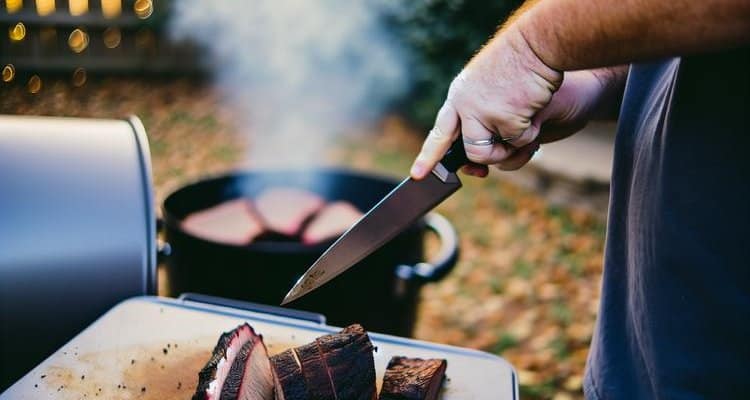
Slicing for Maximum Impact
Proper slicing technique preserves all your hard work and ensures each bite delivers maximum flavor and tenderness. The grain direction changes between point and flat, requiring attention and potentially different approaches for each muscle. Slice the flat against the grain in pencil-thick portions, approximately 1/4 inch wide. These slices should hold together when lifted but pull apart easily when eaten. Thinner slices work for leaner flats, while fattier briskets can support slightly thicker cuts. The point’s irregular grain and higher fat content allow for different presentations. Some prefer thick chunks for burnt ends, while others slice thinly for maximum tenderness. The point’s forgiving nature means less precise slicing still yields excellent results. Competition presentations often separate the muscles, slicing each for optimal appearance. Backyard cooks might prefer leaving them attached, offering variety in each portion. Mark your initial grain direction before cooking, as the dark bark can obscure grain patterns. Use long, smooth strokes with minimal downward pressure, letting the knife’s weight and sharpness do the work. Sawing motions tear the meat and destroy bark integrity. Clean your knife between cuts if buildup occurs, maintaining clean slice edges.
Advanced Techniques and Methods
Beyond basic smoking, advanced techniques can elevate your brisket from good to competition-worthy. These methods require experience and confidence but offer opportunities for customization and improvement.
Injection Strategies
Injection adds moisture and flavor directly into the meat, particularly beneficial for leaner briskets or choice-grade meat. Basic beef broth injections provide moisture insurance, while phosphate-enhanced injections improve moisture retention through protein modification. Competition injectors often use complex mixtures including beef base, phosphates, MSG, and butter. These injections require 12-24 hours to equalize throughout the meat. Over-injection creates pockets of liquid that prevent proper bark formation and create artificial texture. Inject in a grid pattern every 1-2 inches, angling the needle to distribute liquid throughout different layers. Focus extra attention on the leaner flat sections that benefit most from additional moisture. Some pitmasters inject only the flat, allowing the fatty point to self-baste naturally.
Hot and Fast Methods
While traditional low-and-slow remains standard, hot-and-fast methods produce excellent briskets in 5-6 hours. Cooking at 325-350°F requires different techniques but can yield comparable results with proper execution. Higher temperatures require more frequent spritzing to prevent surface drying before interior cooking completes. The reduced cooking time means less smoke exposure, potentially requiring stronger wood or smoke supplementation. Wrapping becomes essential earlier in the cook to prevent overcooking the exterior. The hot-and-fast method works particularly well for choice-grade briskets where extended rendering time offers fewer benefits. The faster cook preserves moisture that might evaporate during traditional marathon sessions. Many restaurants employ this method for consistency and timing flexibility.
Reverse Searing Applications
Some pitmasters finish brisket with high heat after traditional smoking, creating an enhanced crust through caramelization. After reaching target temperature and resting, the brisket returns to 400°F heat for 5-10 minutes, crisping the exterior without overcooking. This technique works best with wrapped briskets where the bark has softened. The high-heat finish restores textural contrast between crust and interior. Monitor carefully to prevent burning the sugars in any applied sauces or glazes. If you enjoy low-and-slow beef smoking, our guide to smoked beef short ribs applies many of the same principles with a shorter, more manageable cook time.
Troubleshooting Common Problems
Even experienced pitmasters encounter challenges with brisket. Understanding common problems and their solutions helps recover from mistakes and prevent future issues.
Dealing with Dry Brisket
Dry brisket typically results from overcooking the flat or insufficient marbling in the raw meat. While prevention is ideal, several rescue techniques can salvage dry brisket. Thinly slicing and serving with au jus or beef broth adds moisture back. Chopping for sandwiches with sauce masks dryness while preserving flavor. Future prevention focuses on temperature control and wrapping timing. Lower cooking temperatures extend rendering time without overcooking exterior portions. Earlier wrapping preserves moisture at the expense of bark development. Selecting higher-grade briskets provides insurance through increased marbling.
Addressing Tough Texture
Undercooking is the primary cause of tough brisket, where collagen hasn’t fully converted to gelatin. The solution requires returning the brisket to heat until proper tenderness develops. Re-wrap and continue cooking at 275°F, checking every 30 minutes for probe tenderness. Tough brisket can also result from quality issues with the raw meat. Older animals or improperly aged beef may never achieve ideal tenderness regardless of cooking method. These briskets benefit from thinner slicing or mechanical tenderizing through chopping.
Fixing Overseasoned or Underseasoned Brisket
Overseasoned brisket can be partially corrected during slicing by trimming heavily seasoned edges or serving with mild sides that balance intensity. Acidic sauces or pickles cut through excessive salt or pepper. For future cooks, reduce rub quantity or dilute with unseasoned sections. Underseasoned brisket benefits from finishing salts or seasoned compound butters applied during slicing. Table sauces add flavor complexity that compensates for mild meat. Adjust rub quantities upward for future cooks, remembering that brisket’s large surface area requires generous seasoning.
Competition Secrets and Presentation
Competition brisket represents the pinnacle of smoking excellence, where minute details separate winners from also-rans. While backyard cooks needn’t obsess over competition standards, understanding these techniques improves overall results.
Box Presentation Strategies
Competition turn-in boxes showcase 6-8 perfect slices demonstrating consistent cooking, smoke ring, and moisture. Judges evaluate appearance first, making visual presentation crucial. Slices are arranged in overlapping fans or straight lines, with point and flat often separated for optimal appearance. The money muscle, where the point meets the flat, provides the ideal competition slice combining tenderness, moisture, and flavor. Competition cooks identify and protect this section throughout cooking, sometimes wrapping it separately for precise doneness. Garnish remains minimal in modern competition, with clean white boxes preferred over the parsley beds of previous eras. The focus stays entirely on the meat, with perfect bark color, visible smoke rings, and glistening moisture indicating proper execution.
Timing and Workflow
Competition timing requires backward planning from turn-in deadlines. Most cooks start briskets 16-18 hours before turn-in, building buffer time for extended stalls or temperature management issues. Multiple briskets provide insurance against disasters and selection options for best presentation. Practice cooks under competition conditions improve timing and temperature management. Document everything: injection timing, wrap temperatures, rest periods, and results. This data becomes invaluable for consistency and continuous improvement.
Regional Variations and Styles
Brisket traditions vary significantly across barbecue regions, each with distinctive approaches reflecting local preferences and historical influences.
Texas Style Fundamentals
Central Texas style emphasizes beef quality and smoke flavor over sauce or complex seasonings. The traditional salt and pepper rub lets the meat shine, while post oak provides the definitive smoke profile. Sauce, if offered, arrives on the side rather than applied during cooking. East Texas style incorporates sweeter profiles and saucing traditions. These briskets might include brown sugar in rubs and receive mop sauces during cooking. The final product often features a glossy, sauced exterior contrasting with Central Texas’s dry bark.
Kansas City and Beyond
Kansas City brisket embraces bold flavors through complex rubs and thick, molasses-based sauces. Burnt ends originated here, transforming the fatty point into candy-like cubes through additional smoking and saucing. This style celebrates intensity over subtlety. Modern fusion approaches incorporate international flavors into traditional smoking. Korean gochujang glazes, Mexican barbacoa techniques, and Japanese yakitori-inspired preparations expand brisket possibilities. These innovations respect traditional methods while exploring new flavor territories.
Serving Suggestions and Pairings
The perfect brisket deserves equally thoughtful accompaniments that complement without overwhelming the star attraction.
Traditional Sides
Classic Texas sides include pinto beans, potato salad, coleslaw, and white bread. These simple preparations provide textural contrast and palate cleansing between rich bites of brisket. The bread serves a functional purpose, creating impromptu sandwiches or soaking up juices. Pickles and onions cut through fat richness with acidity and sharpness. House-made pickles elevate the experience, with variations including bread and butter, spicy dill, or pickled jalapeños. Raw white onion provides sharp contrast, while pickled red onions offer milder acidity. Mac and cheese has become a modern barbecue essential, providing creamy richness that complements lean flat slices. Smoked versions incorporating brisket pieces create ultimate indulgence. Cornbread offers sweetness and texture while absorbing meat juices effectively.
Beverage Pairings
Beer remains the traditional brisket beverage, with malty lagers balancing smoke and fat. Darker beers like porters complement charred bark notes, while IPAs cut through richness with hop bitterness. Local craft options often incorporate barbecue-friendly flavor profiles. Wine pairings focus on bold reds capable of standing up to intense flavors. Zinfandel’s fruit-forward character complements sweet barbecue sauces, while Malbec’s tannins handle fatty point slices. Texas wines increasingly appear at barbecue restaurants, supporting local producers. Non-alcoholic options shouldn’t be afterthoughts. Sweet tea provides regional authenticity and palate cleansing. Mexican Coca-Cola’s cane sugar sweetness pairs naturally with smoke flavors. Tart lemonade cuts through richness while refreshing the palate between courses.
Storage and Leftover Management
Properly stored brisket maintains quality for extended periods, providing multiple meals from a single cook. Understanding storage techniques preserves texture and flavor while ensuring food safety.
Refrigeration Methods
Cool brisket completely before refrigeration to prevent temperature danger zones. Separate point and flat for faster cooling and portion control. Vacuum sealing provides the best preservation, removing air that causes oxidation and freezer burn. Store sliced brisket with accumulated juices to maintain moisture during reheating. Layer slices with butcher paper to prevent sticking while maintaining easy portion access. Properly stored refrigerated brisket maintains quality for 4-5 days.
Freezing Techniques
Freeze brisket in meal-sized portions for convenient future use. Vacuum-sealed portions maintain quality for 3-6 months, though flavor gradually diminishes. Label packages with date, cut identification, and weight for inventory management. Flash-freezing slices individually before vacuum sealing prevents clumping and allows single-serving retrieval. This technique works particularly well for lunch portions or small household needs. Avoid refreezing thawed brisket, which severely degrades texture.
Reheating Best Practices
Sous vide reheating at 140°F provides the gentlest method, preserving moisture and texture without additional cooking. Vacuum-sealed portions go directly into water baths, reheating evenly without quality loss. This method works for both refrigerated and frozen portions. Oven reheating at 250°F wrapped in foil with added moisture works without specialized equipment. Include beef broth or accumulated juices to prevent drying. Slice cold brisket before reheating for faster, more even warming. Avoid microwave reheating when possible, as uneven heating creates tough spots and moisture loss. If necessary, use 50% power in short intervals, adding moisture and covering tightly. Arrange slices in single layers for even heating.
For a full comparison of wireless meat thermometer options, see our wireless meat thermometer guide.
Frequently Asked Questions About Smoking Brisket
What temperature do you smoke brisket at?
Smoke brisket at 225-250°F for traditional low-and-slow cooking. If you want to cook faster without wrapping, you can go up to 275-300°F. Maintain steady temperatures throughout — temperature swings cause uneven cooking and stress the meat during the long cook.
How long does it take to smoke a brisket?
Plan on 1 to 1.5 hours per pound at 225°F, plus 2-4 hours of rest time. A 12-pound brisket typically takes 14-18 hours to cook plus rest. Always build in extra buffer time — brisket stalls are unpredictable. Cook to internal temperature and probe feel, never to the clock.
What internal temperature is brisket done?
Most briskets are probe-tender between 195-205°F internal temperature. However, temperature is a guide, not a rule. The most reliable indicator is the probe test: a thermometer or skewer should slide through the thickest part of the flat with zero resistance, feeling like warm butter. This can happen anywhere from 195°F to 210°F depending on the brisket.
Should I wrap my brisket in foil or butcher paper?
Butcher paper is generally preferred because it allows the bark to breathe while still accelerating the cook through the stall. It preserves more bark texture than foil. Foil (Texas Crutch) retains more moisture and cooks faster but can soften the bark. Both work — butcher paper for better bark, foil for maximum moisture. Wrap when the bark is dark, set, and resists scratching, typically around 165°F internal.
Fat side up or down when smoking brisket?
It depends on your smoker. Fat side down works best in offset smokers where heat comes from the side or below — the fat cap acts as a heat shield protecting the meat. Fat side up works better in pellet grills where radiant heat rises from below. Despite popular myths, fat does not self-baste through meat — but it does provide thermal protection on the appropriate side.
How long should brisket rest after smoking?
Rest brisket for a minimum of 1 hour, but 2-4 hours is ideal for home cooks. Texas BBQ restaurants rest briskets for 8-12 hours in a warmer set to 140°F. Resting allows juices to redistribute, carryover cooking to finish, and the meat to reach a uniform temperature. Keep the wrapped brisket in a preheated cooler lined with towels to hold temperature above 140°F (food safety threshold). See our full guide on how long to let brisket rest.
What is the best wood for smoking brisket?
Post oak is the traditional Texas choice — it provides clean, medium smoke that complements beef without overpowering. Hickory adds bold, bacon-like flavor (use sparingly to avoid bitterness). Cherry and apple contribute mild sweetness and beautiful bark color. Many pitmasters blend oak with a fruit wood. Avoid softwoods (pine, cedar) entirely — the resin creates bitter, unpleasant flavors.
What is the Texas Crutch?
The Texas Crutch is the practice of wrapping brisket in aluminum foil partway through the cook (typically when the bark is set around 165°F internal) to power through the stall. The foil traps steam and moisture, dramatically accelerating cooking. The downside is softened bark — which is why many pitmasters use butcher paper as a compromise between bark preservation and stall-busting speed.
How much brisket per person should I buy?
Plan on buying 3/4 to 1 pound of raw brisket per person to yield approximately 1/2 pound of cooked meat per person after the 30-40% weight loss during smoking. For a party of 10, buy a 10-12 pound brisket. For larger groups, consider two smaller briskets rather than one giant brisket — multiple briskets are easier to manage and provide cooking redundancy.
How do I know when brisket is done without a thermometer?
Without a thermometer, use the wiggle test and the poke test. Pick up the brisket with tongs at the center — it should jiggle like gelatin rather than holding rigid. Poke the thickest part with a toothpick or skewer — it should slide in with zero resistance. The bark should be very dark mahogany, firm, and dry to the touch. That said, a thermometer is strongly recommended — brisket is a 12-16 hour investment worth protecting with proper tools.
Conclusion
Mastering how to smoke brisket combines scientific understanding with artistic intuition developed through practice. Each cook teaches valuable lessons about fire management, meat selection, and timing that improve future results. The journey from tough, raw brisket to tender, smoky perfection rewards patience and attention with one of barbecue’s greatest achievements. Success comes from understanding fundamentals while remaining flexible enough to adjust for individual brisket characteristics and conditions. Weather, meat quality, equipment quirks, and personal preferences all influence the process. Embrace these variables as opportunities for learning rather than obstacles to perfection. The barbecue community’s generosity with knowledge and encouragement helps newcomers develop skills and confidence. Share your successes and failures, contributing to the collective wisdom that advances the craft. Every perfectly smoked brisket carries forward traditions while adding personal touches that make barbecue culture vibrant and evolving. Remember that even experienced pitmasters produce occasional failures, and today’s disaster becomes tomorrow’s learning experience. The pursuit of brisket perfection provides lifetime challenges and rewards, with each cook offering opportunities for improvement and innovation. Whether serving family, competing for trophies, or simply pursuing personal excellence, the satisfaction of producing exceptional smoked brisket justifies every hour of effort, patience, and dedication required to master this iconic Texas BBQ achievement.
Contents
- Quick Navigation
- Understanding Brisket Anatomy
- Essential Equipment and Setup
- Trimming and Preparation Techniques
- The Complete Smoking Process
- Resting and Slicing Techniques
- Advanced Techniques and Methods
- Troubleshooting Common Problems
- Competition Secrets and Presentation
- Regional Variations and Styles
- Serving Suggestions and Pairings
- Storage and Leftover Management
- Frequently Asked Questions About Smoking Brisket
- Conclusion