Craving restaurant-quality fried chicken strips at home? The secret isn’t a complicated recipe, but a focus on technique. Perfect results come down to four key steps: pounding the chicken thin, using a double dredge through seasoned flour and buttermilk, frying at a precise 350°F, and draining on a wire rack. Follow this guide, and you’ll achieve shatteringly crispy chicken tenders with a juicy interior every single time.
Essential Ingredients and Equipment
Before you begin, gathering the right ingredients and tools will make the process smooth and successful. Having everything prepped and ready in your breading station and by the stove is key to achieving that perfect crispy coating without any last-minute scrambling.
For the Chicken and Breading
- Chicken: 1.5 to 2 pounds of boneless, skinless chicken breasts or chicken tenders.
- Buttermilk: About 1.5 cups for the marinade and dredge. Its acidity is crucial for tenderizing the chicken.
- All-Purpose Flour: The foundation of your breading, you’ll need about 2 cups.
- Cornstarch: 2 tablespoons mixed with the flour creates a lighter, crispier texture.
- Seasonings: Salt, black pepper, garlic powder, onion powder, and paprika are essential. A pinch of cayenne adds a gentle heat.
- Frying Oil: A neutral oil with a high smoke point is required. Canola, vegetable, or peanut oil are excellent choices.
Essential Kitchen Tools
- Meat Mallet: For pounding the chicken to an even thickness. A heavy skillet or rolling pin can work in a pinch.
- Shallow Dishes: You’ll need at least three for setting up the flour-buttermilk-flour breading station.
- Heavy-Bottomed Pot or Skillet: A cast iron skillet or Dutch oven provides excellent heat retention and distribution for even frying.
A few tools that make this recipe easier:
- TempPro TP510 Digital Candy Thermometer — 10-inch probe for accurate oil temperature control during frying
- Lodge Seasoned Cast Iron Skillet 12 Inch — superior heat retention for even frying without temperature drops
- Gorilla Grip Dual-Sided Meat Tenderizer Mallet — pounds strips to even thickness for uniform cooking
- Deep-Fry Thermometer: This is non-negotiable for accurately monitoring and maintaining the oil temperature.
- Tongs: For safely adding, turning, and removing the chicken strips from the hot oil.
- Wire Rack and Baking Sheet: The only way to properly drain fried chicken to keep it crispy.
Choosing and Preparing the Chicken
Boneless, skinless chicken breasts or tenders work best for fried chicken strips. Slice breasts lengthwise into 1-inch wide strips, or use pre-cut tenders for convenience. Either way, pounding to an even thickness is the critical prep step that most recipes skip.
Chicken Breasts vs. Chicken Tenders
Chicken breasts give you more control over strip size and thickness but are slightly less tender. Tenders (the small muscle under the breast) are naturally uniform, stay juicier, and are more forgiving if you slightly overcook. Both work well — pounding to even thickness matters more than which cut you choose.
Why Pounding Matters
Uneven chicken strips cook unevenly — thick parts stay raw while thin edges dry out. Pound each strip to 1/2-inch thickness between sheets of plastic wrap using a meat mallet or heavy pan. This guarantees uniform cooking so every strip finishes at the same time with no pink center and no overcooked edges.
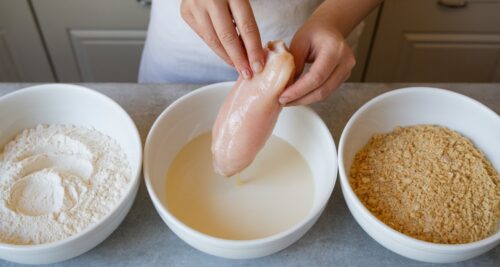
The Perfect Breading Station
Set up three stations in order: seasoned flour, buttermilk, and a second coat of seasoned flour. Dredge each strip through flour, then buttermilk, then flour again. This double-dip method creates the thick, shaggy crust that shatters when you bite into it.
Seasoning the Flour
Mix 1 cup all-purpose flour per pound of chicken with salt, black pepper, garlic powder, onion powder, paprika, and a pinch of cayenne. For extra crunch, add 1 tablespoon of cornstarch per cup of flour — the cornstarch creates a lighter, crispier texture that stays crunchy longer than flour alone. Feel free to customize the blend with smoked paprika for a smoky flavor or a pinch of white pepper for a different kind of heat.
The Buttermilk Soak Advantage
Buttermilk does two things that no other liquid can match. The lactic acid in buttermilk gently tenderizes the chicken by breaking down tough protein fibers. It also creates a sticky surface that helps the breading adhere far better than a plain egg wash.
Soak the chicken strips in buttermilk for 30 minutes to 4 hours in the refrigerator before breading. Longer soaks produce more tender results. If you do not have buttermilk, mix 1 cup of regular milk with 1 tablespoon of white vinegar or lemon juice and let it sit for 5 minutes. The acid curdles the milk, mimicking the properties of true buttermilk.

Double-Dip vs. Single-Dip
The double-dip method (flour, then buttermilk, then flour again) builds a thicker, shaggier crust with more surface texture. Those irregular ridges and craggy bits are what fry up into the crunchiest coating. A single dip produces a thinner, more delicate coating that works for lighter preparations.
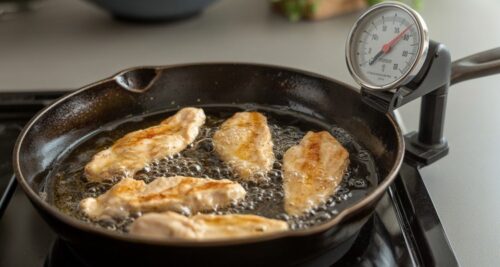
Oil Temperature and Frying Technique
Fry at 350°F using a neutral oil with a high smoke point — canola, peanut, or vegetable oil all work well. Oil temperature is the single most important variable in frying. Too cold and the strips absorb oil and turn greasy; too hot and the breading burns before the chicken cooks through.
| Oil Temperature | Breading Result | Chicken Interior | Overall |
|---|---|---|---|
| Below 325°F (too cold) | Pale, soggy, oil-soaked | May be undercooked | Greasy, limp |
| 325-340°F (too low) | Slightly soft, uneven color | Cooked but slow | Acceptable but not crispy |
| 350°F (ideal) | Deep golden, crispy, shaggy | Juicy, 165°F in 6-8 min | Perfect crunch + juicy |
| 375°F+ (too hot) | Dark, burned spots, bitter | Possibly raw center | Burned outside, undercooked inside |
Choosing the Right Oil
Canola oil is the most affordable neutral option with a 400°F smoke point. Peanut oil adds a slightly nutty flavor and has an even higher smoke point at 450°F, making it the traditional choice for Southern fried chicken. Avoid olive oil — its low smoke point and strong flavor make it a poor choice for deep frying.
Pan vs. Deep Fryer vs. Air Fryer
A cast iron skillet offers the best heat retention for home frying. Fill it about 1 inch deep with oil for pan-frying strips.
A Dutch oven works well for deeper frying with less splatter. Air fryers use less oil and produce good crunch but a lighter, thinner coating than traditional frying.
After each batch, allow the oil a minute or two to return to 350°F before adding the next set of chicken strips. A reliable clip-on thermometer is your best tool for maintaining a stable oil temperature, which is crucial for consistent results.

How to Know When Chicken Strips Are Done
Chicken strips are done when they reach an internal temperature of 165°F (per USDA) and the breading is deep golden brown. In 350°F oil, strips pounded to 1/2-inch thickness take approximately 3-4 minutes per side, or 6-8 minutes total.
Color alone is not a reliable indicator of doneness — dark breading can happen before the chicken is cooked through if the oil is too hot. Always verify with an instant-read thermometer inserted into the thickest part of the strip.
The Drain and Rest Step
Always drain fried chicken strips on a wire rack set over a sheet pan, never directly on paper towels. A wire rack lets hot air circulate under the strips, which prevents the bottom from steaming and going soggy. Paper towels trap moisture against the breading and undo the crunch you worked to build.
Let the strips rest on the rack for 3-5 minutes before serving. This brief rest allows the internal juices to settle and the residual steam to escape, keeping the breading crispy. If you need to hold them warm, place the rack in a 200°F oven.
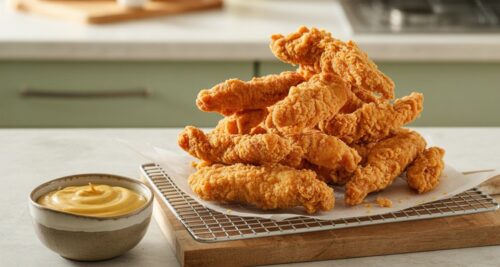
Dipping Sauce Pairings
Crispy fried chicken strips pair well with tangy or creamy dips that cut through the richness of the fried coating. While store-bought sauces are convenient, making your own is simple and allows you to control the flavor. Here are a few easy homemade options.
Classic Honey Mustard
This timeless sauce offers the perfect balance of sweet and tangy. Simply whisk together equal parts Dijon mustard and honey. Add a tablespoon of mayonnaise for a creamier texture and a dash of apple cider vinegar to brighten the flavor.
Homemade Ranch Dressing
For a cool and creamy dip, combine 1/2 cup of mayonnaise, 1/4 cup of buttermilk, and 1/4 cup of sour cream. Stir in a teaspoon each of dried dill, parsley, and chives, along with a 1/2 teaspoon of garlic powder and onion powder. Season with salt and pepper to taste.
Simple Hot Honey
For a sweet and spicy kick, gently warm 1/2 cup of honey in a small saucepan over low heat. Stir in 1-2 tablespoons of your favorite hot sauce and a pinch of red pepper flakes. Let it infuse for a few minutes before serving.
Common Mistakes That Ruin Crispy Chicken Strips
Most fried chicken strip failures trace back to oil temperature control, breading technique, or draining method. Avoiding these common mistakes makes the difference between restaurant-quality strips and a greasy, soggy disappointment that never gets crispy.
- Oil too cold: Strips absorb excess oil and come out greasy with pale, soft breading. Use a thermometer and maintain 350°F throughout cooking.
- Overcrowding the pan: Adding too many strips at once drops oil temperature 25-50°F, causing steaming instead of frying. Cook in small batches of 3-4 strips.
- Skipping the rest on a wire rack: Placing hot strips directly on paper towels or a plate traps steam against the bottom and softens the crust within minutes.
- Pressing the breading too hard: A firm press compresses the flour coating and eliminates the shaggy texture that fries up crispy. Gently pat the flour on and let the irregular bits stay.
- Using wet chicken in the breading station: Shake off excess buttermilk before the flour coat. Too much liquid creates a gummy paste instead of a dry, craggy crust.
Frequently Asked Questions
How do you keep fried chicken strips crispy after cooking?
Place them on a wire rack in a 200°F oven. Never cover them or pile them on top of each other — trapped steam is the fastest way to turn crispy breading soft. The wire rack keeps air circulating on all sides.
Can you make fried chicken strips without buttermilk?
Mix 1 cup of regular milk with 1 tablespoon of white vinegar or lemon juice and let it sit for 5 minutes. This creates a quick buttermilk substitute that provides similar tenderizing and adhesion properties for the breading.
What oil temperature is best for frying chicken strips?
350°F is the ideal frying temperature. Use a clip-on thermometer to monitor the oil and maintain temperature throughout cooking. Add strips in small batches to avoid temperature drops that cause greasy, undercooked results.
How long do you fry chicken strips?
At 350°F, strips pounded to 1/2-inch thickness take 3-4 minutes per side for a total of 6-8 minutes. Always confirm doneness with an instant-read thermometer — the internal temperature must reach 165°F.
Can you bake instead of fry chicken strips?
Coat the strips with panko breadcrumbs, spray generously with cooking oil, and bake at 425°F on a wire rack set over a sheet pan. Flip once at the halfway point. Total baking time is 18-22 minutes until golden and cooked through to 165°F.
Why is my breading falling off the chicken?
The chicken was too wet, or you skipped the initial flour coat. Dry the chicken thoroughly, coat in flour first (this gives the buttermilk something to grip), then dip in buttermilk, then flour again. Press gently — do not squeeze.
Can you fry frozen chicken strips?
Not recommended for homemade breaded strips — the ice crystals cause dangerous oil splatter and the breading will not cook evenly. Thaw completely and pat dry before breading and frying. Store-bought frozen strips are pre-cooked and can be fried from frozen per package directions.
How do you reheat fried chicken strips?
Reheat in a 375°F oven on a wire rack for 8-10 minutes until crispy and heated through to 165°F per USDA FSIS leftovers guidelines. Avoid the microwave — it makes the breading soggy.
Final Thoughts on Perfect Fried Chicken Strips
Mastering how to make fried chicken strips is a rewarding kitchen skill. By focusing on the fundamentals—even thickness, a proper buttermilk and flour breading, precise oil temperature control, and draining on a wire rack—you can consistently produce crispy, juicy results that rival any restaurant. Grab your favorite dipping sauce and enjoy the perfect crunch.
Crispy Fried Chicken Strips
Equipment
- Cast iron skillet or Dutch oven
- Deep-fry thermometer
- Wire rack and sheet pan
- Tongs
- Shallow breading dishes
Ingredients
Chicken
- 1 1/2 lb boneless skinless chicken breasts or chicken tenders cut into 1-inch strips and pounded to 1/2-inch thickness
- 1 1/2 cups buttermilk for soaking and dredging
Seasoned Flour
- 2 cups all-purpose flour divided between breading dishes if desired
- 2 tbsp cornstarch for extra crispness
- 2 tsp kosher salt plus more to taste after frying
- 1 tsp black pepper freshly ground
- 1 tsp garlic powder
- 1 tsp onion powder
- 1 tsp paprika smoked paprika works well
- 1/4 tsp cayenne pepper optional
For Frying
- 4 cups canola, vegetable, or peanut oil enough for about 1 inch in the pan
Instructions
- Cut chicken breasts lengthwise into 1-inch strips, or use pre-cut tenders. Pound each strip between plastic wrap to an even 1/2-inch thickness so the pieces cook at the same rate.
- Place the chicken in a bowl with the buttermilk and refrigerate for at least 30 minutes, or up to 4 hours for a more tender texture.
- Whisk the flour, cornstarch, salt, pepper, garlic powder, onion powder, paprika, and cayenne in a shallow dish. Pour extra buttermilk into a second shallow dish if using a separate dredge.
- Dredge each chicken strip in seasoned flour, dip it back through buttermilk, then coat it in seasoned flour again. Let the breaded strips rest on a wire rack for 10 minutes so the coating hydrates and sticks.
- Heat 1 inch of oil in a cast iron skillet or Dutch oven to 350°F. Use a thermometer to keep the oil close to that temperature throughout frying.
- Fry the chicken in small batches for 3 to 4 minutes per side, or 6 to 8 minutes total, until the coating is deep golden and the thickest part reaches 165°F.
- Transfer the strips to a wire rack set over a sheet pan. Season lightly while hot and rest for 3 to 5 minutes before serving with your favorite dipping sauce.
Notes
Contents
- Essential Ingredients and Equipment
- Choosing and Preparing the Chicken
- The Perfect Breading Station
- Oil Temperature and Frying Technique
- How to Know When Chicken Strips Are Done
- The Drain and Rest Step
- Dipping Sauce Pairings
- Common Mistakes That Ruin Crispy Chicken Strips
- Frequently Asked Questions
- Final Thoughts on Perfect Fried Chicken Strips
- Crispy Fried Chicken Strips