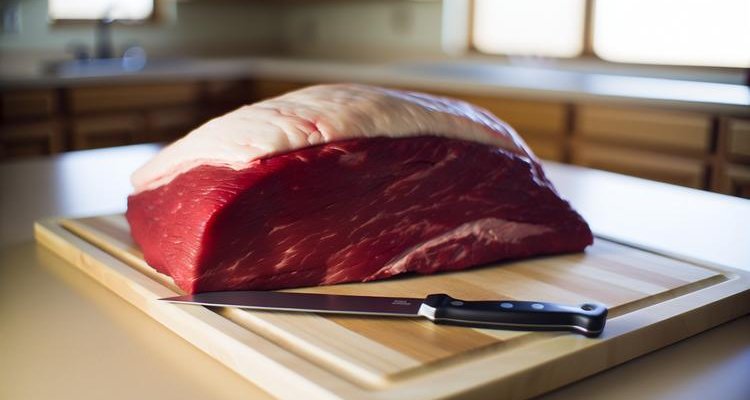
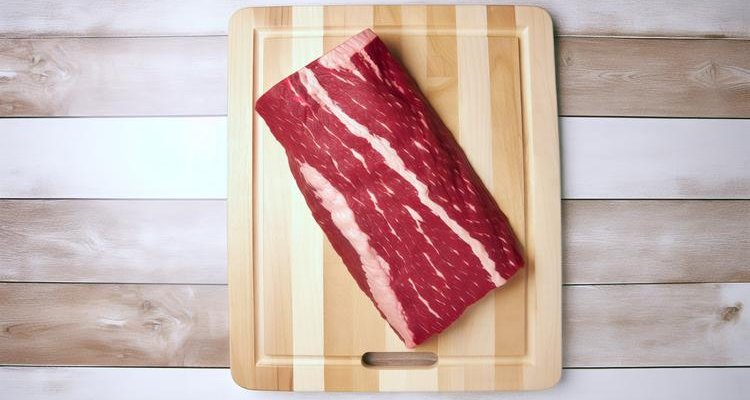
If you’ve ever stood at the meat counter staring at a massive, untrimmed whole packer brisket, you know the feeling. This expensive cut of meat is intimidating—especially when you realize you’re supposed to take a knife to it before it even hits the smoker. One wrong move and you could ruin 15 pounds of premium beef.
But here’s the truth: proper trimming is what separates good brisket from great brisket. When you trim correctly, you create the perfect canvas for smoke penetration, ensure even cooking, and develop that coveted mahogany bark everyone loves. In this comprehensive guide, you’ll learn exactly how to trim a brisket like a pitmaster—from understanding the anatomy to mastering different trimming styles.
Whether you’re a complete beginner or looking to refine your technique, this guide will walk you through every cut, every decision, and every pro tip you need to confidently prepare your brisket for the smoker.
Understanding Brisket Anatomy
Before you make the first cut, you need to understand what you’re working with. A whole packer brisket isn’t just a single piece of meat—it’s a complex structure of two distinct muscles, layers of fat, connective tissue, and membranes. Knowing these components transforms trimming from guesswork into a methodical process.
What is a Brisket?
Brisket comes from the breast area of the cow, located just below the chuck and above the plate. Because this muscle supports about 60% of the cow’s body weight, it’s naturally tough and filled with connective tissue. This is why brisket requires low and slow cooking—the long smoking process breaks down that tough collagen into tender, juicy gelatin.
When you learn more about brisket cuts, you’ll discover that this cut’s unique composition makes it ideal for BBQ. The combination of lean meat and fat creates incredible flavor when smoked properly.
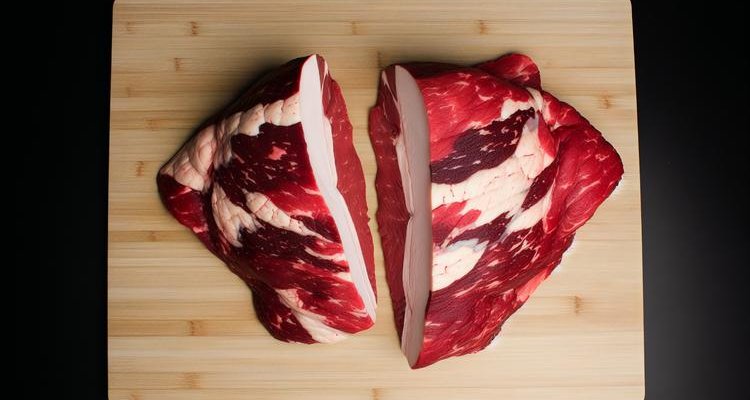
The Two Main Muscles: Flat and Point
A whole packer brisket contains two distinct muscles that serve different purposes in the final cook:
The Flat (First Cut)
The flat is the larger, leaner portion with a rectangular shape. Technically called the deep pectoral muscle, it sits on the interior surface closest to the cow’s ribcage. The flat is what most people slice for traditional brisket servings. It has less marbling than the point, which means it can dry out if over-trimmed or overcooked.
The Point (Second Cut)
The point sits on top of the flat and is significantly fattier with beautiful marbling throughout. This smaller, thicker muscle (the superficial pectoral) is what pitmasters use for burnt ends. The extra fat content makes the point more forgiving during the cook and creates those rich, caramelized chunks everyone fights over.
Key Anatomical Features to Know
Understanding these features will guide every cut you make:
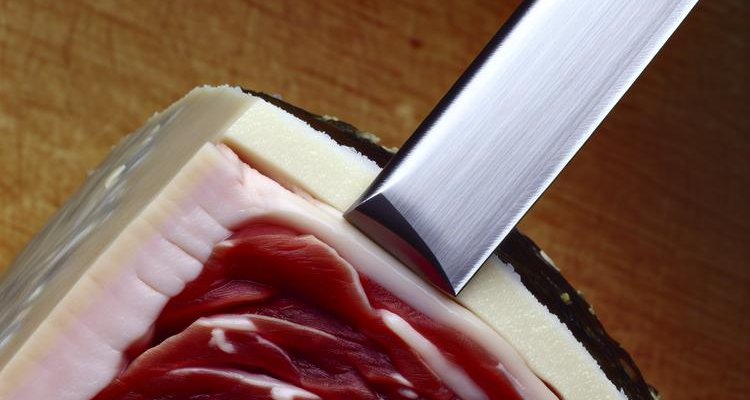
- Fat Cap: The thick layer of external fat covering one side of the brisket. This can range from 1/2 inch to over an inch thick on untrimmed briskets. Your job is to reduce this to about 1/4 inch.
- Deckle: The thick seam of fat and connective tissue running between the point and flat. It includes hard fat, rubbery membranes, and intercostal meat. Hard portions must be removed, but you don’t separate the muscles completely.
- Silverskin/Membrane: A thin, translucent membrane on the meat side that looks silvery. This must be completely removed as it blocks smoke and seasoning penetration.
- Grain Direction: The muscle fibers run lengthwise down the flat but almost perpendicular in the point. Understanding grain direction now helps you slice correctly after cooking.
| Part | Location | Purpose | Trim or Keep? |
|---|---|---|---|
| Fat Cap | Top surface | Moisture & rendering | Trim to 1/4″ |
| Deckle | Between point/flat | Connective tissue | Remove hard portions |
| Silverskin | Meat side | Membrane | Remove completely |
| Point | Fatty end | Marbling & fat | Shape & trim |
| Flat | Lean end | Main slicing muscle | Shape edges |
Why Trimming a Brisket Matters
You might be tempted to skip trimming and just throw your brisket on the smoker. After all, won’t the fat render anyway? Unfortunately, no. Improper trimming leads to mediocre brisket, and here’s why the extra 20 minutes of knife work makes all the difference.
Smoke Penetration
Thick fat acts like a barrier. When you leave a 3/4-inch or thicker fat cap, smoke can’t reach the meat underneath. The fat might render down slightly, but it happens too late in the cook to allow proper smoke absorption. Trimming to 1/4 inch creates the sweet spot—enough fat for moisture and flavor, but thin enough for smoke to penetrate the meat itself.
This is especially critical if you’re aiming for that signature smoke ring and deep smoke flavor. Over-trimming exposes too much meat and can lead to dryness, but leaving too much fat blocks everything that makes smoked brisket special.
Even Cooking
An untrimmed brisket has wildly varying thickness. Thin edges cook faster and can burn before the thick center reaches tender. Thick fat deposits insulate certain areas, creating hot and cold spots that result in inconsistent texture.
By trimming to uniform thickness and removing hard fat deposits, you create a brisket that cooks evenly from edge to edge. This means no burnt corners and no undercooked sections—just consistent, tender meat throughout.
Bark Formation
The bark—that dark, flavorful crust—forms when smoke, rub, and rendered fat interact with exposed meat. Fat doesn’t develop bark; only meat does. When you trim properly, you expose more meat surface area for bark development while still maintaining enough fat for moisture.
Think of trimming as sculpting your brisket for maximum bark potential. Every inch of exposed meat becomes an opportunity for flavor development.
Essential Tools for Trimming Brisket
The right tools make trimming faster, safer, and more precise. While you can technically trim a brisket with any sharp knife, having the proper equipment dramatically improves your results.
The Right Knife
Your knife choice makes or breaks the trimming experience. Here’s what works best:
Best Choice: 6-8 Inch Boning or Fillet Knife
A curved blade follows the natural contours of the brisket, making it easy to slide under fat and membrane. The sharp, pointed tip can get into tight spaces around the deckle. The flexibility of a boning knife gives you control for precise cuts without gouging the meat underneath.
If you’re serious about brisket, invest in a quality knife. Check out our guide to the best brisket knives for detailed recommendations on professional-grade options.
Acceptable Alternative: Sharp Chef’s Knife
A chef’s knife works but takes more effort. The straighter blade makes it harder to follow curves, and you’ll spend more time making multiple passes to achieve smooth cuts.
Critical Requirement: Razor-Sharp Blade
Regardless of which knife you choose, it must be razor-sharp. A dull knife slips, requires excessive pressure, and creates ragged cuts. More importantly, dull knives are dangerous—they require more force and are more likely to slip and cause injury.
Other Equipment Needed
- Extra-Large Cutting Board: Briskets are huge (12-18 pounds). A standard cutting board won’t cut it. Use your largest board or place parchment paper over your counter.
- Nitrile Gloves (Optional): Some pitmasters prefer gloves for better grip and easier cleanup. Not required, but helpful.
- Bowl for Trimmings: Save that fat! You’ll render it into beef tallow—superior to butter for high-heat cooking and perfect for frying potatoes.
- Good Lighting: Overhead lighting helps you see exactly what you’re cutting. Natural daylight is ideal.
Pro Tip: Keep It Cold
Here’s a game-changer: trim your brisket straight from the refrigerator or after 20 minutes in the freezer. Cold fat is firm and easy to cut cleanly. Warm fat becomes sticky, soft, and nearly impossible to trim precisely. It’ll gum up your knife and create frustration.
If your brisket has been sitting at room temperature, put it back in the fridge for 30 minutes before trimming. This small step makes the entire process smoother and faster.
Step-by-Step Brisket Trimming Guide
Now for the main event. Follow these seven steps methodically, and you’ll transform that intimidating slab of meat into a perfectly prepared brisket ready for the smoker.
Step 1: Prepare Your Brisket
Remove the brisket from its packaging and pat it completely dry with paper towels. Excess moisture makes the surface slippery and harder to work with. Orient the brisket with the fat cap facing up—this is typically the smoother side with thick white fat.
Before making any cuts, take 30 seconds to survey the landscape. Identify the point (thicker, fattier end), the flat (leaner, rectangular end), and any obvious hard fat deposits. This mental mapping helps you plan your approach.
Step 2: Trim the Underside (Meat Side)
Flip the brisket so the fat cap is down and the meat side is up. You’ll see a thin, silvery membrane called silverskin covering portions of the meat. This must be completely removed.
Why? Silverskin doesn’t break down during cooking. It blocks seasoning penetration and creates chewy sections in your finished brisket.
How to Remove It:
- Use your knife tip to get under the edge of the membrane
- Angle the blade slightly upward to avoid cutting into the meat
- Pull the membrane away in strips while using the knife to separate it
- Trim any hard fat pockets on the underside as well
Work slowly and carefully. It’s okay if small bits of silverskin remain—you’re aiming for 95% removal, not surgical perfection.
Step 3: Square the Brisket (Optional but Recommended)
Look at the edges of your brisket. You’ll likely see thin flaps of meat that taper to almost nothing. These thin edges will burn during your 12+ hour cook, creating bitter, inedible sections.
Trim about 1/4 inch from each side to create a more uniform rectangular shape. Remove any extremely thin portions. This also helps you visualize the brisket’s shape and curvature for the next steps.
Don’t go overboard—you’re just removing the thinnest edges, not creating a perfect rectangle.
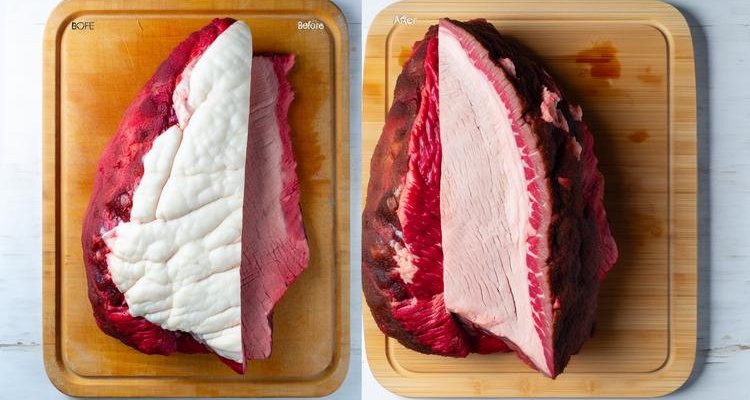
Step 4: Trim the Fat Cap
This is the most important step. Flip the brisket back over so the fat cap faces up.
Target Thickness: 1/4 Inch
Think of two quarters stacked—that’s your goal. This thickness allows the fat to render and baste the meat while permitting smoke penetration.
Technique
- Use long, sweeping strokes with your knife rather than short, choppy cuts
- Follow the natural curvature of the meat underneath—don’t try to make the surface flat
- Trim in thin layers. You can always remove more; you can’t put it back
- If you see red meat, stop immediately—you’ve gone too deep
- Look at the brisket from the side to gauge fat thickness as you work
Work in sections rather than trying to trim the entire fat cap in one pass. Start at one end and work methodically toward the other. Don’t rush this step—it’s where most mistakes happen.
Step 5: Remove Hard Fat
Not all fat is created equal. As you trim, you’ll encounter two types:
- Soft, Creamy Fat: This renders beautifully during the cook. Keep this.
- Hard, Waxy Fat: This doesn’t render even after 14 hours of smoking. Remove it completely.
Feel the fat with your non-knife hand. Hard fat feels firm and waxy, almost like cold butter straight from the fridge. You’ll typically find it near the deckle area and on the edges of the point.
Dig your knife under these hard deposits and remove them entirely. These sections won’t contribute to flavor or moisture—they’ll just create unpleasant, chewy bits in your finished brisket.
Step 6: Trim the Deckle
The deckle is the thick seam of fat running between the point and flat. Locate it by gently pulling the point away from the flat—you’ll see the deckle in the gap.
You want to remove thick, rubbery portions of deckle fat, but don’t separate the point from the flat. The two muscles should remain connected throughout the cook (unless you’re specifically making burnt ends, which is a different process).
Trim away obvious hard fat chunks and create a smoother transition between point and flat. This helps the entire brisket cook more uniformly.
Step 7: Shape and Round Edges
Take a final look at your brisket. Are there any sharp corners or edges? Round them off. Sharp edges and corners burn easily during long cooks.
Think “aerodynamic” shape—smooth, rounded contours without abrupt angles. Trim any remaining thin flaps or pieces that don’t fit the overall shape.
Do a final quality check: Is your fat cap roughly 1/4 inch throughout? Is the underside free of silverskin? Have you removed hard fat deposits? If yes to all three, you’re ready to season and smoke.
Common Trimming Mistakes to Avoid
- Over-trimming: Removing too much fat leads to dry brisket. If you expose large sections of red meat, you’ve gone too far.
- Under-trimming: Leaving fat thicker than 1/2 inch means it won’t render properly and will block smoke.
- Uneven Fat Cap: Leaving thick spots in some areas and thin spots in others creates hot and cold zones during cooking.
- Forgetting the Underside: Many beginners only trim the fat cap and completely ignore the membrane on the meat side.
- Not Saving Trimmings: That’s 1-2 pounds of valuable beef fat perfect for rendering into tallow.
Different Brisket Trimming Styles
There’s no single “correct” way to trim a brisket. Different competition circuits, restaurants, and pitmasters use varying approaches based on their goals and cooking methods.
| Style | Fat Cap Thickness | Point Trimming | Best For | Difficulty Level |
|---|---|---|---|---|
| Competition Trim | 1/8″ | Heavily trimmed, squared | KCBS competitions | Advanced |
| Aaron Franklin Style | 1/4″ | Moderate, shaped | Restaurant-quality | Intermediate |
| Home Cook Trim | 1/4″ – 1/2″ | Light trim | Backyard smoking | Beginner-friendly |
| Minimal Trim | 1/2″+ | Very light | Longer cooks, moisture | Beginner |
Competition Style Trim
Competition pitmasters trim aggressively—sometimes down to 1/8 inch fat cap or less. They heavily square the brisket, remove almost all visible fat from the point, and create near-perfect presentation. This style prioritizes appearance and bark development over moisture insurance.
Pros: Maximum bark, impressive presentation, excellent smoke penetration
Cons: Requires skill and practice, higher risk of drying out, less forgiving
Don’t attempt this style until you’ve successfully cooked several briskets using more forgiving methods.
Aaron Franklin Style
This is the gold standard for most serious home pitmasters. Franklin’s approach balances protection (enough fat for insurance) with penetration (thin enough for smoke and bark development). The fat cap stays around 1/4 inch, and the brisket is shaped for clean, professional appearance while remaining approachable for skilled home cooks.
Pros: Excellent balance, beautiful results, forgiving enough for intermediates
Cons: Still requires practice and a sharp knife
This is our recommended starting point once you’ve completed one or two successful cooks.
Home Cook Trim
This beginner-friendly approach leaves fat thickness between 1/4 and 1/2 inch, providing extra insurance against drying. Shaping is simpler and less precise. You’ll still remove silverskin and hard fat, but you’re more conservative with overall fat removal.
Pros: More forgiving, less intimidating, still produces excellent results
Cons: Slightly less bark development, may need to remove unrendered fat when serving
Minimal Trim
Some pitmasters barely trim at all, especially for very long cooks (14+ hours). They remove silverskin and the hardest fat deposits but leave most of the fat cap intact.
Pros: Maximum moisture insurance, extremely forgiving
Cons: Less bark, requires longer rendering time, may have unrendered fat to trim when serving
Which Style Should You Choose?
Consider these factors:
- Beginners: Start with Home Cook Trim (1/4″ – 1/2″ fat cap). The extra insurance helps while you learn temperature control.
- Experienced Cooks: Progress to Franklin Style for optimal results. Once you trust your process, try Competition Trim.
- Long Cooks (12+ hours): Leave more fat for moisture insurance during extended cooking.
- Hot and Fast (250-275°F): Trim closer to 1/4″ since shorter cook time means less fat rendering.
Understanding Grain Direction
Grain direction might seem like an advanced topic, but understanding it now—before you cook—pays dividends when it’s time to slice. The muscle fibers in brisket run in specific directions, and cutting against these fibers is the difference between tender slices and chewy, stringy meat.
Why Grain Direction Matters
Muscle fibers are like bundles of long strings held together. When you cut parallel to these fibers (with the grain), you’re leaving those long strings intact—creating chewy bites that require excessive chewing. When you cut perpendicular to the fibers (against the grain), you’re cutting those strings into short segments that fall apart tender.
This principle applies to all meat, but it’s especially critical for brisket due to the long muscle fibers and extended cooking time.
Grain Direction in the Flat
The flat’s grain runs lengthwise—from the point end toward the flat end. Look at the raw meat surface and you’ll see parallel lines running the length of the muscle. These are the fiber bundles.
When you slice a cooked flat, you’ll cut perpendicular to these lines, creating slices that fall apart tender. It’s relatively straightforward because the grain direction is consistent throughout the flat.
Grain Direction in the Point
Here’s where it gets interesting: the point’s grain runs almost perpendicular to the flat’s grain—roughly 90 degrees different. This is why experienced pitmasters separate the point from the flat after cooking. Each muscle needs to be sliced in a different direction.
If you try to slice a whole brisket without separating the muscles, you’ll either slice with the grain on the flat or with the grain on the point. One section will be tough regardless of how perfectly you cooked it.
How to Identify the Grain
Look for parallel lines running through the meat. They’re more visible on the meat side (after removing silverskin) than on the fat side. If you’re having trouble seeing grain direction, make a small test cut—the muscle fibers will be obvious in the cross-section.
Some pitmasters mark the grain direction with a small cut or toothpick before applying rub, ensuring they remember the correct slicing direction after the 12+ hour cook.
What to Do With Brisket Trimmings
An average 14-pound whole packer brisket yields 1 to 1.5 pounds of trimmings—and that’s liquid gold for BBQ enthusiasts. Don’t throw it away!
Save That Fat!
The majority of your trimmings are fat, and beef fat is incredibly versatile. Render it into beef tallow by heating it slowly in a pot until the fat melts and the solids separate. Strain out the solids, and you’re left with pure, shelf-stable beef tallow.
Uses for Beef Tallow:
- Frying potatoes (makes the crispiest fries you’ve ever tasted)
- High-heat searing for steaks
- Adding richness to soups and stews
- Coating cast iron cookware for seasoning
Beef tallow has a higher smoke point than butter, making it superior for high-heat cooking. Store it in the refrigerator for up to 6 months or freeze for up to a year.
Meat Trimmings
The small bits of meat trimmed from edges have several uses:
- Grind for Burgers: Mix them with additional beef fat for incredibly rich, flavorful burger meat
- Season and Smoke: Toss them with rub and smoke alongside your brisket for “poor man’s burnt ends”
- Add to Ground Beef: Mix into store-bought ground beef to add depth and smokiness to meatloaf or meatballs
Frequently Asked Questions
Do you have to trim a brisket?
Yes, for best results. Untrimmed brisket has too much fat that won’t render properly, which blocks smoke penetration and seasoning. While you can technically smoke an untrimmed brisket, you’ll end up with unrendered fat cap, limited bark development, and less smoke flavor. The 20 minutes spent trimming dramatically improves your final results.
How much fat should I leave on a brisket?
Leave approximately 1/4 inch of fat cap—about the thickness of two quarters stacked together. This provides sufficient moisture and fat rendering without blocking smoke penetration. Beginners can safely leave up to 1/2 inch for extra insurance while learning temperature control.
What’s the best knife for trimming brisket?
A 6-8 inch boning knife or fillet knife with a curved blade works best. The curved blade follows the brisket’s natural contours, and the sharp tip navigates tight spaces easily. A quality chef’s knife is an acceptable alternative, though it requires more effort. The most critical factor is sharpness—a dull knife is both dangerous and ineffective. For specific recommendations, check out our guide to the best brisket knives.
Can I trim a brisket the night before cooking?
Yes! Trimming the night before and refrigerating uncovered is actually beneficial. The exposed meat surface develops a tacky layer called a pellicle, which helps smoke adhere and promotes better bark formation. Just make sure to pat the surface dry before applying your rub.
Should I remove all the fat from a brisket?
No—you need some fat for moisture, flavor, and protection during the long cook. Remove hard, waxy fat deposits that won’t render, but preserve the soft fat cap at 1/4 inch thickness. Complete fat removal leads to dry, tough brisket. The key is balance: enough fat for protection and flavor, but not so much that it blocks smoke and prevents bark development.
Which way does the grain run on a brisket?
The grain runs lengthwise down the flat (from point to flat end) but nearly perpendicular in the point. They run roughly 90 degrees to each other, which is why you separate the point from the flat after cooking. Each muscle is then sliced perpendicular to its own grain direction for maximum tenderness.
What is the deckle on a brisket?
The deckle is the thick layer of fat, connective tissue, and intercostal meat between the point and flat muscles. It contains both soft renderable fat and hard, rubbery portions. When trimming, remove the hardest sections of deckle while maintaining the connection between point and flat. You don’t want to separate the two muscles during trimming (unless specifically making burnt ends).
How long does it take to trim a brisket?
For first-timers, expect 20-30 minutes. With practice and a sharp knife, you can trim a brisket in 10-15 minutes. Don’t rush—it’s better to take your time and trim correctly than to hurry and make costly mistakes. As you gain experience, you’ll develop muscle memory and work faster naturally.
Should you trim brisket cold or at room temperature?
Always trim cold—straight from the refrigerator or after 20 minutes in the freezer. Cold fat is firm and slices cleanly. Warm fat becomes sticky and nearly impossible to trim precisely. If your brisket has been sitting at room temperature, return it to the fridge for 30 minutes before trimming.
Can you over-trim a brisket?
Absolutely. Removing too much fat leads to dry, tough meat because there’s insufficient fat for moisture during the long cook. If you see large sections of red meat (except on the underside after removing silverskin), you’ve trimmed too aggressively. The fat cap should never be completely removed—always maintain at least 1/8 to 1/4 inch coverage.
What’s the difference between trimming a flat and a whole packer?
A whole packer brisket has both the flat and point attached, requiring more comprehensive trimming including fat cap reduction, deckle trimming, and point shaping. A pre-separated flat sold alone still needs fat cap trimming and membrane removal but requires significantly less work overall. Whole packers offer better value and the option to make burnt ends, but flats are more beginner-friendly.
Do competition pitmasters trim differently?
Yes—competition trimming is far more aggressive. Competition pitmasters often reduce the fat cap to 1/8 inch or less, heavily square the brisket for presentation, and meticulously shape every surface. They prioritize appearance and bark development over moisture insurance. This approach requires significant skill and isn’t recommended for beginners. Home cooks should start with the more forgiving Franklin style or home cook trim before attempting competition-level trimming.
Final Tips for Success
You’re now equipped with everything you need to trim a brisket like a pro. Before you grab that knife, here are the essential takeaways to keep in mind:
Key Takeaways
- Keep your brisket cold while trimming—firm fat cuts cleanly and precisely
- Use a sharp knife—dull knives are dangerous and create messy, ragged cuts
- Trim to 1/4″ fat cap for the optimal balance of protection and smoke penetration
- Don’t rush—take your time and make deliberate cuts rather than hacking away
- Save your trimmings for beef tallow and other uses—they’re too valuable to waste
- Practice makes perfect—your first trim won’t be perfect, and that’s okay
Next Steps After Trimming
Now that your brisket is perfectly trimmed, here’s what comes next:
- Season immediately with your rub, or refrigerate uncovered overnight for pellicle formation
- Plan your smoking schedule—a 12-14 pound trimmed brisket takes 10-14 hours at 225-250°F
- Prepare your smoker and ensure you have enough fuel for the long cook
- Review how to smoke brisket for complete cooking guidance
- Learn about wrapping your brisket during the cook for optimal results
Conclusion
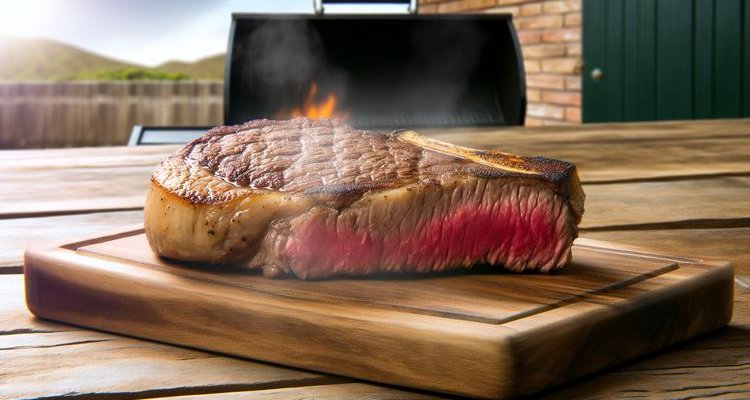
Proper brisket trimming transforms good BBQ into great BBQ. By understanding the anatomy, mastering the essential techniques, and avoiding common mistakes, you’ve taken the first critical step toward competition-quality brisket. The 20 minutes you invest in trimming pays dividends in smoke penetration, even cooking, and that incredible bark everyone craves.
Start conservatively with your first few briskets—leave a slightly thicker fat cap until you’re confident in your temperature control. As you gain experience, you can progressively trim more aggressively. Remember: you can always remove more fat, but you can’t put it back.
The effort is absolutely worth it. There’s nothing quite like slicing into a perfectly smoked brisket, seeing that smoke ring, and watching your guests’ faces when they taste the result of your careful preparation. Now get that brisket trimmed and onto the smoker—your best BBQ yet is waiting!
Contents