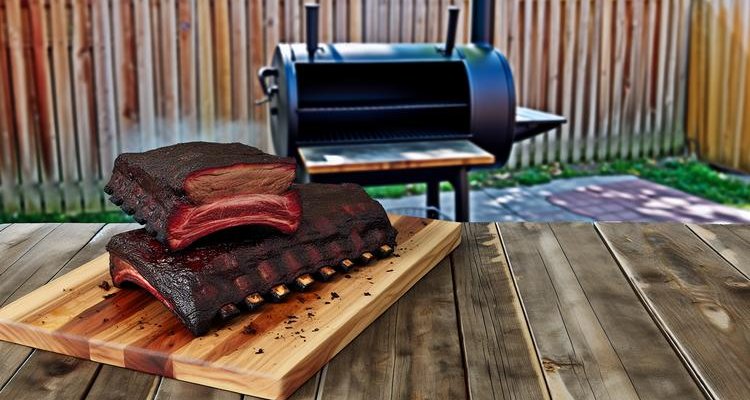
Few things impress at a holiday gathering or special celebration quite like a perfectly smoked prime rib. This luxurious cut of beef, when prepared with the low-and-slow smoking method, transforms into a melt-in-your-mouth masterpiece that rivals any high-end steakhouse. The beauty of smoking prime rib lies in the way smoke penetrates the richly marbled meat, creating complex flavors while the gentle heat renders the fat into buttery perfection.
In this comprehensive guide, you’ll learn everything you need to know about smoking prime rib—from selecting the perfect roast at your local butcher to carving restaurant-quality slices for your guests. We’ll cover the science behind temperature control, the art of achieving that coveted smoke ring, and the critical timing that separates good prime rib from extraordinary prime rib.
Why choose smoking over traditional oven roasting? Smoking adds depth of flavor that simply can’t be replicated indoors. The gentle, indirect heat allows the fat to render slowly while keeping the meat incredibly tender. You’ll achieve a perfectly seasoned crust, a beautiful pink smoke ring just beneath the surface, and a juicy, medium-rare center that’s consistent from edge to edge.
Understanding Prime Rib: What Makes This Cut Special
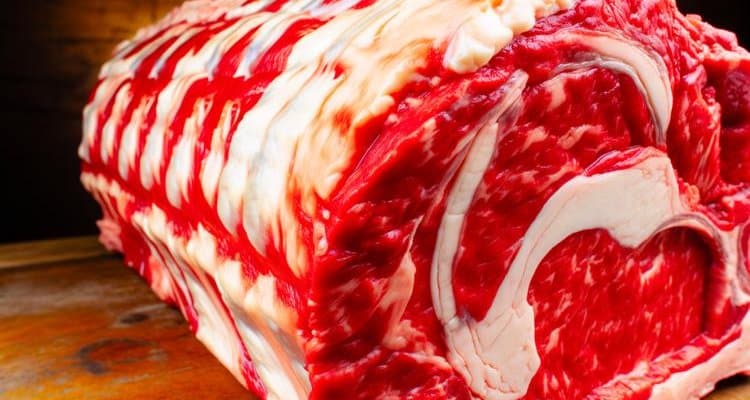
Prime rib comes from the primal rib section of beef, specifically ribs six through twelve. This premium cut is also known as a standing rib roast when bone-in, or simply a ribeye roast when deboned. The name “prime rib” can be slightly confusing—it refers both to the cut’s location (the primal rib section) and potentially to the USDA Prime grade, though you can purchase prime rib in Choice or Select grades as well.
What sets prime rib apart from other beef cuts is its extraordinary marbling—those white flecks of intramuscular fat running throughout the meat. This marbling is what makes prime rib so forgiving to cook and incredibly flavorful. As the roast smokes, this fat slowly melts, basting the meat from within and creating that signature tenderness and rich, beefy flavor.
Prime Rib vs. Ribeye Roast: What’s the Difference?
The terms “prime rib” and “ribeye roast” are often used interchangeably, and in many cases, they refer to the same cut. The main distinction is that “prime rib” traditionally implies a bone-in roast, while “ribeye roast” can be either bone-in or boneless. Functionally, they’re cut from the same section of the cow and offer the same marbling and flavor profile.
| Feature | Bone-In Prime Rib | Boneless Prime Rib |
|---|---|---|
| Flavor | Bones add depth and richness during cooking | Excellent beef flavor, slightly less complex |
| Moisture Retention | Bones help insulate meat, keeping it juicier | Still very juicy with proper technique |
| Carving | Requires removing bones first, slightly more work | Much easier to slice into uniform portions |
| Presentation | Dramatic, traditional presentation with bones | Clean, elegant slices |
| Cooking Time | Slightly longer due to bone mass | Cooks marginally faster and more evenly |
The bone-in option is preferred by traditionalists and those who want maximum flavor, while boneless works beautifully for easier serving and consistent cooking throughout. For smoking specifically, bone-in roasts benefit from the bones acting as a natural heat shield, protecting the meat closest to them from overcooking.
Selecting Your Prime Rib: Quality Indicators and Sizing
Choosing the right prime rib is the foundation of your success. The quality of your raw meat will directly impact the final result, so it’s worth investing time in selecting the best roast you can find.
Where to Buy
Your best options for sourcing quality prime rib include:
- Local Butcher or Meat Market: Butchers can cut a roast to your exact specifications, provide expert advice, and often source higher-quality beef than grocery stores. They can also trim and tie the roast for you.
- Farmers Markets: For locally raised, often grass-fed or grain-finished beef with exceptional flavor.
- Warehouse Clubs (Costco, Sam’s Club): Excellent for USDA Prime grade at competitive prices, especially during holiday seasons.
- High-End Grocery Stores: Stores like Whole Foods typically carry Prime and upper-Choice grades.
USDA Grades and What to Look For
Understanding beef grading helps you make informed decisions. The USDA beef grading system evaluates marbling and maturity:
- USDA Prime: The highest grade with abundant marbling (8-10% intramuscular fat). Prime represents only about 2% of all beef and delivers exceptional tenderness, juiciness, and flavor. This is your best choice for smoking if budget allows.
- USDA Choice: Very good marbling (4-7% intramuscular fat) and excellent quality. Upper Choice grades approach Prime quality and work beautifully for smoking at a more accessible price point.
- USDA Select: Moderate marbling (2-4% intramuscular fat). While leaner and more affordable, Select grade is less forgiving during smoking and can become dry if overcooked.
When examining a prime rib roast, look for:
- Bright red color: Fresh beef should be cherry red, not brown or gray
- Creamy white fat: Fat should be white or cream-colored, not yellow (which indicates older beef)
- Abundant marbling: Look for white specks throughout the meat, not just around the edges
- Good fat cap: A ¼ to ½ inch layer of external fat helps protect the meat during smoking
- No off odors: Fresh beef should have a clean, slightly metallic smell
Sizing Guide: How Much Prime Rib Do You Need?
| Number of Ribs | Approximate Weight | People Served | Notes |
|---|---|---|---|
| 2 ribs | 4-5 lbs | 4-5 people | Minimum size for smoking, cooks faster |
| 3 ribs | 6-8 lbs | 6-8 people | Ideal for small gatherings |
| 4 ribs | 8-10 lbs | 8-10 people | Most popular size for holiday meals |
| 5-7 ribs | 10-16 lbs | 12-16 people | Large roast for big gatherings, requires longer cooking |
Plan on approximately ¾ to 1 pound per person for bone-in prime rib, or ½ pound per person for boneless. These portions account for bone weight and some waste, ensuring everyone gets a generous serving with potential leftovers.
Equipment You’ll Need for Smoking Prime Rib
Having the right tools makes smoking prime rib significantly easier and more reliable. While you don’t need an arsenal of gadgets, a few key pieces of equipment will dramatically improve your results.
Smoker Types
Prime rib can be successfully smoked on virtually any type of smoker:
- Pellet Grills: Excellent temperature stability and convenience with automatic pellet feeding. Set-and-forget operation makes these ideal for beginners. If you’re new to pellet grilling, check out our BBQ and grilling guide for beginners.
- Offset Smokers: Traditional stick-burners provide authentic smoke flavor but require more attention to maintain steady temperatures. Learn more in our guide to the best offset smokers.
- Electric Smokers: Extremely consistent temperatures with minimal effort, though some purists prefer the flavor from wood or charcoal.
- Kamado Grills (Big Green Egg, Kamado Joe): Superior heat retention and fuel efficiency, excellent for low-and-slow cooking.
- Kettle Grills (Weber): With indirect heat setup, these can absolutely smoke a prime rib, though they require more monitoring.
Essential Tools
Reliable Meat Thermometer: This is non-negotiable. A wireless meat thermometer allows you to monitor internal temperature without opening the smoker, which is critical for maintaining consistent heat. Since prime rib can smoke for 3-5 hours, a leave-in probe thermometer saves you from constant checking.
Sharp Carving Knife: A long, thin slicing knife ensures clean cuts through the tender meat without tearing or shredding.
Roasting Pan or Drip Pan: Place this beneath the roast to catch drippings for au jus and to protect your smoker from grease buildup.
Heavy-Duty Aluminum Foil: For tenting the roast during its crucial resting period.
Kitchen Twine: If smoking a boneless roast, tying it ensures even thickness and uniform cooking.
Wood Selection for Prime Rib
Beef pairs best with medium-intensity woods that complement without overwhelming. Understanding wood pellet flavor profiles helps you make the right choice.
| Wood Type | Flavor Profile | Intensity | Best For |
|---|---|---|---|
| Oak | Classic, slightly sweet smoke | Medium | Traditional choice, versatile and reliable |
| Cherry | Mild, slightly fruity and sweet | Mild-Medium | Beautiful mahogany color, subtle flavor |
| Apple | Sweet, fruity, delicate | Mild | Excellent for those who prefer lighter smoke |
| Pecan | Rich, nutty, slightly sweet | Medium | Similar to hickory but less intense |
| Hickory | Strong, bacon-like, robust | Medium-Strong | Bold flavor lovers (use sparingly) |
| Mesquite | Intense, earthy, almost spicy | Very Strong | Generally too strong for prime rib |
Preparation Steps: Getting Your Prime Rib Ready
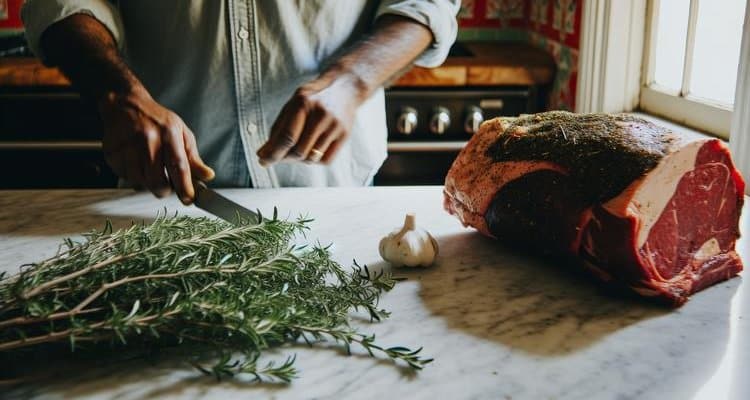
Trimming and Prep Work
Proper trimming ensures even cooking and prevents flare-ups from excess fat dripping onto your fire:
Trim the Fat Cap: While you want some fat for flavor and moisture, an excessively thick fat cap (over ½ inch) won’t render properly and can prevent smoke penetration. Trim down to about ¼ inch of fat, leaving enough to protect the meat but not so much that it stays rubbery.
Remove Silver Skin: If you notice any tough silver skin (connective tissue with a silvery sheen), carefully trim it away with a sharp knife. Unlike fat, silver skin doesn’t break down during cooking and will remain chewy.
Tie Boneless Roasts: If working with a boneless prime rib, tie it with kitchen twine at 2-inch intervals. This creates uniform thickness, ensuring the roast cooks evenly from end to end. Without tying, the thinner tail section will overcook while the thick center reaches target temperature.
Seasoning Options: From Simple to Complex
Prime rib’s rich flavor means it doesn’t need elaborate seasoning, though you have several excellent options:
Classic Salt and Pepper: The purist approach. Generously coat all surfaces with coarse kosher salt and freshly cracked black pepper. This allows the natural beef flavor and smoke to shine. Use about 1 tablespoon of salt and 1 tablespoon of pepper per 3-4 pounds of meat.
Traditional Herb Rub (Recommended):
- 5 tablespoons kosher salt
- 5 tablespoons freshly ground black pepper
- 4 tablespoons fresh thyme leaves, chopped
- 3 tablespoons fresh rosemary, finely chopped
- 6 cloves garlic, minced (optional)
Combine ingredients and press firmly into all surfaces of the meat. The herbs complement beef beautifully and create an aromatic crust.
Garlic and Herb Crust Variation: Mix the herb rub above with 2 tablespoons of olive oil to create a paste. This helps the seasonings adhere and creates an even more pronounced crust during the reverse sear.
Coffee-Crusted Option: For adventurous cooks, combine 3 tablespoons finely ground coffee with salt, pepper, and a tablespoon of brown sugar. The coffee adds earthy, complex notes that pair surprisingly well with beef.
Dry Brining: When to Season
For maximum flavor penetration and a better crust, apply your seasoning 8-24 hours before smoking—this is called dry brining. Salt draws moisture to the surface initially, then that moisture reabsorbs back into the meat along with the seasonings. Place the seasoned roast uncovered on a rack in your refrigerator. The air circulation dries the surface, which helps achieve a better crust when smoking.
If you’re short on time, season at least 1 hour before smoking. Avoid seasoning and immediately cooking—this is the worst timing, as salt draws moisture out but hasn’t had time for reabsorption.
Bringing to Room Temperature
Remove your prime rib from the refrigerator 1-2 hours before smoking. Bringing the meat closer to room temperature promotes more even cooking throughout. A cold roast straight from the refrigerator will cook unevenly—the exterior overcooks before the center reaches target temperature.
The Smoking Process: Step-by-Step to Perfection
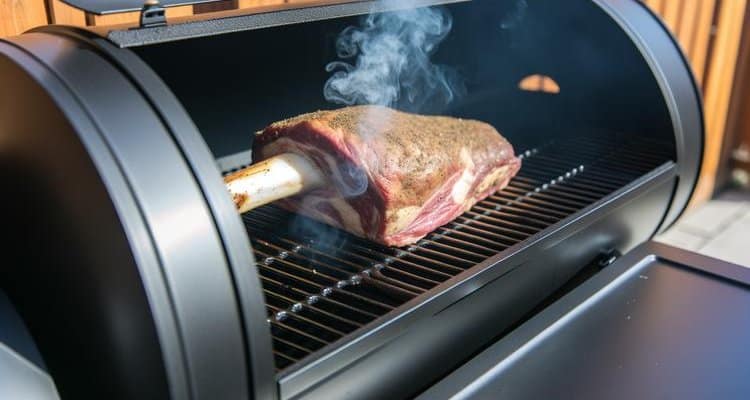
Smoker Setup
Preheat Your Smoker: Bring your smoker to a stable 225-250°F before adding the meat. Stability is key—you want consistent temperature throughout the cook, not fluctuations that lead to uneven results.
Add Your Wood: For a 4-6 hour smoke, you’ll need about 2-3 chunks of hardwood (for stick burners or charcoal smokers) or ensure your pellet hopper is full. You want visible smoke for the first 2-3 hours; after that, the meat won’t absorb much more smoke flavor.
Set Up Your Drip Pan: Place a disposable aluminum pan on the grate below where your roast will sit, or on the heat deflector. Add 1-2 cups of water, beef broth, or red wine. This catches drippings for au jus and adds moisture to the cooking environment.
Water Pan (Optional): Some smokers benefit from an additional water pan to stabilize temperature and add humidity. This isn’t necessary for prime rib, which has enough fat to stay moist, but it doesn’t hurt.
Placement and Initial Monitoring
Place your prime rib bone-side down (if bone-in) or fat-cap up (if boneless) directly on the grate. Insert your probe thermometer into the thickest part of the meat, making sure it’s in the center and not touching bone or fat.
Close the lid and resist the urge to check constantly. Every time you open the smoker, you lose heat and extend cooking time. Trust your thermometer and maintain patience—this is low-and-slow cooking, where time is your friend.
Smoking Time and Temperature Guidelines
The total cooking time depends on the roast’s weight, your smoker temperature, and how often you open the lid. Use these guidelines as starting points:
| Weight Range | Smoking Time at 225°F | Smoking Time at 250°F | Notes |
|---|---|---|---|
| 3-5 lbs (2 ribs) | 2-3 hours | 1.5-2.5 hours | Smaller roasts cook faster, monitor closely |
| 5-7 lbs (3 ribs) | 3-4 hours | 2.5-3.5 hours | Ideal size for consistent results |
| 7-10 lbs (4 ribs) | 4-5.5 hours | 3.5-4.5 hours | Most common holiday roast size |
| 10-14 lbs (5-6 ribs) | 5.5-7 hours | 4.5-6 hours | Large roasts benefit from lower temperatures |
For authentic smoked prime rib, stick with 225-250°F. This temperature range allows maximum smoke penetration while slowly rendering fat into the meat.
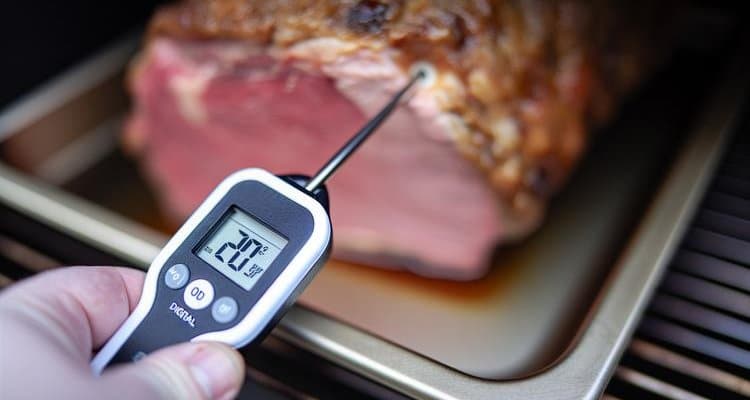
Internal Temperature Targets by Doneness
Here’s the critical part: you must pull your prime rib before it reaches final target temperature. Carryover cooking will raise the internal temperature another 10-15°F during resting.
| Doneness Level | Pull Temperature | Final Temperature (After Rest) | Description |
|---|---|---|---|
| Rare | 115-120°F | 125-130°F | Cool red center, very soft texture |
| Medium-Rare (Recommended) | 120-125°F | 130-135°F | Warm red center, perfectly tender |
| Medium | 130-135°F | 140-145°F | Pink center, slightly firmer |
| Medium-Well | 140-145°F | 150-155°F | Slight pink, noticeably firmer |
| Well Done | 150°F+ | 160°F+ | No pink, quite firm (not recommended) |
Maintaining Temperature and Smoke Quality
Throughout the smoke:
- Check your smoker temperature every 30-45 minutes (not the meat temperature—that changes slowly)
- Look for thin, blue smoke, not thick white billows. Thick smoke means incomplete combustion and can make the meat taste bitter. Thin, barely visible smoke is ideal.
- Adjust vents or burner settings as needed to maintain your target range. Small adjustments work better than drastic changes.
- Avoid opening the lid except to check temperature or adjust vents. “If you’re lookin’, you ain’t cookin'” is a barbecue truism.
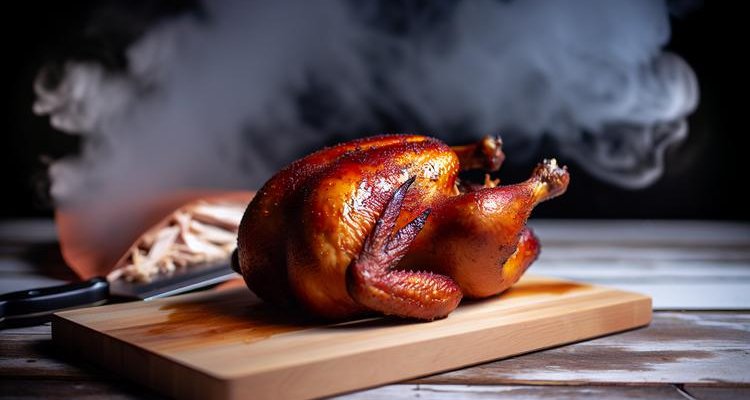
Reverse Sear Technique: Creating the Perfect Crust
The reverse sear method—smoking low and slow first, then finishing with high heat—produces results superior to traditional cooking methods. You get the benefits of smoke flavor, even cooking throughout, and a beautifully caramelized crust.
When to Remove from Smoker: Pull your prime rib when it reaches 5-10°F below your target pull temperature (so 110-115°F for medium-rare). Don’t worry—it won’t be done yet.
Increase Smoker Temperature: Crank your smoker up to 450-500°F. For pellet grills, this takes 10-15 minutes. For charcoal or stick burners, open vents fully and add fresh coals if needed.
The Searing Phase: Once your smoker is screaming hot, return the prime rib to the grates. Sear for 5-10 minutes, rotating every 2-3 minutes to brown all sides evenly. You’re looking for a deep mahogany crust with some charred bits.
Monitor Temperature Closely: During the sear, internal temperature climbs rapidly. Pull the roast when it reaches your target pull temp (120-125°F for medium-rare). The high heat adds another 10-15°F quickly, so watch carefully.
Alternative Searing Methods:
- Cast Iron Skillet: Heat a large cast iron skillet with a tablespoon of high-smoke-point oil (avocado or grapeseed) over high heat on your stovetop. Sear each side of the roast for 1-2 minutes.
- Culinary Torch: For precise control, use a high-powered torch to char the exterior without adding much heat to the interior.
- Broiler: As a last resort, place the roast under a preheated broiler for 3-5 minutes, watching constantly to prevent burning.
Resting and Carryover Cooking: The Most Important 30 Minutes
After spending hours smoking your prime rib to perfection, the single most important step is also the easiest to skip—and the costliest mistake. Resting is not optional; it’s what separates amateur results from professional quality.
Why Resting is Critical
During cooking, heat drives moisture toward the center of the meat. Muscle fibers contract and squeeze juices inward. If you slice immediately after removing from heat, all those juices run out onto the cutting board instead of staying in the meat. You’ll have a dry roast swimming in a pool of wasted juice.
Resting allows several things to happen:
- Muscle fibers relax, redistributing moisture evenly throughout the roast
- Juices thicken slightly as temperature drops, making them less likely to run out when sliced
- Temperature equalizes from exterior to interior, giving you consistent doneness edge to edge
- Carryover cooking completes, bringing the roast to final target temperature
How to Rest Properly
Minimum Time: 20-30 minutes for smaller roasts (under 6 pounds), 30-45 minutes for larger roasts (over 6 pounds). For very large roasts (10+ pounds), 45-60 minutes is ideal.
Tenting: Loosely tent the roast with aluminum foil. Don’t wrap tightly or seal—you want some air circulation. Tight wrapping traps steam and softens your beautifully seared crust.
Resting Location: Place the roast on a cutting board with a groove to catch juices, or leave it on the roasting pan. Keep it in a warm (not hot) area away from drafts. Room temperature is fine—large roasts retain heat remarkably well.
Temperature Monitoring: If you’re nervous, leave your probe thermometer in to watch carryover cooking. You’ll see the temperature continue climbing for 10-15 minutes before plateauing or slowly declining.
Understanding Carryover Cooking Temperature Rise
As mentioned, expect a 10-15°F rise during resting for large prime rib roasts. This is why precise pull temperature matters so much. Here’s what actually happens:
- First 5 minutes: Temperature climbs most rapidly (5-8°F)
- 5-15 minutes: Temperature continues rising more slowly (another 5-7°F)
- 15-30 minutes: Temperature plateaus at peak, may start to very gradually decline
- After 30 minutes: Very slow temperature drop as meat radiates heat
This predictable pattern is why experienced cooks can nail their target doneness consistently. Trust the science, pull early, and rest properly. For more guidance on proper resting techniques, see our comprehensive article on how long to rest meat.
Carving and Serving: Restaurant-Quality Presentation
Tools You’ll Need
- Sharp carving knife: A long, thin-bladed slicing knife (10-12 inches) makes clean cuts
- Carving fork (optional): Helps stabilize the roast while slicing
- Large cutting board: Preferably with a juice groove to catch drippings
Step-by-Step Carving Instructions
Step 1: Remove the Bones (If Bone-In)
Turn the roast bone-side up. You’ll see where the meat meets the bones. Using your sharp knife, cut between the bones and the meaty eye of the roast, following the curve of the bones. Use long, smooth strokes rather than sawing. Set bones aside (they’re delicious to gnaw on or use for stock).
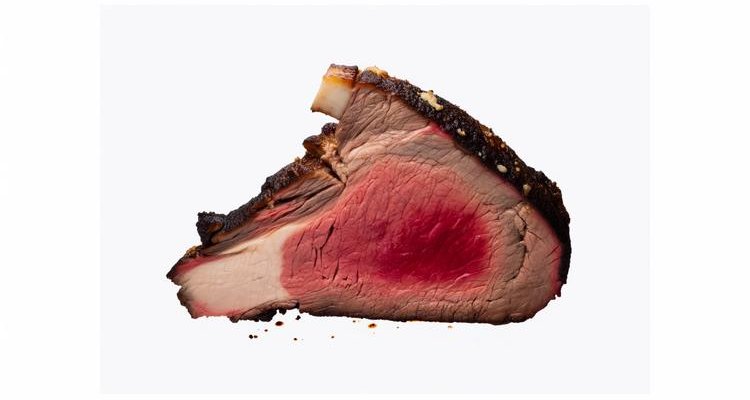
Step 2: Identify the Grain
Look at the meat closely—you’ll see parallel lines of muscle fiber running in one direction. This is the grain. Your goal is to slice perpendicular (across) to these lines, not parallel with them.
Step 3: Slice Against the Grain
Position the roast so you’ll be cutting across the grain. Using smooth, confident strokes, slice portions ½ to 1 inch thick. Thinner slices (½ inch) are more tender and traditional, while thicker cuts (1 inch) make a more impressive presentation and retain heat longer.
Step 4: Arrange and Serve
Arrange slices on a warm platter in overlapping rows. This looks elegant and keeps the meat warmer. Pour any collected juices over the top.
Serving Suggestions
Au Jus from Drippings: The liquid in your drip pan is liquid gold. Strain it through a fine-mesh strainer to remove any solids. Skim off excess fat if desired (or leave some for richness). Season with salt and pepper. If the au jus seems thin, simmer it on the stovetop for 5 minutes to concentrate flavors. Serve warm in a gravy boat.
Classic Horseradish Sauce: Mix ½ cup sour cream, 3 tablespoons prepared horseradish, 1 tablespoon Dijon mustard, 1 teaspoon lemon juice, and salt to taste. The sharp horseradish cuts through rich beef beautifully.
Serving Size Per Person: Plan on ¾ to 1 pound per person for bone-in prime rib (accounting for bone weight), or ½ to ¾ pound per person for boneless. For a 4-rib, 8-pound roast, expect to serve 8-10 people with some leftovers.
Perfect Side Dishes:
- Creamy mashed potatoes or garlic mashed potatoes
- Yorkshire pudding (traditional British accompaniment)
- Roasted root vegetables (carrots, parsnips, turnips)
- Creamed spinach or sautéed green beans
- Caesar salad or arugula salad with shaved parmesan
- Roasted Brussels sprouts with bacon
Common Mistakes to Avoid When Smoking Prime Rib
Even experienced cooks can stumble with prime rib. Here are the most frequent pitfalls and how to avoid them:
1. Not Using a Meat Thermometer
Guessing doneness by time alone is gambling with expensive beef. Every roast is different—bone structure, fat distribution, and starting temperature all affect cooking time. Invest in a reliable meat thermometer and use it. This single tool eliminates guesswork and guarantees results.
2. Overcooking the Meat
Prime rib is best at medium-rare (130-135°F final). Many home cooks, worried about food safety or accustomed to well-done meat, take it too far. Beef is safe at 145°F according to USDA guidelines, but prime rib truly shines at lower temperatures where the fat is just melted and the meat is tender. Remember to account for carryover cooking—this is where most overcooking happens.
3. Opening the Smoker Too Frequently
“If you’re lookin’, you ain’t cookin’.” Every time you open the lid, you lose heat and smoke, extending cooking time and creating temperature fluctuations. With a probe thermometer, you can monitor progress without opening anything. Limit yourself to checking every 1-2 hours unless adjusting temperature.
4. Skipping the Resting Period
Impatience costs you here. We’ve covered this extensively, but it bears repeating: resting is when magic happens. Without it, you lose 30-40% of the juice to the cutting board. Always rest for minimum 20-30 minutes, longer for large roasts.
5. Wrong Wood Choice
Mesquite and hickory are too strong for prime rib’s long smoking time. They work for brisket smoked at higher temps for shorter periods, but for 4-6 hours of smoke, they create bitter, overpowering flavors. Stick with oak, cherry, apple, or pecan. Your guests should taste beef enhanced by smoke, not smoke with a hint of beef.
6. Not Accounting for Carryover Cooking
This is the #1 reason home cooks end up with medium or medium-well instead of medium-rare. Pull your roast 10-15°F below your target final temperature. Set an alarm on your thermometer for your pull temp, not your target temp.
7. Slicing With the Grain Instead of Against It
Cutting parallel to the muscle fibers leaves them long and chewy. Cutting perpendicular severs them into short segments, making each bite tender. Take 10 seconds to identify grain direction before making your first cut.
8. Serving Immediately Without Resting
Yes, this is listed twice because it’s that important. Patience during resting pays dividends in juiciness and flavor.
Frequently Asked Questions About Smoking Prime Rib
What temperature should I smoke prime rib at?
The ideal temperature range for smoking prime rib is 225-250°F. This low-and-slow approach allows maximum smoke absorption while gently rendering the fat throughout the meat. At 225°F, expect 35-40 minutes per pound; at 250°F, plan on 30-35 minutes per pound. Some cooks prefer 275°F for faster results (20-25 minutes per pound), but you’ll get less smoke flavor. Avoid going above 300°F—at that point you’re roasting rather than smoking.
How long does it take to smoke a 5-pound prime rib?
A 5-pound prime rib will take approximately 3-3.5 hours at 225°F, or 2.5-3 hours at 250°F. However, cooking time varies based on several factors: bone-in vs. boneless, starting temperature of the meat, weather conditions, and how often you open your smoker. Always cook to internal temperature (120-125°F for medium-rare pull temp), not to time. A probe thermometer eliminates guessing and ensures perfect results.
Do I need to wrap prime rib when smoking?
No, you should not wrap prime rib during smoking. Unlike brisket or pork shoulder, which benefit from wrapping during a stall, prime rib doesn’t experience the same stall phenomenon and has enough internal fat to stay moist without wrapping. Wrapping would steam the exterior and prevent bark formation, while also reducing smoke penetration. Keep your prime rib unwrapped throughout the entire smoking process for the best crust and smoke flavor.
What’s the best wood for smoking prime rib?
Oak is the gold standard for smoking prime rib, providing classic, medium-intensity smoke that complements beef perfectly. Cherry is an excellent alternative, adding subtle sweetness and a beautiful mahogany color. Apple and pecan also work well for milder, slightly fruity smoke. Avoid mesquite and go easy on hickory—both are too strong for the long smoking time required for prime rib and can create bitter, overpowering flavors. Many pitmasters use a blend of oak and cherry for balanced flavor and color.
Should I sear prime rib before or after smoking?
Always sear after smoking (the reverse sear method) for best results. Smoking first allows the meat to cook evenly at low temperature while absorbing smoke flavor. Then finishing with high heat (450-500°F) for 5-10 minutes creates a beautiful, caramelized crust through the Maillard reaction. Searing before smoking means the crust gets soggy during the long, moist cooking process. The reverse sear method produces superior texture, better smoke penetration, and more consistent doneness throughout the roast.
How do I know when smoked prime rib is done?
Use a meat thermometer inserted into the thickest part of the roast, avoiding bones and fat. Pull the roast from your smoker 10-15°F below your target final temperature to account for carryover cooking during resting. For medium-rare (recommended), pull at 120-125°F; final temperature after resting will be 130-135°F. For medium, pull at 130-135°F (final 140-145°F). Never rely on cooking time alone—different roasts cook at different rates even at the same weight.
What’s the difference between prime rib and ribeye roast?
The terms are often used interchangeably, and in most cases, they refer to the same cut—the meat from the primal rib section of beef (ribs 6-12). Technically, “prime rib” traditionally refers to a bone-in roast and can also indicate USDA Prime grade, while “ribeye roast” can be bone-in or boneless and doesn’t specify grade. Functionally, they’re the same exceptionally marbled, flavorful cut. When shopping, focus on the marbling and grade rather than the name—a USDA Prime ribeye roast is the same quality as USDA Prime prime rib.
How much prime rib per person should I plan?
Plan on ¾ to 1 pound per person for bone-in prime rib, or ½ to ¾ pound per person for boneless. This accounts for bone weight and trimming, ensuring generous servings with some leftovers. For example, a 4-rib, 8-10 pound bone-in roast will serve 8-10 people. If your guests are big eaters or you want abundant leftovers, err on the higher end. Remember that prime rib is rich—people often eat slightly less than they would of leaner cuts.
Can I smoke a frozen prime rib?
No, you must completely thaw your prime rib before smoking. Frozen meat won’t cook evenly—the exterior will overcook before the interior thaws and comes up to temperature. Thaw prime rib in the refrigerator, allowing 24 hours for every 5 pounds of meat. For a large roast, this may take 2-3 days. Never thaw at room temperature or in hot water, as this creates food safety risks. Plan ahead and start thawing well before your cook date.
How long should prime rib rest after smoking?
Minimum 20-30 minutes for smaller roasts (under 6 pounds), and 30-45 minutes for larger roasts (over 6 pounds). Very large roasts (10+ pounds) benefit from 45-60 minutes of resting. This crucial step allows muscle fibers to relax and juices to redistribute throughout the meat. Skipping or shortening rest time results in dry meat with juices pooling on the cutting board. Loosely tent with foil during resting—don’t seal tightly or you’ll steam the crust. Large roasts retain heat remarkably well and will still be warm after a full 45-minute rest.
What sides go well with smoked prime rib?
Classic accompaniments include creamy mashed potatoes, Yorkshire pudding, roasted root vegetables (carrots, parsnips, turnips), creamed spinach, and Caesar salad. Roasted Brussels sprouts with bacon, garlic green beans, and scalloped potatoes also pair beautifully. For a complete steakhouse experience, serve with horseradish sauce and au jus made from the drippings. Choose 2-3 sides that offer variety in texture and flavor—something creamy, something fresh, and something roasted works well.
How do I store leftover smoked prime rib?
Refrigerate leftover prime rib within 2 hours of serving. Wrap tightly in aluminum foil or place in an airtight container and refrigerate for up to 3-4 days. To reheat without drying out, place slices in a baking dish with a few tablespoons of beef broth or au jus, cover with foil, and warm at 250°F for 15-20 minutes until heated through. Alternatively, gently warm slices in a skillet with butter. For longer storage, wrap portions tightly in plastic wrap and then foil, and freeze for up to 2-3 months. Use leftovers for sandwiches, beef stroganoff, hash, or soup.
Conclusion: Your Path to Perfect Smoked Prime Rib
Smoking prime rib transforms an already exceptional cut of beef into something truly unforgettable. By following the techniques in this guide—selecting quality meat with good marbling, maintaining steady smoking temperatures of 225-250°F, monitoring internal temperature precisely, and allowing proper resting time—you’ll achieve results that rival high-end steakhouses.
Remember the key principles: patience is your greatest asset, temperature monitoring eliminates guesswork, and resting is not optional. The reverse sear technique gives you the best of both worlds—tender, smoke-infused interior and a beautifully caramelized crust. Choose your wood wisely (oak or cherry are safest bets), trust your thermometer over cooking times, and pull the roast early to account for carryover cooking.
If you’re smoking prime rib for the first time, don’t let anxiety hold you back. This cut is remarkably forgiving thanks to its abundant marbling. Even if you overcook slightly or your smoke isn’t perfect, you’ll still produce delicious beef that impresses your guests. With practice, you’ll develop an intuitive sense for timing and temperature, making the process second nature.
For your next special occasion—whether it’s a holiday gathering, anniversary celebration, or Sunday dinner you want to elevate—try this smoked prime rib method. The investment of time and attention pays dividends in flavor, tenderness, and the satisfaction of serving a dish you crafted from scratch. Your guests will remember the meal, and you’ll have mastered a centerpiece worthy of any celebration.
Contents
- Quick Navigation
- Understanding Prime Rib: What Makes This Cut Special
- Selecting Your Prime Rib: Quality Indicators and Sizing
- Equipment You’ll Need for Smoking Prime Rib
- Preparation Steps: Getting Your Prime Rib Ready
- The Smoking Process: Step-by-Step to Perfection
- Reverse Sear Technique: Creating the Perfect Crust
- Resting and Carryover Cooking: The Most Important 30 Minutes
- Carving and Serving: Restaurant-Quality Presentation
- Common Mistakes to Avoid When Smoking Prime Rib
- Frequently Asked Questions About Smoking Prime Rib
- Conclusion: Your Path to Perfect Smoked Prime Rib