You just unboxed your new smoker, assembled it piece by piece, and you’re ready to throw on that first brisket. But hold on – there’s one crucial step standing between you and barbecue greatness that many new smoker owners overlook.
Seasoning your smoker (also called curing or burn-in) is the process of coating the interior surfaces with oil and running it at high temperatures before cooking any food. This essential first step accomplishes two critical goals: removing manufacturing residues that could contaminate your food and creating a protective layer that prevents rust and extends your smoker’s lifespan.
Whether you own a charcoal smoker, pellet grill, offset smoker, or electric smoker, this comprehensive guide walks you through exactly how to season your specific type of smoker the right way.
Why Seasoning Your Smoker is Essential
Before diving into the how-to, understanding why seasoning matters will help you appreciate this crucial step in your smoking journey.
Removing Manufacturing Residues
When your smoker leaves the factory, it carries remnants from the manufacturing process. These include factory oils used during metal fabrication, solvents and adhesives from assembly, metal shavings and dust from cutting and welding, and uncured paint that needs to be properly set.
Some of these chemicals can be toxic when heated, while others simply add unpleasant metallic or chemical flavors to your food. Seasoning burns off these contaminants before they ever contact your meat.
Creating a Protective Layer
The seasoning process creates a polymerized oil coating on your smoker’s interior surfaces. When oil is heated past its smoke point, it undergoes a chemical transformation that bonds it to the metal, creating a hard, protective layer similar to what develops on a well-seasoned cast iron skillet.
This protective coating prevents rust and corrosion from moisture exposure, extends your smoker’s operational lifespan by years, creates a slightly non-stick surface that’s easier to clean, and helps maintain consistent temperatures during cooking.
Getting to Know Your Smoker
Seasoning provides the perfect opportunity to learn how your smoker behaves without risking an expensive cut of meat. You’ll discover how to control temperature using vents and dampers, identify any air leaks that need sealing, understand how long it takes to reach target temperatures, and build confidence before your first real cook.
What You’ll Need to Season Your Smoker
Gather these supplies before starting the seasoning process:
- Mild dish soap – For initial cleaning only
- Water and soft cloths – Avoid abrasive materials that scratch surfaces
- High smoke-point cooking oil – Canola, grapeseed, or avocado oil work best
- Cooking spray – Optional alternative to liquid oil
- Charcoal – For charcoal and offset smokers (quality lump charcoal is recommended)
- Wood chips or chunks – Optional for adding smoke during seasoning
- Chimney starter – For lighting charcoal safely
- Fire starter cubes – For easy chimney lighting
- Heat-resistant gloves – For safe handling
Safety Precautions Before You Start
Seasoning involves high heat and open flames. Follow these safety guidelines to protect yourself and your property.
Ventilation Requirements
Always season your smoker outdoors in a well-ventilated area. Never attempt to season inside a garage, even with the door open. Position your smoker at least 10 feet away from any structures, overhangs, or flammable materials.
Fire Safety
Keep a fire extinguisher within reach during the entire seasoning process. Clear the area around your smoker of leaves, paper, and other combustible materials. Never leave your smoker unattended while it’s running at high temperatures.
Handling Hot Oil
Use long-handled brushes or spray bottles to apply oil – never reach into a hot smoker. Wear heat-resistant gloves when handling any components. Apply oil before heating, not during, to avoid dangerous splattering.
Follow Manufacturer Guidelines
Always consult your smoker’s manual before seasoning. Some brands have specific first-run procedures that differ from general guidelines. Following manufacturer instructions may also be required to maintain your warranty coverage.
Choosing the Right Oil for Seasoning
Not all cooking oils are suitable for seasoning. The key factor is smoke point – the temperature at which oil begins to break down and smoke. Since seasoning requires high heat, you need oils that can withstand temperatures of 275-400 degrees Fahrenheit without burning.
| Oil Type | Smoke Point | Flavor Profile | Best For |
|---|---|---|---|
| Avocado Oil | 520°F | Neutral | All smoker types – Best choice |
| Grapeseed Oil | 420°F | Neutral | All smoker types – Excellent choice |
| Canola Oil | 400°F | Neutral | Budget-friendly option |
| Vegetable Oil | 400°F | Neutral | Common household choice |
| Bacon Fat/Lard | 370°F | Smoky/Savory | Traditional seasoning method |
| Flaxseed Oil | 225°F | Nutty | Cast iron grates only |
Our Recommendation: Avocado oil or grapeseed oil provides the best results due to their high smoke points and neutral flavors. Avoid olive oil for seasoning – its relatively low smoke point (320-405°F depending on type) can result in a sticky, uneven coating.
Step-by-Step Guide to Seasoning Any Smoker
While specific details vary by smoker type, the fundamental process remains the same across all smokers. Follow these core steps for successful seasoning.
Step 1: Clean the Interior Thoroughly
Start by removing all racks, grates, pans, and the water bowl from your smoker. Wash each component with mild dish soap and warm water, using a soft cloth to avoid scratching the finish. Clean the entire interior of the smoker, including the walls, lid, door, and firebox.
Rinse everything thoroughly to remove all soap residue, then allow all components to air dry completely. This initial cleaning removes dust, manufacturing oils, and any debris from shipping.
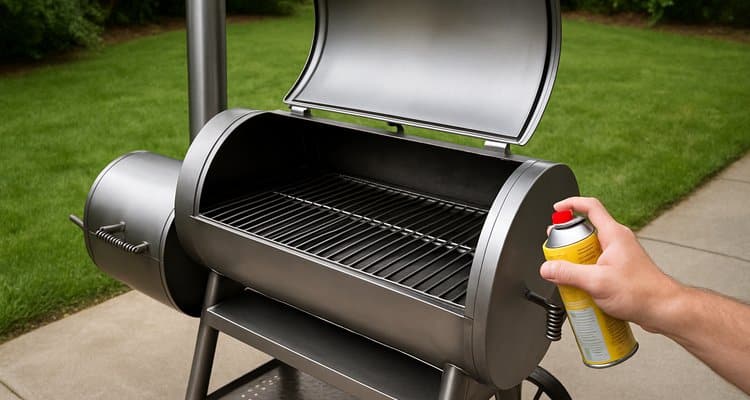
Step 2: Apply the Oil Coating
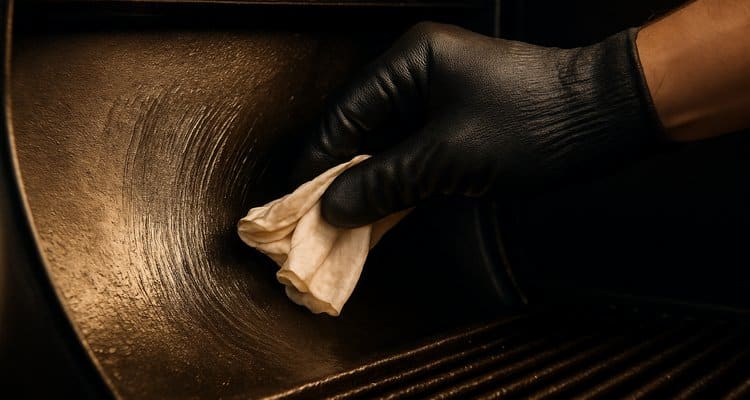
Once everything is dry, apply a thin, even coat of your chosen oil to all interior surfaces. Use cooking spray or pour liquid oil onto a soft cloth and wipe it across the walls, lid, door interior, and all removable components including racks and grates.
Critical tip: The goal is a thin, even coating – not a thick layer. Excess oil will pool at the bottom, create sticky spots, and potentially cause flare-ups. If you see drips forming, you’ve applied too much. Wipe away any excess before proceeding.
For electric smokers, carefully avoid getting oil on the heating element as this can create smoke and potentially damage the component.
Step 3: Heat and Maintain Temperature
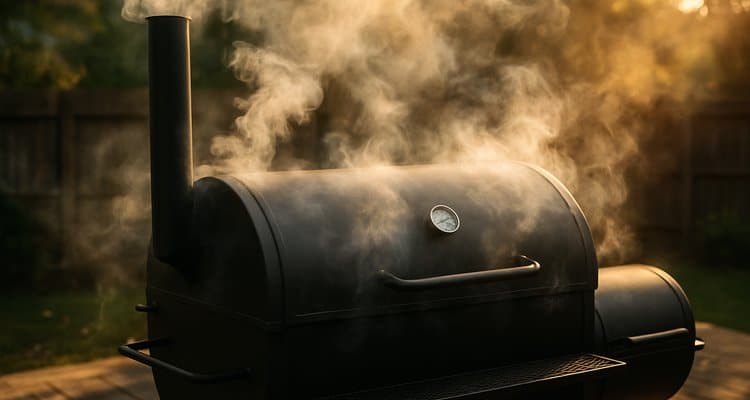
Bring your smoker up to temperature gradually – rushing this step can warp thin metal components. Your target temperature should be 275-300°F for most smokers, which is slightly higher than typical cooking temperatures to ensure proper oil polymerization.
Maintain this temperature for 2-4 hours, allowing the oil to bake onto the metal surfaces. You’ll notice smoke during this process as the oil polymerizes – this is completely normal and expected.
After the seasoning period, allow your smoker to cool down slowly and naturally. Don’t open it to speed cooling, as rapid temperature changes can cause warping. Once cool, inspect the interior – you should see a darker, slightly glossy coating on all surfaces.
Seasoning Instructions by Smoker Type
Different smoker types require slightly different approaches. Here’s how to season each type properly.
How to Season a Charcoal Smoker
Charcoal smokers require the most hands-on approach to seasoning. If you’re using a quality lump charcoal, you’ll get cleaner burning and better results.
- Clean all interior surfaces and components with soap and water
- Allow everything to air dry completely
- Apply a thin oil coating to all interior surfaces, racks, and grates
- Fill your chimney starter with charcoal and light it
- Wait 10-15 minutes until coals are fully lit and ashed over
- Add unlit charcoal to the firebox, then pour lit coals on top
- Open all intake and exhaust vents fully
- Bring temperature up to 275-300°F
- Add a few wood chunks during the last hour for smoke
- Maintain temperature for 2-4 hours total
- Close vents and allow to cool completely
How to Season a Pellet Grill
Pellet grills often have specific first-run procedures from the manufacturer, so check your manual first. Many modern pellet grills require minimal oil application. If you need quality pellets, choose a mild hardwood for your first burn.
- Clean interior surfaces and remove any packaging materials
- Apply a light oil coating (unless manufacturer says to skip this)
- Fill the hopper with pellets – use a mild hardwood like oak or apple
- Run the initial startup cycle as directed by your manual
- Set temperature to 350-400°F
- Run for 45-60 minutes
- Allow to cool completely
- Wipe away any residue that formed
How to Season an Offset Smoker
Offset smokers have more surface area and require extra attention to the firebox connection and cooking chamber.
- Clean both the firebox and main cooking chamber thoroughly
- Apply oil to all interior surfaces of both chambers
- Build a small fire in the firebox using charcoal and wood
- Gradually increase temperature over 30-45 minutes
- Reach 275-300°F and hold steady
- Add hardwood chunks for smoke during the last hour
- Pay attention to how smoke flows through dampers and seals
- Maintain for 3-4 hours total
- Allow slow cooldown with vents closed
How to Season an Electric Smoker
Electric smokers are the simplest to season since temperature control is automatic.
- Remove all racks and the water pan
- Wipe interior clean – soap usually isn’t necessary for electric smokers
- Apply a thin oil coat to walls, door, and racks – avoid the heating element
- Replace racks in their normal positions
- Set temperature dial to 275°F
- Run for 2-3 hours
- Add wood chips to the chip tray during the last 30 minutes (optional)
- Turn off and allow to cool completely
Temperature and Time Guidelines by Smoker Type
Use this quick reference table to ensure you’re seasoning at the right temperature for the right duration.
| Smoker Type | Temperature | Duration | Special Notes |
|---|---|---|---|
| Charcoal Smoker | 275-300°F | 2-4 hours | Add wood during last hour |
| Offset Smoker | 275-300°F | 3-4 hours | Focus on firebox and seals |
| Pellet Grill | 350-400°F | 45-60 min | Follow manufacturer instructions |
| Electric Smoker | 275°F | 2-3 hours | Avoid oil on heating element |
| Drum Smoker | 300°F | 2-3 hours | Extra attention to drum walls |
| Kamado/Ceramic | 350-400°F | 1-2 hours | Shorter due to heat retention |
Signs of Proper Seasoning
After the seasoning process, inspect your smoker to confirm it worked correctly.
What Successful Seasoning Looks Like
- Interior surfaces have a dark brown or black patina
- Slight sheen from the polymerized oil coating
- No more raw metal smell when you open the lid
- Subtle smoky aroma instead of chemical odors
- Grates show slight darkening and coloring
Signs Something Went Wrong
- Sticky or tacky residue: You used too much oil – clean and re-season with a thinner coat
- Flaking or peeling coating: Temperature increased too quickly – this may require stripping and starting over
- Raw metal still visible: Seasoning time was too short – run another cycle
- Strong chemical odor persists: Manufacturing residues remain – run another burn cycle at high heat
Maintaining Your Seasoning Long-Term
Once your smoker is properly seasoned, a little maintenance keeps it protected for years.
- Light re-oil after deep cleaning: If you scrub the interior, apply a thin oil coat and run a short heat cycle
- Annual re-seasoning: A quick seasoning session once a year maintains protection
- Use a cover: Protect your smoker from rain and humidity when not in use
- Avoid harsh chemicals: Never use oven cleaner or harsh degreasers on seasoned surfaces
- Keep it dry: Moisture is the enemy – dry your smoker if it gets wet
When to Re-Season Your Smoker
Your smoker will need re-seasoning periodically. Watch for these situations:
- After aggressive deep cleaning that removes the protective layer
- If rust spots appear on interior surfaces
- After extended storage (3+ months without use)
- If off-flavors develop in your smoked food
- After winter storage in humid conditions
- Following any repair work that exposes raw metal
Common Seasoning Mistakes to Avoid
Learn from others’ mistakes to ensure your seasoning goes smoothly.
| Mistake | What Happens | Solution |
|---|---|---|
| Using too much oil | Creates sticky residue that attracts dirt and can cause flare-ups | Apply thin coats only; wipe away excess before heating |
| Heating too fast | Rapid temperature increases can warp thin metal components | Bring heat up gradually over 30-45 minutes |
| Skipping the cleaning step | Manufacturing residues trapped under oil contaminate food | Always clean thoroughly before applying oil |
| Wrong oil type | Low smoke point oils like olive oil burn and create off-flavors | Use avocado, grapeseed, or canola oil |
| Not enough time | Cutting the process short results in incomplete seasoning | Follow recommended duration for your smoker type |
| Forgetting the grates | Cooking grates rust and food sticks without protection | Season grates along with the smoker body |
| Oil on electric elements | Creates excessive smoke and can damage the heating element | Apply oil carefully, avoiding the heating element |
| Seasoning in rain | Moisture prevents proper oil polymerization | Wait for dry weather before seasoning |
Frequently Asked Questions
Do I really need to season a new smoker?
Yes, seasoning is essential for any new smoker. It removes manufacturing residues like oils, solvents, and metal shavings that could contaminate your food or create off-flavors. Seasoning also creates a protective layer that prevents rust and extends your smoker’s lifespan significantly. Skipping this step risks both food safety issues and premature equipment failure.
What happens if I skip seasoning my smoker?
If you skip seasoning, your first several cooks may have a metallic or chemical taste from manufacturing residues. Your smoker will also be more susceptible to rust, especially in humid climates. The interior surfaces won’t have the protective coating that makes cleaning easier and prevents moisture damage. Many pitmasters who skip seasoning end up with rust problems within the first year.
Can I use olive oil to season my smoker?
Olive oil is not recommended for smoker seasoning. Regular olive oil has a smoke point of only 320-405°F depending on the grade, which is too low for proper seasoning temperatures. When heated beyond its smoke point, olive oil breaks down and can leave a sticky, uneven coating with off-flavors. Instead, use avocado oil (520°F smoke point), grapeseed oil (420°F), or canola oil (400°F).
How long does smoker seasoning take?
The total time depends on your smoker type. Charcoal and offset smokers typically need 2-4 hours at temperature. Electric smokers require 2-3 hours. Pellet grills are quickest at 45-60 minutes due to their efficient heating and manufacturer-specific procedures. Add prep and cooldown time, and plan for a half-day project for most smokers.
Do electric smokers need to be seasoned?
Yes, electric smokers need seasoning just like other types. The process is simpler since you don’t need to manage fire, but the same principles apply – clean first, apply oil (avoiding the heating element), and run at 275°F for 2-3 hours. Some manufacturers include specific first-run procedures in their manuals, so check your documentation.
Should I season my smoker with the water pan in place?
Most experts recommend placing the water pan in its normal position during seasoning but leaving it empty. This allows the pan itself to be seasoned and ensures heat circulates naturally through the cooking chamber. Some pitmasters add water or other liquids for additional seasoning effects, but this isn’t necessary for the initial burn-in.
How do I know when my smoker is properly seasoned?
Look for a dark brown or black patina on all interior surfaces. The metal should have a slight sheen from the polymerized oil coating. When you open the lid, you should smell subtle smokiness rather than raw metal or chemicals. The grates should show some darkening as well. If surfaces still look raw or shiny silver, run another seasoning cycle.
Can I over-season a smoker?
You can’t really “over-season” in terms of running too many heat cycles, but you can use too much oil in a single session. Excess oil creates sticky buildup, pools at the bottom of the smoker, and can cause flare-ups. Always apply thin, even coats. If you’ve applied too much, wipe away the excess before heating or clean and start over with less oil.
Do the cooking grates need to be seasoned separately?
Cooking grates should be seasoned along with the rest of the smoker during the initial process. However, many pitmasters recommend not re-seasoning grates after the first time. Instead, keep them clean by brushing after each cook. The natural fats from cooking will maintain a light protective coating. Some experts like Meathead Goldwyn suggest keeping grates spotlessly clean rather than building up layers of seasoning.
How often should I re-season my smoker?
A light re-seasoning once a year is good practice for most smokers. You should also re-season after any deep cleaning that removes the protective layer, after extended storage periods, if rust begins to appear, or if your smoked food develops off-flavors. Regular cooking with fatty meats helps maintain seasoning between full re-seasoning sessions.
Start Your Smoking Journey Right
Seasoning your smoker is a simple investment of a few hours that pays dividends for years to come. You’ll enjoy better-tasting food free from chemical contamination, a smoker that resists rust and lasts longer, and the confidence of knowing your equipment is properly prepared.
The process is straightforward: clean thoroughly, apply a thin oil coating, heat to the recommended temperature for your smoker type, and allow it to cool naturally. Whether you’re working with a charcoal smoker, pellet grill, offset smoker, or electric unit, the fundamentals remain the same.
Now that your smoker is properly seasoned, you’re ready to start creating incredible barbecue. If you’re still shopping for your first smoker, check out our guide to the best smokers under $500 for excellent options that won’t break the bank.
Contents
- Why Seasoning Your Smoker is Essential
- What You’ll Need to Season Your Smoker
- Safety Precautions Before You Start
- Choosing the Right Oil for Seasoning
- Step-by-Step Guide to Seasoning Any Smoker
- Seasoning Instructions by Smoker Type
- Temperature and Time Guidelines by Smoker Type
- Signs of Proper Seasoning
- Maintaining Your Seasoning Long-Term
- When to Re-Season Your Smoker
- Common Seasoning Mistakes to Avoid
- Frequently Asked Questions
- Start Your Smoking Journey Right


