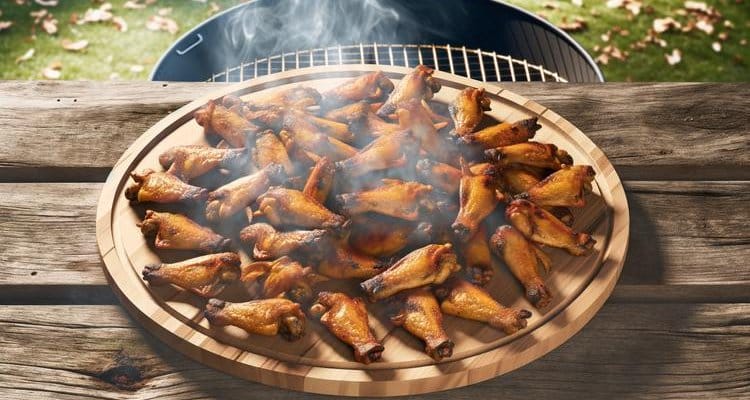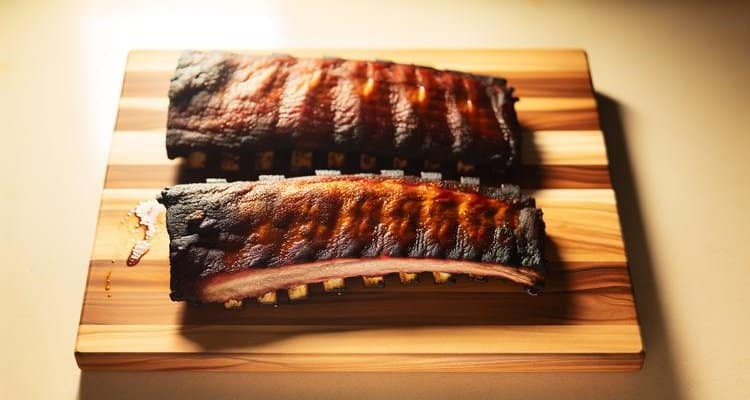
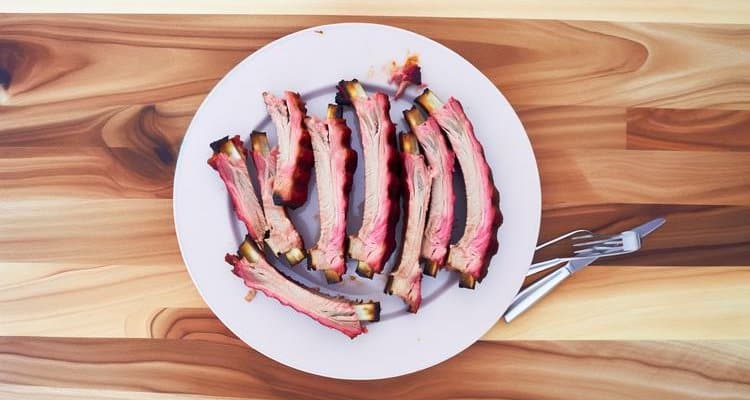
There’s nothing quite like the satisfaction of pulling perfectly smoked ribs off your smoker—tender meat that pulls cleanly from the bone, a deep mahogany bark that crunches with every bite, and that unmistakable smoke ring that tells you everything went right. The 3-2-1 method is the secret that transforms beginners into backyard BBQ heroes.
The 3-2-1 method is a time-tested smoking technique that breaks the cooking process into three distinct phases: 3 hours of smoking unwrapped, 2 hours wrapped in foil, and 1 hour of glazing and finishing. This foolproof approach delivers consistently tender, flavorful ribs by controlling smoke penetration, moisture retention, and texture at each stage.
Whether you’re a complete beginner or an experienced pitmaster looking to refine your technique, this comprehensive guide will walk you through every step of how to smoke ribs using the 3-2-1 method. You’ll learn the science behind each phase, master temperature control, avoid common mistakes, and troubleshoot any issues that arise. By the end, you’ll have the knowledge and confidence to produce competition-quality ribs in your own backyard.
Quick Roundup List
- Phase 1: 3 Hours Smoking Unwrapped
- Phase 2: 2 Hours Wrapped in Foil
- Phase 3: 1 Hour Glazing and Finishing
What is the 3-2-1 Method for Smoking Ribs?
The 3-2-1 method is a structured smoking technique that divides the cooking process into three timed phases, each serving a specific purpose in creating perfectly tender, flavorful ribs.
The Three Phases Explained
- 3 Hours: Smoke the ribs unwrapped at 225-250°F. During this phase, the meat absorbs smoke flavor, develops a crusty bark, and begins the initial rendering of fat. The ribs remain exposed to direct smoke, allowing maximum smoke penetration.
- 2 Hours: Wrap the ribs tightly in aluminum foil with liquid (apple juice, butter, brown sugar). This braising phase breaks down tough connective tissue, retains moisture, and tenderizes the meat through steam and gentle heat.
- 1 Hour: Unwrap the ribs and apply BBQ sauce. This final phase allows the sauce to caramelize, the bark to re-establish, and the texture to firm slightly, preventing the fall-apart mushiness that can occur from over-braising.
Often called the “Texas Crutch” method when referring specifically to the foil-wrapping phase, this technique was popularized in competition BBQ circles and has become the go-to approach for achieving consistent results. The method is considered “foolproof” because it removes much of the guesswork—you’re working with reliable time blocks rather than relying solely on visual cues or feel, which can be challenging for beginners.
One important distinction: the traditional 3-2-1 method is designed for spare ribs, which are larger and meatier. For baby back ribs, which are leaner and more tender, you’ll want to use the modified 2-2-1 method (2 hours unwrapped, 2 hours wrapped, 1 hour glazing) to prevent over-tenderizing.
Why the 3-2-1 Method Works: The Science Behind Each Phase
Understanding the science behind each phase helps you make informed adjustments and troubleshoot issues when they arise. Let’s break down what’s happening at the molecular level during each stage of smoking ribs.
Phase 1: Smoke Penetration and Bark Formation (3 Hours)
During the first three hours, two critical processes occur simultaneously. First, smoke particles penetrate the meat’s surface, binding with myoglobin (the protein responsible for meat color) to create the distinctive smoke ring—that pink layer just beneath the surface that’s prized in competition BBQ. This smoke absorption happens most effectively when the meat surface is cool and moist, which is why smoke penetration diminishes significantly once the internal temperature exceeds 140°F.
Second, the exterior of the ribs undergoes the Maillard reaction—a complex chemical process where proteins and sugars break down under heat to create hundreds of new flavor compounds. This creates the “bark,” that dark, crusty exterior that provides textural contrast and concentrated flavor. The dry rub you applied earlier caramelizes, forming a protective crust that seals in moisture while developing deep, complex flavors.
Phase 2: Collagen Breakdown and Tenderization (2 Hours)
The foil-wrapping phase is where the magic of tenderization happens. Ribs contain significant amounts of collagen—a tough connective tissue that makes raw ribs chewy and unpleasant. Collagen begins breaking down into gelatin at temperatures above 160°F, and this conversion accelerates significantly between 195-205°F.
By wrapping the ribs in foil with liquid, you create a sealed environment that traps steam and moisture. This essentially braises the ribs, maintaining high humidity that prevents the meat from drying out while the temperature climbs into the collagen-melting zone. The added brown sugar and butter not only contribute flavor but also help maintain moisture and aid in the tenderization process.
This phase can’t be rushed. The collagen conversion takes time, which is why ribs cooked too quickly remain tough despite reaching the “correct” temperature. Low and slow wins the race here.
Phase 3: Texture Firming and Glaze Setting (1 Hour)
After two hours wrapped in foil, your ribs will be incredibly tender—sometimes too tender, with the meat threatening to fall off the bone. The final unwrapped hour serves multiple purposes. As the ribs cook uncovered, surface moisture evaporates, allowing the bark to firm up and regain some of its textural appeal. The applied BBQ sauce undergoes caramelization, with its sugars breaking down to create complex flavors and a sticky, glossy finish.
This phase also allows you to dial in the final texture. Competition-style ribs typically maintain some “bite”—you should be able to bite cleanly through the meat without it falling off the bone. Home cooks often prefer more tender ribs, but even then, you want to avoid the mushy texture that results from over-cooking.
Advantages of the 3-2-1 Method:
- Consistency: Time-based phases reduce variability and guesswork
- Beginner-friendly: Clear structure makes it easy to follow
- Prevents drying: Foil wrap phase locks in moisture
- Guarantees tenderness: Extended braise breaks down collagen completely
Trade-offs to Understand:
- Very tender texture: Results may be too soft for those who prefer more “bite”
- Time commitment: Full 6-hour cook time required
- Bark softening: Foil wrap softens the crust (though Phase 3 helps recover it)
Equipment and Supplies Needed
Having the right equipment makes the difference between frustration and success when smoking ribs. Here’s everything you need for the 3-2-1 method.
Smoker Equipment
The good news is that the 3-2-1 method works with virtually any smoker type—pellet, electric, charcoal, offset, or even a gas grill set up for indirect heat. The key requirement is the ability to maintain a steady temperature in the 225-250°F range for 6 hours. Pellet and electric smokers excel at temperature stability, making them ideal for beginners. Charcoal and offset smokers require more attention but reward you with superior smoke flavor. If you’re shopping for a smoker, check out our guide to the best vertical pellet smokers for options that work beautifully with this method.
Essential Tools
- Meat Thermometer: An accurate smoker thermometer is non-negotiable. You need to monitor both the smoker temperature and the internal temperature of the ribs. Look for a dual-probe thermometer with ±1.8°F accuracy—cheaper models can be off by 10-15 degrees, which drastically affects your results.
- Heavy-Duty Aluminum Foil: Regular thin foil tears too easily. Use heavy-duty foil, and consider doubling it for extra security during the wrap phase.
- Spray Bottle: Fill with apple juice or apple cider vinegar for spritzing during Phase 1 to maintain surface moisture.
- Silicone Basting Brush: Easier to clean than traditional brushes and won’t harbor bacteria.
- Long-Handled Tongs: Essential for moving ribs without burning yourself.
- Paper Towels: Critical for removing the membrane (more on this later).
Ingredients
- Ribs: 2-3 racks of spare ribs or St. Louis style ribs (3-3.5 lbs each)
- Yellow Mustard: 2-3 tablespoons (acts as a binder for the rub)
- Dry Rub: ½ cup (store-bought or homemade—your choice)
- Apple Juice or Apple Cider: 2 cups (for spritzing and foil wrap)
- Brown Sugar: ¼ cup (for foil wrap phase)
- Honey: 2 tablespoons (for foil wrap phase)
- Butter: 4 tablespoons (optional, for foil wrap)
- BBQ Sauce: 1-2 cups (your favorite style)
- Wood Pellets or Chunks: Hickory, apple, cherry, or oak (4-6 cups)
Choosing and Preparing Your Ribs
Proper rib selection and preparation are the foundation of great smoked ribs. Cut corners here, and no amount of technique will save your cook.
Understanding Rib Types
| Rib Type | Description | Recommended Method | Best For |
|---|---|---|---|
| Spare Ribs | Larger, meatier, higher fat content. Cut from the belly area below baby backs. | 3-2-1 Method (6 hours) | Those who want maximum flavor and don’t mind a bit more fat |
| Baby Back Ribs | Smaller, leaner, more tender. Cut from the loin area near the spine. | 2-2-1 Method (5 hours) | Those who prefer leaner meat with slightly less cook time |
| St. Louis Style | Spare ribs with brisket bone and cartilage removed for a rectangular shape. | 3-2-1 Method (6 hours) | Those who want uniform cooking and easier presentation |
For the traditional 3-2-1 method, spare ribs or St. Louis style ribs are your best choice. Their higher fat content and larger size make them more forgiving, and they benefit from the extended cooking time. If you’re using baby back ribs, switch to the 2-2-1 method (2 hours unwrapped, 2 hours wrapped, 1 hour glazing) to avoid over-tenderizing.
Critical Preparation Steps
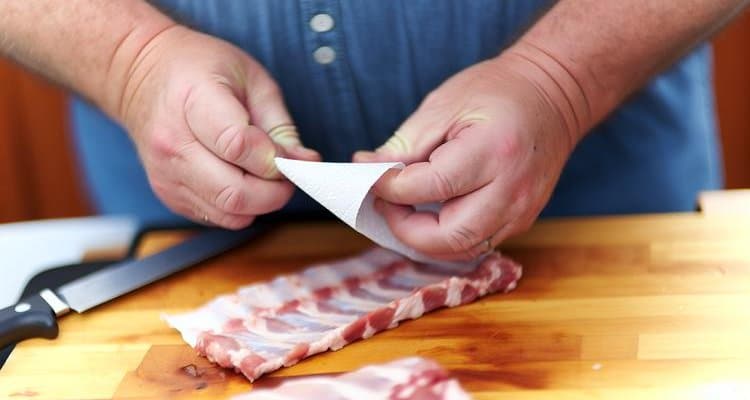
Step 1: Remove the Membrane
This is the single most important preparation step, yet many beginners skip it. The membrane—a thin, silvery layer of connective tissue on the bone side of the ribs—turns tough and rubbery when cooked. It also prevents smoke and seasoning from penetrating the meat.
To remove it: Work a butter knife under the membrane at one end of the rack to loosen it. Once you’ve lifted an edge, grip it with a paper towel (provides traction on the slippery membrane) and peel it off in one smooth motion. If it tears, start again with a new section. Take your time—this step is worth doing right.
Step 2: Trim Excess Fat
Unlike brisket, where fat renders and bastes the meat, rib fat can create unpleasantly greasy pockets. Trim any thick deposits of fat, but don’t go crazy—a thin layer helps with flavor and moisture retention. Remove any loose or hanging pieces that would burn during cooking.
Step 3: Apply Mustard Binder
Slather a thin layer of yellow mustard over both sides of the ribs. Don’t worry—you won’t taste the mustard after cooking. The mustard serves as a “glue” that helps the dry rub adhere evenly and penetrate the meat. Some pitmasters use hot sauce, Worcestershire, or olive oil, but mustard’s acidity also helps tenderize the meat surface.
Step 4: Apply Dry Rub Generously
Coat both sides of the ribs with a generous layer of dry rub. Don’t be shy—you want visible coverage. Pat the rub in gently to help it adhere. Let the seasoned ribs sit for at least 30 minutes at room temperature, or refrigerate them overnight for deeper flavor penetration. If refrigerating, bring them to room temperature 30-45 minutes before smoking.
Phase 1: The 3 Hours (Smoking Unwrapped)
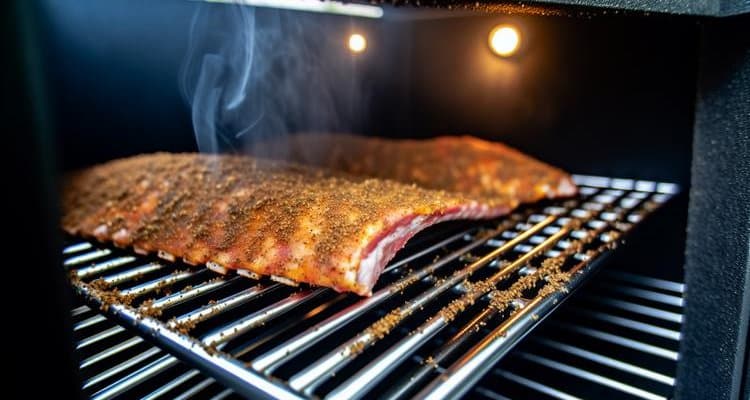
Phase 1 is where the foundation of flavor is built. This is when smoke penetration and bark formation occur—the two elements that separate ordinary ribs from extraordinary ones.
Smoker Setup
Preheat your smoker to 225-250°F. This temperature range is ideal because it’s hot enough to render fat and develop bark, but cool enough to allow extended cooking without drying out the meat. Add your wood—hickory provides strong smoke flavor, apple and cherry are milder and fruitier, and oak is neutral and clean. Avoid mesquite, which can turn bitter during long cooks. For more guidance on selecting the right wood, check out our guide to choosing the best wood pellets for smoking.
Set up a water pan if your smoker has one. The water moderates temperature spikes and adds humidity, which helps smoke particles adhere to the meat surface. Fill it with hot water to minimize heat loss when you add it to the smoker.
The Smoking Process
Place the ribs on the grates meat-side up, bone-side down. This positioning allows the bones to act as a heat shield, protecting the meat from direct heat while the top surface absorbs maximum smoke. Leave space between racks for smoke circulation—crowding restricts airflow and creates uneven cooking.
Close the lid and resist the urge to peek. Every time you open the smoker, you lose heat and extend cooking time. The old saying is true: “If you’re lookin’, you ain’t cookin’.” Trust your thermometer and maintain steady temperature.
After 90 minutes, you can optionally spritz the ribs with apple juice using a spray bottle. This adds a subtle sweetness, keeps the surface moist for continued smoke adhesion, and helps prevent the rub from burning. Spritz every 45 minutes for the remainder of Phase 1, working quickly to minimize heat loss.
What Ribs Should Look Like at 3 Hours
After three hours, your ribs should display:
- Color Development: Deep reddish-brown bark beginning to form
- Smoke Ring: Visible pink layer just beneath the surface (if you peek at a corner)
- Dry Surface: Exterior should look dry with crusty seasoning
- Internal Temperature: Around 160-165°F
- Flexibility: Ribs should still be somewhat firm, not yet tender
Common Phase 1 Mistakes to Avoid
- Opening the smoker too frequently: Each peek drops temperature by 15-25°F and adds 10-15 minutes to cook time.
- Too much smoke: Heavy smoke creates bitter, acrid flavors. You want thin, blue smoke—not thick white billows.
- Inconsistent temperature: Wild temperature swings prevent proper rendering and bark formation. Invest in a quality thermometer and learn your smoker’s quirks.
Phase 2: The 2 Hours (Wrapped in Foil)
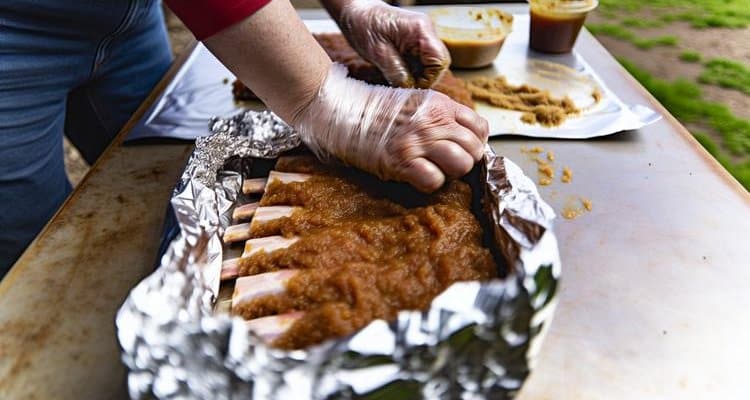
Phase 2 is the tenderization phase—where tough connective tissue breaks down and the ribs transform from chewy to succulent. This is the “crutch” that makes the 3-2-1 method so forgiving.
Preparation for Wrapping
After three hours, remove the ribs from the smoker and work quickly. Tear off two sheets of heavy-duty aluminum foil for each rack, each about 1.5 times the length of the ribs. Lay them out in a cross pattern to create a double-thick wrap.
In a small bowl, mix:
- ½ cup apple juice or cider
- 2 tablespoons brown sugar
- 1 tablespoon honey
- 1 tablespoon butter (optional, but adds richness)
Wrapping Technique
Place the ribs meat-side down on the foil (yes, meat-side down—this prevents the bark from steaming off). Pour the liquid mixture over the bone side. Fold the foil up and over the ribs, then fold the ends over to create a tight seal. You want it sealed well enough that steam won’t escape, but you don’t need to make it airtight.
The science here is critical: by wrapping the ribs with liquid in a sealed environment, you’re essentially braising them. The trapped steam keeps the meat moist while the temperature rises into the 195-205°F range, where collagen rapidly converts to gelatin. This is what transforms tough ribs into tender, pull-from-the-bone perfection.
Back to the Smoker
Return the wrapped ribs to the smoker. You can increase the temperature slightly to 250°F if needed—the foil protects the meat from direct heat, and you’re no longer building bark or absorbing smoke. Cook for exactly 2 hours.
During this phase, resist the temptation to unwrap and check. Trust the process. The internal temperature should reach 195-205°F, the magic zone where collagen breaks down completely. Some cooks use a probe thermometer inserted through the foil to monitor temperature without unwrapping, but it’s not strictly necessary if you’re following the time schedule.
What’s Happening Inside the Foil
Inside that sealed foil packet, several processes occur simultaneously. The liquid creates steam that penetrates the meat, keeping it moist and accelerating heat transfer. The brown sugar and honey partially dissolve and mix with rendered fat and meat juices, creating a flavorful braising liquid. The temperature climbs past the collagen conversion threshold, and tough connective tissue melts into gelatin, which lubricates the meat fibers and creates that tender, juicy texture.
Phase 2 Pro Tips
- Don’t peek: Opening the foil releases all that precious steam and defeats the purpose of wrapping.
- Seal properly: If your foil tears or doesn’t seal well, steam escapes and the ribs won’t tenderize properly.
- This phase can’t be rushed: Collagen conversion takes time. Trying to speed this up by increasing heat creates tough, dry ribs.
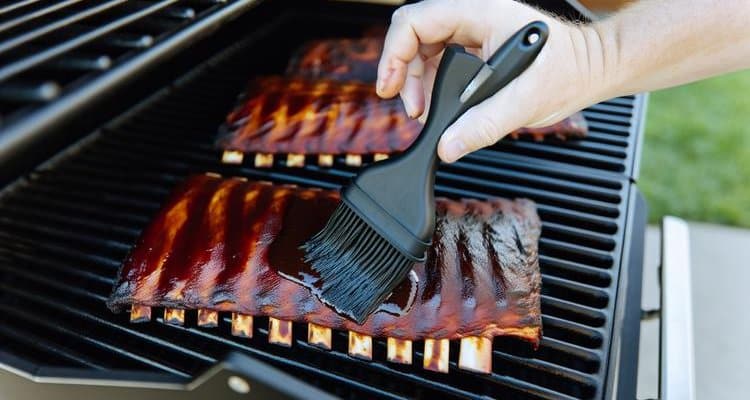
Phase 3: The 1 Hour (Glazing and Finishing)
The final hour brings everything together—setting the glaze, firming the texture, and adding that glossy, caramelized finish that makes your ribs irresistible.
Unwrapping with Care
Carefully remove the foil-wrapped ribs from the smoker. Be extremely cautious when opening the foil—the steam inside is hot enough to cause serious burns. Let the steam escape for a few seconds before fully unwrapping.
You’ll notice the ribs are very tender at this point, almost falling apart. Handle them gently with tongs, supporting them from underneath. The meat should have pulled back from the bones by about ¼ inch—a visual indicator of doneness.
You can save the liquid that accumulated in the foil—it’s rich with flavor and can be used as an au jus or incorporated into your sauce. Or discard it if you prefer.
Applying BBQ Sauce
Using your silicone basting brush, apply a generous layer of BBQ sauce to both sides of the ribs. Use a sauce you love—whether that’s a thick Kansas City-style sauce, a tangy Carolina vinegar sauce, or something in between. The key is not to use too much—you want to enhance the smoke flavor, not mask it.
Return the sauced ribs to the smoker, meat-side up. Leave them uncovered for this final phase.
Why This Phase Matters
Several important things happen during this final hour:
- Glaze Caramelization: The sugars in the BBQ sauce break down under heat, creating complex flavors and a glossy, sticky finish.
- Texture Firming: After two hours in foil, the ribs can be too tender. This final hour of dry heat firms the texture slightly, giving you that ideal bite-through tenderness without falling-apart mushiness.
- Bark Re-establishment: The bark that softened during the foil phase dries out and firms up again, providing textural contrast.
Final Hour Details
Maintain your smoker at 225-250°F for 30-60 minutes. Watch for the sauce to darken and become tacky—that’s the caramelization you’re looking for. Be careful not to let it burn; BBQ sauce is high in sugar and can go from caramelized to charred quickly.
Some pitmasters apply a second coat of sauce halfway through this phase for extra glaze buildup. If you do this, work quickly and apply a thin layer.
The final internal temperature should be 200-205°F. At this point, the ribs are done.
Doneness Tests
Temperature is reliable, but experienced pitmasters use additional indicators:
- The Bend Test: Pick up the ribs from the center with tongs. They should bend significantly, with the meat starting to crack on the surface, but they shouldn’t break in half. If they break, they’re overdone.
- The Toothpick Test: Insert a toothpick or probe between the bones. It should slide in with little resistance—like pushing through soft butter.
- Visual Cues: Meat pulling back from the bones (¼ to ½ inch), a deep mahogany color, and a glossy glaze that’s tacky to the touch.
Temperature and Timing Reference Guide
Use these tables as your roadmap for perfectly smoked ribs every time.
| Phase | Time | Temperature | Rib Position | What’s Happening |
|---|---|---|---|---|
| Phase 1 | 3 hours | 225-250°F | Unwrapped, meat-side up | Smoke penetration, bark formation, initial fat rendering |
| Phase 2 | 2 hours | 225-250°F | Wrapped in foil, meat-side down | Collagen breakdown, tenderization, moisture retention |
| Phase 3 | 1 hour | 225-250°F | Unwrapped, meat-side up, sauced | Glaze setting, texture firming, bark re-establishing |
| Total | 6 hours | 225-250°F | — | — |
| Rib Type | Recommended Method | Total Time | Notes |
|---|---|---|---|
| Spare Ribs | 3-2-1 Method | 6 hours | Larger, meatier—needs full cook time for tenderization |
| Baby Back Ribs | 2-2-1 Method | 5 hours | Leaner, more tender—reduce Phase 1 to avoid over-cooking |
| St. Louis Style | 3-2-1 Method | 6 hours | Trimmed spare ribs with uniform shape for even cooking |
| Stage | Target Internal Temp | What It Means |
|---|---|---|
| After Phase 1 (3 hours) | 160-165°F | Smoke absorbed, bark forming, collagen beginning to break down |
| After Phase 2 (5 hours) | 195-205°F | Collagen fully converted to gelatin, meat tender and juicy |
| Final/Resting (6 hours) | 200-205°F | Perfect doneness—tender with ideal texture |
Common Mistakes to Avoid
Even with a foolproof method like 3-2-1, mistakes can derail your cook. Here are the most common pitfalls and how to avoid them.
Temperature Control Issues
- Running Too Hot (275°F+): Ribs cook too fast, fat doesn’t render properly, exterior burns before interior tenderizes. The result is tough, dry meat with an acrid bark.
- Running Too Cool (Below 225°F): Extended cooking time dries out the meat, and you never reach the temperature needed for proper collagen breakdown. Ribs remain chewy.
- Wild Temperature Swings: Inconsistent heat creates uneven cooking and unpredictable results. Learn your smoker’s behavior and make small, gradual adjustments.
Timing Errors
- Rushing Phase 2: Cutting the foil phase short leaves collagen partially unbroken, resulting in tough, chewy ribs despite reaching temperature.
- Over-cooking: Leaving ribs wrapped too long creates fall-apart, mushy texture with no structural integrity.
- Skipping Phase 3: Without the final hour, the bark stays soft and the sauce never sets properly.
Preparation Mistakes
- Not Removing the Membrane: This is the #1 beginner mistake. The membrane turns into a tough, rubbery layer that’s unpleasant to eat and prevents smoke and seasoning penetration.
- Too Much Rub: While generous seasoning is good, caking on too much creates an overpowering, crusty exterior that tastes more like seasoning than meat.
- Skipping the Binder: Without mustard or another binder, the rub doesn’t adhere well and falls off during cooking.
Wrapping Problems
- Loose Foil Seal: If steam escapes, you lose the braising effect and the ribs won’t tenderize properly.
- Not Enough Liquid: Dry foil wrap can actually make ribs drier rather than more tender.
- Too Much Liquid: Drowning ribs in liquid creates a boiled texture rather than smoked.
Sauce Application Mistakes
- Applying Too Early: Sauce applied before Phase 3 burns and turns bitter from extended heat exposure.
- Too Much Sauce: Heavy-handed saucing masks the smoke flavor you worked hard to develop.
- Wrong Sauce Type: High-sugar sauces burn easily. If using a sweet sauce, thin it slightly with apple juice or apply a thinner layer.
Troubleshooting Guide
When things don’t go as planned, use this guide to diagnose and fix the issue—either mid-cook or for your next attempt.
Problem: Ribs Are Too Tender or Mushy
Cause: Over-cooked in Phase 2, or temperature too high throughout the cook.
Solution: Reduce Phase 2 to 1.5 hours next time, or try the 2-2-1 method instead. Some pitmasters prefer more “bite” in their ribs and intentionally reduce the foil phase. You can also try increasing your smoker temperature slightly (245-250°F) to reduce total cook time while still achieving tenderness.
Problem: Ribs Are Tough and Chewy
Cause: Not enough time in Phase 2, temperature too low, or collagen didn’t break down completely.
Solution: Verify your thermometer accuracy—many cheap thermometers are off by 10-25°F. If temperature is accurate, extend Phase 2 to 2.5 hours. Make sure ribs reach at least 195°F internal temperature. If they’re still tough after proper time and temp, you may have had particularly tough ribs to begin with (older animal, less marbling).
Problem: No Smoke Flavor
Cause: Not enough wood added, wood added only at the beginning, or temperature too high (smoke compounds burn off rather than penetrate).
Solution: Add wood throughout Phase 1, not just at the start. Use wood chunks rather than chips—they smolder longer. Consider a smoke tube or pellet tube to generate consistent smoke. Make sure you’re seeing thin, blue smoke, not thick white smoke (which indicates incomplete combustion and bitter flavors).
Problem: Bitter, Acrid Taste
Cause: Too much smoke, especially thick white smoke, or using too strong a wood (mesquite on long cooks).
Solution: Use lighter woods like apple, cherry, or pecan. Reduce the amount of wood—you don’t need continuous heavy smoke. Ensure proper airflow in your smoker; poor ventilation creates creosote buildup that tastes terrible.
Problem: Bark Is Soft or Non-Existent
Cause: Too much moisture during Phase 1, foil leaked during Phase 2 and steamed the bark off, or Phase 3 was too short.
Solution: Reduce spritzing frequency in Phase 1. Ensure tight foil seal in Phase 2. Extend Phase 3 to 75-90 minutes and consider increasing temperature slightly (250-275°F) to dry out the surface. Some competition cooks skip sauce entirely to maintain maximum bark crispness.
Problem: BBQ Sauce Is Burning
Cause: Temperature too high during Phase 3, sauce applied too thick, or sauce has very high sugar content.
Solution: Lower temperature to 225°F for Phase 3. Thin your sauce with 2-3 tablespoons of apple juice. Apply a thinner layer and consider a second coat rather than one thick application. Watch closely during the final 30 minutes.
Tips for Perfect Results Every Time
Master these advanced tips to take your smoked ribs from good to competition-worthy.
Pro Tips from Competition BBQ Pitmasters
- Let Ribs Rest: After removing from the smoker, let ribs rest for 10-15 minutes tented with foil. This allows juices to redistribute and makes slicing cleaner. If you want to learn more about proper resting techniques, check out our guide on how long to rest brisket which applies similar principles to ribs.
- Save the Foil Liquid: That flavorful liquid from Phase 2 makes an incredible au jus. Strain it, skim the fat, and serve it alongside the ribs or reduce it into a sauce.
- Experiment with Woods: Try different wood combinations—hickory and cherry, oak and apple, etc. Keep notes on which flavors you prefer.
- Keep a Cook Log: Document temperature, timing, weather conditions, and results. This helps you dial in your specific smoker and climate.
- Calibrate Your Thermometer: Test it in boiling water (should read 212°F at sea level) and ice water (should read 32°F). If it’s off, either calibrate it or note the offset.
- Cut Against the Bone: When slicing, cut between each bone for perfect single-bone portions that look professional.
Variations to Try
- Competition-Style Ribs: Reduce Phase 2 to 1.5 hours for more “bite” and texture. Competition judges prefer ribs that don’t fall off the bone.
- Extra-Tender Home-Style: Extend Phase 2 to 2.5 hours for fall-off-the-bone tenderness that’s perfect for family cookouts.
- Spicy Glazed Ribs: Mix hot sauce or chili crisp into your BBQ sauce during Phase 3 for heat.
- Asian-Inspired Ribs: Replace BBQ sauce with teriyaki glaze or gochujang mixed with honey in Phase 3.
- Dry-Rub Style: Skip the sauce entirely in Phase 3 and add a second layer of rub for a crusty, Memphis-style rib finish.
Quick Reference: Perfect 3-2-1 Ribs Checklist
- ✓ Remove membrane completely
- ✓ Apply generous rub with binder
- ✓ Maintain 225-250°F throughout cook
- ✓ Phase 1: 3 hours unwrapped, optional spritzing
- ✓ Phase 2: 2 hours wrapped with liquid, sealed tight
- ✓ Phase 3: 1 hour unwrapped with sauce
- ✓ Final temp: 200-205°F
- ✓ Rest 10-15 minutes before serving
Frequently Asked Questions
1. What is the 3-2-1 method for smoking ribs?
The 3-2-1 method is a time-tested technique for smoking ribs that divides the cooking process into three phases: 3 hours of smoking unwrapped at 225-250°F to develop bark and smoke flavor, 2 hours wrapped in foil with liquid to tenderize and break down connective tissue, and 1 hour unwrapped with BBQ sauce to set the glaze and firm the texture. This structured approach delivers consistently tender, flavorful ribs and is particularly forgiving for beginners because it removes much of the guesswork associated with traditional smoking.
2. How long does it take to smoke ribs using the 3-2-1 method?
The 3-2-1 method takes exactly 6 hours of cooking time, broken down as follows: 3 hours unwrapped smoking, 2 hours wrapped in foil, and 1 hour unwrapped glazing. Add approximately 30-45 minutes for the smoker to preheat and 15 minutes of resting time after cooking, bringing your total time commitment to about 7 hours from start to finish. Note that baby back ribs require less time and should use the 2-2-1 method (5 hours total) to avoid over-tenderizing.
3. What temperature should I smoke ribs at?
Maintain your smoker at 225-250°F throughout all three phases of the cook. This temperature range is ideal because it’s hot enough to render fat, develop bark, and break down collagen, but cool enough to prevent drying or burning during the 6-hour cook. The internal temperature of the ribs should reach 160-165°F after Phase 1 and 200-205°F by the end of Phase 3. Accurate temperature monitoring requires a reliable thermometer—see our guide to the best smoker thermometers for recommendations.
4. Should I use the 3-2-1 method for baby back ribs?
No, the traditional 3-2-1 method is designed for spare ribs and St. Louis style ribs, which are larger and meatier. Baby back ribs are leaner and more tender, so they cook faster and require less time to break down connective tissue. For baby back ribs, use the modified 2-2-1 method: 2 hours unwrapped, 2 hours wrapped, and 1 hour glazing, for a total of 5 hours. Using the full 3-2-1 method on baby backs typically results in over-tenderized, mushy meat that falls apart.
5. Do I have to wrap ribs in foil?
Wrapping in foil isn’t mandatory, but it’s the defining characteristic of the 3-2-1 method and serves a critical purpose: creating a sealed, humid environment that breaks down collagen and tenderizes the meat. Without wrapping (sometimes called “naked ribs”), you’ll get more bark and a firmer texture, but the ribs require more attention to avoid drying out and may not achieve the same level of tenderness. Some pitmasters prefer unwrapped ribs for competition, where more “bite” is preferred. If you skip wrapping, monitor moisture carefully and consider using a water pan throughout the cook.
6. What’s the best wood for smoking ribs?
The best wood depends on your flavor preference. Hickory is the traditional choice, providing strong, bacon-like smoke flavor that’s classic for pork ribs. Apple and cherry offer milder, slightly fruity smoke that’s excellent for those who prefer subtler flavor. Oak provides clean, neutral smoke that lets the meat and rub shine through. Avoid mesquite for long cooks like the 3-2-1 method—it’s too intense and can turn bitter over 6 hours. Many pitmasters use a combination, like hickory for the first hour and then apple for the remaining Phase 1 time.
7. Can I use this method on a gas grill?
Yes, you can adapt the 3-2-1 method for a gas grill with some modifications. Set up for indirect heat by turning on only one or two burners and placing the ribs on the opposite side. Maintain 225-250°F by adjusting the burner(s). For smoke flavor, use a smoker box filled with wood chips, or wrap wood chips in aluminum foil with holes poked in it and place directly on the lit burner. You’ll need to replace the chips every 45-60 minutes during Phase 1. While gas grills don’t provide as much smoke flavor as dedicated smokers, the 3-2-1 method still delivers tender, delicious ribs.
8. How do I know when ribs are done?
Use a combination of indicators: the internal temperature should reach 200-205°F by the end of Phase 3. For the bend test, pick up the ribs from the center with tongs—they should bend significantly with the meat starting to crack on the surface, but they shouldn’t break in half. For the toothpick test, insert a toothpick or probe between bones—it should slide in with little resistance, like pushing through soft butter. Visually, look for meat that’s pulled back from the bones by ¼ to ½ inch, a deep mahogany color, and a glossy, tacky glaze.
9. Why are my ribs tough after 6 hours?
If your ribs are tough despite following the 3-2-1 method timing, the most likely causes are: (1) smoker temperature too low—collagen doesn’t break down properly below 225°F, (2) inaccurate thermometer reading—many cheap thermometers are off by 10-25°F, or (3) foil wasn’t sealed properly during Phase 2, allowing steam to escape and preventing proper braising. Verify your thermometer accuracy and ensure your smoker is actually reaching 225-250°F. Next time, extend Phase 2 to 2.5 hours if your particular ribs were especially tough. If you’re new to BBQ, our BBQ beginner’s guide covers temperature control fundamentals.
10. Can I make ribs ahead of time?
Yes, smoked ribs reheat well and can be made 1-2 days ahead. After completing the 3-2-1 method, let the ribs cool completely, then wrap tightly in foil and refrigerate. To reheat, place the foil-wrapped ribs in a 250°F oven for 30-45 minutes until heated through (internal temp 140°F). Alternatively, reheat them on the grill for 10-15 minutes per side over indirect heat. For longer storage, wrap ribs in plastic wrap and then foil, and freeze for up to 3 months. Thaw in the refrigerator overnight before reheating. Note that reheated ribs won’t have the same crispy bark as freshly cooked ribs, but the flavor and tenderness remain excellent.
11. What if I don’t have apple juice?
Apple juice is commonly used for spritzing during Phase 1 and in the foil wrap during Phase 2, but several substitutes work well. Apple cider vinegar (diluted 1:3 with water) adds tang and helps break down connective tissue. Beer (especially lighter lagers or wheat beers) adds malty depth. Cola provides sweetness and acidity. Chicken or beef broth adds savory notes without sweetness. Even plain water works in a pinch—the primary purpose of the liquid is to create steam and keep the surface moist, with flavor being a secondary benefit. For the foil wrap specifically, combine your liquid with brown sugar and honey to ensure you still get the tenderizing and flavoring effect.
12. Should ribs fall off the bone?
This is a matter of personal preference, though competition BBQ judges prefer ribs that don’t fall off the bone. Ribs that pull cleanly from the bone with a bite but maintain some structure are considered the ideal by BBQ purists—this is called “bite-through” tenderness. Ribs that fall off the bone are technically over-cooked, though many home cooks and casual BBQ lovers prefer this ultra-tender texture. The 3-2-1 method typically produces ribs that are close to fall-off-the-bone tender. If you want more bite, reduce Phase 2 to 1.5 hours. If you want them even more tender, extend Phase 2 to 2.5 hours. There’s no right or wrong—cook to your preference.
Conclusion
Mastering how to smoke ribs using the 3-2-1 method is one of the most rewarding skills in BBQ. By understanding the science behind each phase—smoke penetration and bark formation in Phase 1, collagen breakdown and tenderization in Phase 2, and texture firming and glaze setting in Phase 3—you’re equipped to produce consistently outstanding results.
Remember the key principles: maintain steady temperature control at 225-250°F, remove the membrane before cooking, seal the foil tightly during Phase 2, and trust the process rather than constantly checking. Temperature control and timing are everything with this method.
Your first attempt may not be perfect, and that’s okay. Even experienced pitmasters continue refining their technique with each cook. Keep notes on what works for your specific smoker and climate, experiment with different woods and rubs, and don’t be afraid to adjust the timing based on your texture preferences.
The beauty of the 3-2-1 method is that it’s both foolproof enough for beginners and flexible enough for advanced cooks to customize. Whether you prefer fall-off-the-bone tender ribs for family cookouts or competition-style ribs with more bite, this method provides the foundation to achieve your perfect rack.
Now it’s time to fire up your smoker and put this knowledge into practice. Grab a couple of racks of spare ribs, set aside 7 hours this weekend, and experience the satisfaction of serving ribs that rival the best BBQ joints. Your friends and family will be impressed, and you’ll join the ranks of backyard pitmasters who’ve mastered the art of smoking ribs.
Pro tip: Keep a detailed log of your first few cooks—temperatures, timing adjustments, weather conditions, and how the ribs turned out. This becomes your personal playbook for achieving perfect ribs every time.
Contents
- Quick Roundup List
- What is the 3-2-1 Method for Smoking Ribs?
- Why the 3-2-1 Method Works: The Science Behind Each Phase
- Equipment and Supplies Needed
- Choosing and Preparing Your Ribs
- Temperature and Timing Reference Guide
- Common Mistakes to Avoid
- Troubleshooting Guide
- Tips for Perfect Results Every Time
- Frequently Asked Questions
- Conclusion