The decision of when and how to wrap brisket represents one of the most critical moments in the entire smoking process. This technique, often called the “Texas Crutch,” can mean the difference between serving succulent, tender meat at the perfect time and watching your brisket languish in the dreaded stall for hours on end.
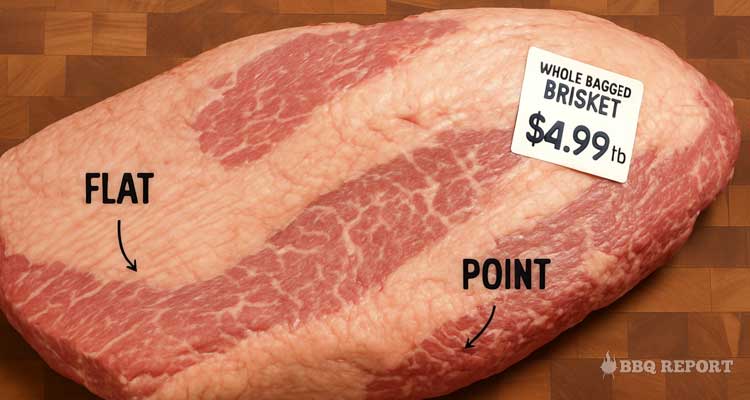
Wrapping brisket involves encasing your partially-cooked meat in either butcher paper or aluminum foil, then returning it to the smoker to finish cooking. This seemingly simple step profoundly impacts your brisket’s cooking time, moisture retention, crust texture, and final flavor profile. Understanding what is brisket and how its unique composition responds to wrapping is essential for making the right choice.
The two primary wrapping methods—pink butcher paper and heavy-duty aluminum foil—each deliver distinctly different results. Butcher paper maintains a firmer bark while still speeding up cooking, whereas aluminum foil creates maximum moisture retention but softens the crust. Some pitmasters skip wrapping entirely, accepting longer cook times in exchange for the crispiest bark and most intense smoke flavor.
By the end of this guide, you’ll know exactly when to wrap brisket, which wrapping method aligns with your goals, and how to execute each technique perfectly. Whether you’re smoking your first brisket or refining your competition-level skills, mastering the wrap will elevate your BBQ game significantly. For a comprehensive overview of the entire brisket smoking process, check out our complete guide on how to smoke brisket.
Why Wrap Brisket?
Beyond simply overcoming the stall, wrapping brisket delivers three primary benefits that dramatically improve your final results.
Faster Cooking Time: Wrapping can shave 2-4 hours off your total cook time by pushing through the temperature plateau efficiently. Instead of waiting for evaporative cooling to naturally subside, you eliminate it entirely. For a 12-pound brisket that might normally take 14-16 hours unwrapped, wrapping can bring your total time down to 10-12 hours—a significant difference when planning your day.
Enhanced Juiciness: Once wrapped, your brisket essentially braises in its own rendered fat and natural liquids. This self-basting environment keeps the meat incredibly tender and accelerates the breakdown of tough connective tissue into silky gelatin. The result is that melt-in-your-mouth quality that defines great brisket.
Crust Protection and Control: Wrapping at the right moment preserves the dark mahogany crust you’ve spent hours developing during the early smoking phase. It prevents over-charring or burning during the extended cooking process. While wrapping does soften the exterior compared to leaving it unwrapped, proper technique maintains a satisfying texture rather than a soggy surface.
The trade-off for these benefits is a slight reduction in smoke flavor intensity, since wrapping creates a barrier between the wood smoke and your meat. However, most smoke absorption occurs during the first few hours of cooking before you wrap—by the time you reach wrapping temperature, your brisket has already absorbed the majority of the smoke flavor it’s going to get.
Understanding the Texas Crutch
The “Texas Crutch” earned its name on the competitive barbecue circuit, where pitmasters needed a reliable way to deliver perfectly cooked brisket at precise times for judging. This wrapping technique became their secret weapon for predictable results under pressure.
At the heart of the Texas Crutch lies a phenomenon every brisket smoker encounters: the stall. When your brisket’s internal temperature reaches approximately 150-170°F, it seemingly stops cooking altogether. What’s happening is a battle between your smoker’s heat and evaporative cooling from the meat’s surface moisture. As liquid evaporates from the brisket, it cools the exterior—the same principle that keeps you cool when you sweat on a hot day.
This temperature plateau can persist for 2-6 hours, testing even the most patient pitmaster’s resolve. The stall occurs because the rate of evaporation perfectly balances the heat input from your smoker, creating a frustrating stalemate. Your brisket isn’t getting hotter, but it’s also not getting more tender, and your carefully planned dinner timeline starts falling apart.
Wrapping brisket eliminates the air circulation around the meat’s surface, preventing moisture from evaporating. Instead of cooling through evaporation, your brisket becomes surrounded by its own hot juices, which conduct heat far more efficiently than air. The temperature begins climbing again, and the collagen-to-gelatin conversion that makes brisket tender accelerates dramatically.
Competition pitmasters embraced this technique because it provided timing control—the ability to predict within reasonable accuracy when their brisket would be ready. For home cooks, the Texas Crutch offers the same advantage: no more guessing whether dinner will be ready at 6 PM or midnight. This technique also works wonderfully for other large cuts like pork shoulder—learn more about smoking pork shoulder and managing its stall.
When to Wrap Brisket
Timing your wrap correctly is crucial—wrap too early and your crust never properly develops; wrap too late and you’ve already endured most of the stall without any benefit.
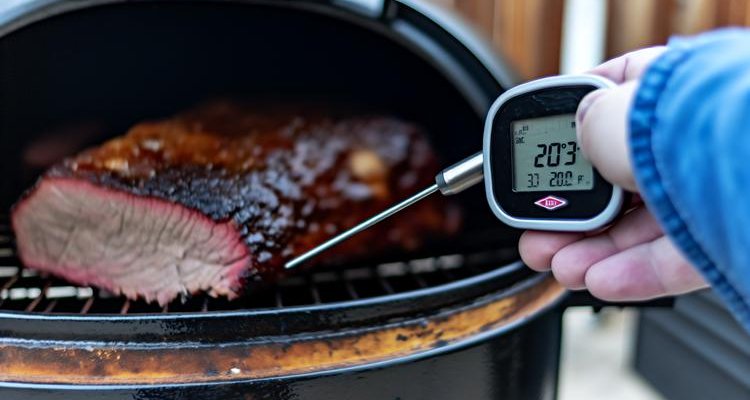
The reliable temperature guideline is 165-170°F internal temperature, measured in the thickest part of the brisket flat. However, temperature alone doesn’t tell the complete story. You must also inspect the exterior visually and tactilely.
The surface should be firm, dark mahogany in color, and resistant to scraping when you touch it. If you can easily wipe the seasoning off with your finger, the crust hasn’t set properly yet—wait longer. It should feel almost crusty to the touch, indicating that the Maillard reaction has fully developed the exterior.
Both temperature and visual inspection matter equally. A brisket might hit 165°F but still have soft, underdeveloped crust if your smoker was running cooler than ideal. Conversely, a hot-running smoker might create firm texture before reaching 165°F. Trust both indicators, not just one. Using a reliable wireless meat thermometer makes monitoring temperature throughout the cook much easier.
If you wrap too early, the surface never has a chance to properly develop that signature crust. The moist environment inside the wrap will prevent the exterior from drying and firming up, leaving you with soft, unimpressive texture even though the meat itself will be tender.
If you wrap too late—say, at 180°F or higher—you’ve likely already pushed through the worst of the stall naturally. You’ll still get some benefit from wrapping, but you’ve missed the window where it provides maximum advantage for overcoming the temperature plateau.
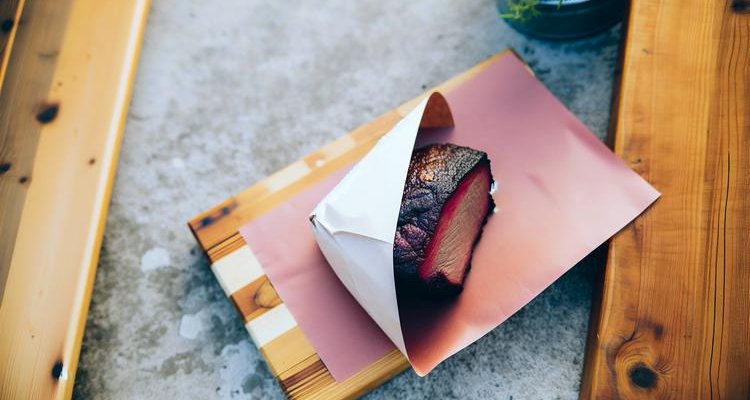
Butcher Paper Method: Complete Guide
Butcher paper, specifically the pink “peach paper” variety, has become the preferred choice among serious pitmasters and competition BBQ teams. This food-grade, unwaxed paper must be specifically designed for cooking—regular kraft paper or waxed paper will not work and can even be dangerous.
Pros of Butcher Paper
- Breathable material: Unlike foil, butcher paper allows vapor exchange, which helps preserve crust texture while still providing insulation against heat loss
- Maintains crust integrity: The paper doesn’t create as wet an environment as foil, so your exterior stays firmer and more textured
- Balanced liquid retention: Absorbs some grease while keeping the brisket from drying out, creating an ideal middle ground
- Allows minimal vapor movement: The breathable nature of paper allows vapor to escape gradually, not through direct smoke penetration but through controlled evaporation that maintains firmness
Cons of Butcher Paper
- Requires practice: Creating a tight, leak-proof wrap takes several attempts to master—your first few wraps may be frustratingly loose or develop gaps
- Slightly longer cook time: Because paper is breathable, it doesn’t push through the temperature plateau quite as fast as foil (though still much faster than unwrapped)
- Less liquid retention: If you prize maximum juiciness above all else, foil creates a more intensely wet environment
- Harder to seal: Paper can tear more easily than foil, and achieving a watertight seal requires proper folding technique
Step-by-Step Butcher Paper Wrapping Instructions
- Prepare your paper: Tear off two arm-length sheets of butcher paper and overlap them by about half their width to create a wider working surface. This prevents gaps and ensures you have enough paper to fully encircle the brisket.
- Position the brisket: Place your brisket fat-side up in the center of the overlapped paper, positioned closer to one edge than the middle.
- Fold the bottom edge: Bring the bottom edge of the paper up and over the brisket, pulling it tightly across the top surface. You want snug contact with the meat—no air pockets.
- Fold the sides: Fold the left and right sides of the paper tightly toward the center, tucking them under the brisket as you roll. Think of it like wrapping a burrito—tight, sequential folds.
- Complete the wrap: Continue rolling the brisket forward, wrapping it in the paper until the entire piece is enclosed with no gaps or exposed areas. The final seam should be on the bottom.
- Optional liquid addition: Before completing the wrap, you can add 2-4 tablespoons of beef broth, beef tallow, or even beer for additional moisture and flavor. This step is purely optional but can enhance juiciness.
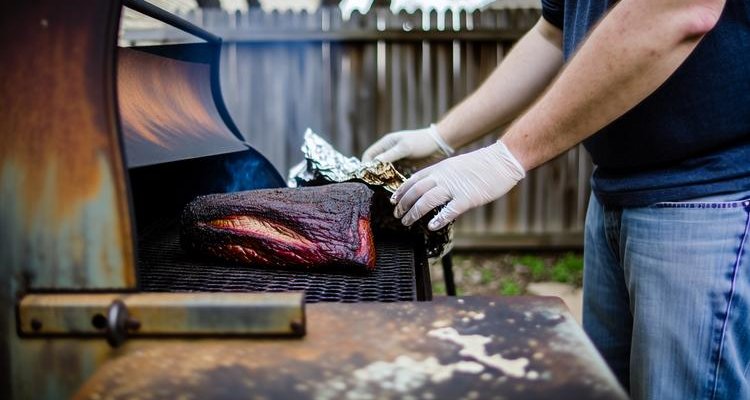
- Return to smoker: Place the wrapped brisket back on the smoker fat-side up. The fat cap will continue to render and baste the meat from above.
Pro Tips for Success: Practice your wrapping technique on a cold brisket before attempting it on a hot one. Don’t worry if small tears develop in the paper—they won’t ruin your brisket. Use heavy-duty butcher paper rated for BBQ use, not the thin variety meant for wrapping sandwiches. Work quickly but carefully when handling the hot brisket.
Aluminum Foil Method: Complete Guide
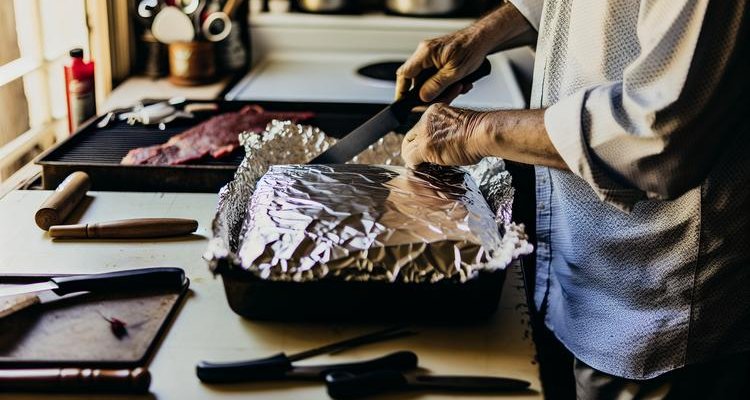
Aluminum foil is the original wrapping method and remains the most foolproof option for beginners learning how to wrap brisket. Its completely non-breathable surface creates the most dramatic effect on cooking time and liquid retention.
Pros of Aluminum Foil
- Easiest for beginners: Foil is incredibly forgiving—even a messy wrap will create an adequate seal
- Fastest cook time: The airtight seal pushes through the temperature plateau more aggressively than any other method
- Maximum juiciness: Creates a sealed, steamy environment that essentially braises your brisket in its own liquids
- Guaranteed tight seal: Unlike paper, foil crimps and molds perfectly around the meat, eliminating any risk of leaks
Cons of Aluminum Foil
- Softens crust texture: The extremely wet environment inside foil wrap significantly softens the crusty exterior you worked so hard to develop
- Stops all vapor exchange: Once wrapped in foil, no smoke can reach the meat and no vapor can escape, creating a pot-roast-like texture if wrapped for too long
- Can create pot-roast texture: Extended time in foil risks making your brisket taste more like braised beef than smoked BBQ
Step-by-Step Aluminum Foil Wrapping Instructions
- Prepare your foil: Tear off two arm-length pieces of heavy-duty aluminum foil. Don’t skimp here—cheap, thin foil will tear easily when handling hot brisket.
- Layer the foil completely: Place both sheets directly on top of each other, creating a double layer for strength and tear resistance.
- Center the brisket: Place your brisket in the middle of the layered foil, positioning it so you have enough foil on all sides to fully wrap around.
- Wrap from all sides: Bring the long sides of the foil up and over the brisket, then fold the ends in tightly. Eliminate air pockets by pressing the foil against the meat’s surface as you work.
- Crimp the edges: Fold and crimp all edges to create a complete, watertight seal. The goal is zero leakage—all those precious juices need to stay with the meat.
- Optional liquid addition: Before sealing completely, add 2-4 tablespoons of beef broth, apple juice, or melted beef tallow. Some pitmasters add up to ¼ cup of liquid for maximum moisture.
- Return to smoker: Place the foil-wrapped brisket back on the smoker fat-side up. You can now safely increase your smoker temperature to 275°F if desired, since the foil protects the meat from direct heat.
Pro Tips for Success: Always use heavy-duty foil—the cheap stuff tears too easily. Double-layering isn’t optional; it prevents punctures and provides better insulation. Seal your edges thoroughly to keep all the moisture inside. Monitor temperature closely after wrapping, as foil can cause rapid temperature increases. Check every 30 minutes once wrapped.
Comparison: Paper vs Foil vs Bare
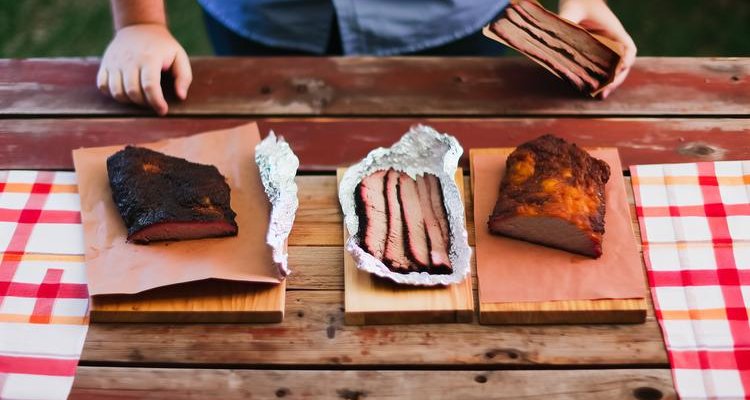
| Method | Cook Time | Juiciness Level | Crust Texture | Smoke Flavor | Difficulty | Best For |
|---|---|---|---|---|---|---|
| Butcher Paper | Moderate (8-12 hrs total) | High | Firm, crusty | Moderate | Medium | Balance of crust & juiciness |
| Aluminum Foil | Fastest (7-10 hrs total) | Highest | Soft, tender | Mild | Easy | Speed & maximum tenderness |
| No Wrap (Bare) | Slowest (12-16 hrs total) | Lower | Crispiest, thickest | Strongest | Hard | Traditional crust, smoke flavor |
The unwrapped or “bare” method appeals to traditionalists who prioritize maximum crust development and the most intense smoke flavor. Cooking brisket completely unwrapped produces the thickest, crunchiest exterior and allows smoke to penetrate throughout the entire cooking process. However, this approach requires constant monitoring, regular spritzing to prevent drying, and acceptance of significantly longer cook times. The risk of drying out increases substantially, especially if you’re working with a leaner cut.
Each method for how to wrap brisket makes sense depending on your specific priorities. Choose butcher paper when you want competition-quality results with balanced texture and juiciness. Choose aluminum foil when time is tight or you’re new to smoking and want foolproof results. Choose the bare method when you’re experienced, have time flexibility, and want to maximize traditional BBQ flavor characteristics. The type of smoker you use also affects your decision—learn more about different smoker types to understand how each handles moisture and temperature.
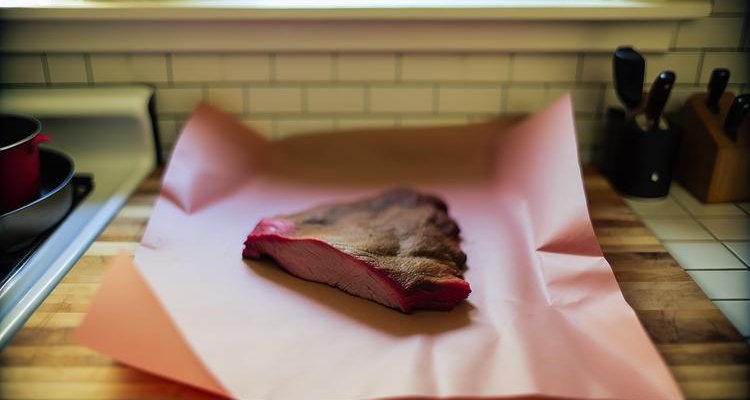
After Wrapping: What to Expect
Once your brisket is wrapped and back in the smoker, the cooking dynamics change dramatically. Temperature monitoring becomes even more critical during this phase.
Check temperature every 30 minutes after wrapping. Unlike the slow climb before wrapping, wrapped brisket can gain 10-20°F per hour once the stall is broken. This rapid rise catches many pitmasters off guard, leading to overcooked meat.
Your target final temperature is 203°F, but temperature alone doesn’t determine doneness. The probe test is equally important: insert your thermometer probe or a skewer into the thickest part of the brisket. It should slide in and out with minimal resistance, feeling like you’re pushing through warm butter. If you encounter firm resistance, the brisket needs more time regardless of what the temperature reads.
Some cuts reach perfect tenderness at 200°F, while others need 207°F—collagen content and individual muscle structure vary. The probe test tells you the truth about tenderness that temperature alone cannot.
Optional crust re-crisping: If you want to restore some crunch to the exterior that softened during wrapping, unwrap your brisket when it hits 203°F and return it to the smoker at 225-250°F for 15-30 minutes. This dries the surface slightly and firms up the texture without overcooking the interior. This step is particularly helpful if you used aluminum foil.
Resting is non-negotiable: Keep your brisket wrapped for a minimum of 1 hour after removing it from the smoker. Better yet, rest it for 2-4 hours in a cooler lined with towels (the “faux Cambro” method). During this rest period, juices redistribute throughout the meat, moisture equalizes, and carryover cooking gently brings the internal temperature up a final degree or two. Learning how long to rest brisket properly is just as important as perfecting the wrapping technique.
Cutting into a brisket immediately after cooking causes all those carefully retained juices to flood out onto your cutting board instead of staying in the meat. Patience during the rest period pays enormous dividends in final juiciness and flavor. When you’re ready to slice, having a quality brisket knife makes all the difference in presentation and texture.
Common Mistakes to Avoid
Even experienced pitmasters can fall into these wrapping pitfalls. Recognizing and avoiding them dramatically improves your success rate.
Wrapping too early: This is the most common mistake when learning how to wrap brisket. If your crust hasn’t developed a firm, dark texture before wrapping, it never will. The wet environment inside the wrap prevents the necessary drying and Maillard reactions that create proper crust. Wait for both the temperature (165-170°F) AND visual confirmation of set crust before wrapping.
Wrapping too late: Waiting until 180°F or higher means you’ve already naturally pushed through most of the temperature plateau. While wrapping will still help finish the cook, you’ve missed the window where it provides maximum time-saving benefit. The sweet spot is truly 165-170°F.
Not sealing the wrap tightly: Loose wrapping allows liquid to escape and heat to dissipate, negating the entire benefit of wrapping. Whether using paper or foil, create a snug seal with minimal air pockets. Sloppy wrapping gives you the worst of both worlds—softened exterior without the time savings or juiciness.
Overcooking after wrapping: The rapid temperature rise after wrapping catches many people off guard. Failing to monitor temperature every 30 minutes can result in brisket that climbs to 210°F or higher, becoming mushy and falling apart instead of slicing cleanly. Set timers and stay vigilant.
Using the wrong type of paper: Waxed paper, parchment paper, or freezer paper are not suitable for high-heat smoking. Waxed paper can melt and transfer chemicals to your food. Always use unwaxed, food-grade pink butcher paper specifically sold for BBQ use.
Not resting after cooking: Slicing immediately causes catastrophic juice loss. All the moisture you worked so hard to retain will pour out onto your cutting board. Minimum one hour rest, preferably 2-4 hours. This isn’t optional—it’s essential.
Expert Tips and Pro Techniques
Competition BBQ insights: Professional competition teams overwhelmingly prefer butcher paper over foil. The firmer exterior scores better with judges, and the moisture level is easier to control precisely. If you’re serious about perfecting your technique, paper is the gold standard to work toward.
Adding liquids strategically: When wrapping, 2-4 tablespoons of beef broth adds beefy flavor, apple juice provides subtle sweetness and helps tenderize, and melted beef tallow boosts richness and fat content. Avoid adding more than ¼ cup liquid—too much creates a braised texture rather than smoked meat.
The “foil boat” method: This hybrid approach uses foil on the bottom and sides of the brisket while leaving the top exposed. It provides moisture retention underneath while allowing the top crust to continue developing. Form a foil tray, place the brisket in it fat-side up, and return it to the smoker uncovered on top. This technique offers a middle ground between full wrapping and leaving bare.
Rescuing over-dried crust: If your exterior became too dry or started to char before wrapping temperature, lightly spritz it with apple cider vinegar diluted 50/50 with water, then wrap immediately. The liquid and acidity help rescue the surface while the wrap prevents further drying. This is a recovery technique for already-damaged crust, not the same as intentionally re-crisping after cooking.
Re-crisping softened crust: If your exterior softened during wrapping but isn’t damaged—just tender—unwrap at 203°F and return to a 250-275°F smoker for 20-30 minutes. This evaporates surface liquid and firms the texture. This is a refinement step for texture that’s fine but could be better, not a rescue operation.
Adjusting smoker temperature after wrapping: Once wrapped, you can safely increase your smoker temperature to 275°F without risk of burning the exterior. The wrap protects the meat from direct heat while the higher temperature accelerates the final cooking phase. This technique is especially useful if you’re running behind schedule.
Frequently Asked Questions
What temperature should I wrap brisket?
Wrap at 165-170°F internal temperature when the crust is firm, dark mahogany-colored, and resistant to scraping. Both temperature and crust development must be right—don’t wrap based on temperature alone.
Should I wrap brisket in foil or butcher paper?
Choose butcher paper for firmer texture and balanced juiciness with longer cook time. Choose aluminum foil for maximum juiciness, fastest cooking, and easiest technique for beginners. Both work—it depends on your priorities.
What is the Texas Crutch?
The Texas Crutch is the technique of wrapping meat (usually brisket) in foil or paper to overcome the temperature plateau and speed up cooking. It originated on the competition barbecue circuit where precise timing was essential.
Can you wrap brisket too early?
Yes. Wrapping before the crust properly develops prevents it from forming a firm texture. Always wait for both the correct temperature AND visual confirmation of set, dark crust before wrapping.
Do you have to wrap brisket?
No, wrapping is optional. Unwrapped brisket takes significantly longer (12-16 hours) and risks drying out, but produces the crispiest exterior and strongest smoke flavor. Wrapping helps most home cooks achieve consistent results.
How long does the brisket stall last?
The stall typically lasts 2-6 hours, occurring around 150-170°F internal temperature. Duration depends on brisket size, smoker temperature, humidity, and how much moisture remains on the surface.
Should I add liquid when wrapping brisket?
Adding 2-4 tablespoons of beef broth, apple juice, or melted beef tallow is optional but beneficial for extra moisture and flavor. Avoid adding more than ¼ cup, as too much liquid creates a braised texture.
Can I switch from paper to foil mid-cook?
Yes. If your cook is running long and you need to speed things up, you can unwrap from paper and rewrap in foil. This accelerates the final cooking phase without sacrificing too much bark quality.
What’s Aaron Franklin’s preferred wrapping method?
Aaron Franklin uses pink butcher paper for his award-winning briskets. This method balances bark texture with moisture retention, producing competition-quality results that made his Austin restaurant world-famous.
Does wrapping brisket make it more tender?
Yes. Wrapping creates a moist, hot environment that accelerates collagen breakdown into gelatin. The brisket essentially braises in its own juices, becoming significantly more tender faster than unwrapped cooking.
How do I re-crisp crust after wrapping?
Unwrap your brisket when it reaches 203°F and return it to a 225-250°F smoker for 20-30 minutes. This evaporates surface liquid and firms the crust texture without overcooking the interior.
Should brisket be fat-side up or down when wrapping?
Fat-side up is recommended for most smokers when you wrap brisket. The fat cap protects the meat from direct heat and continuously bastes as it renders. Maintain this orientation when wrapping and returning to the smoker.
Making Your Decision: Which Wrapping Method Is Right for You?
The decision between butcher paper, aluminum foil, or no wrapping ultimately comes down to three factors: time constraints, crust priorities, and moisture preferences.
Choose aluminum foil if: You’re new to smoking brisket and want the most foolproof results, you’re working with a tight timeline and need the fastest cook time, or maximum tenderness and juiciness are your top priorities. Foil forgives technique errors and delivers consistently tender results.
Choose butcher paper if: You want the best balance of crust quality and juiciness, you’re pursuing competition-level results, or you have time for a slightly longer cook (but still faster than unwrapped). Paper represents the current gold standard among serious pitmasters.
Choose no wrap (bare) if: You’re an experienced pitmaster comfortable with extended cook times, crusty exterior and maximum smoke flavor are your highest priorities, or you’re cooking in the traditional low-and-slow style without time constraints. This method demands the most attention but rewards with the most authentic BBQ characteristics.
Don’t be afraid to experiment with different methods across multiple cooks. Many pitmasters start with foil to build confidence and consistent results, then graduate to butcher paper as their skills develop, and eventually try unwrapped smoking to compare the differences firsthand.
Success in brisket smoking depends less on which wrapping method you choose and more on executing proper technique: monitoring temperature vigilantly, trusting both thermometer and probe tenderness test, and resting adequately before slicing. Master these fundamentals regardless of your wrapping preference.
For those just beginning their BBQ journey, understanding the fundamentals of smoking and temperature control will help you apply these wrapping techniques more effectively and build confidence with each cook. Additionally, choosing quality wood pellets or the right smoker for your setup can significantly impact your results.
Understanding how to wrap brisket with paper vs foil isn’t a shortcut that compromises quality—it’s a sophisticated technique that gives you control over timing and texture. Whether you choose paper, foil, or bare smoking, you’re now equipped with the knowledge to wrap brisket like a competition pitmaster. And if you’re curious about the investment involved, our guide on brisket prices can help you budget for your next cook.
Contents
- Why Wrap Brisket?
- Understanding the Texas Crutch
- When to Wrap Brisket
- Butcher Paper Method: Complete Guide
- Aluminum Foil Method: Complete Guide
- Comparison: Paper vs Foil vs Bare
- After Wrapping: What to Expect
- Common Mistakes to Avoid
- Expert Tips and Pro Techniques
- Frequently Asked Questions
- Making Your Decision: Which Wrapping Method Is Right for You?